

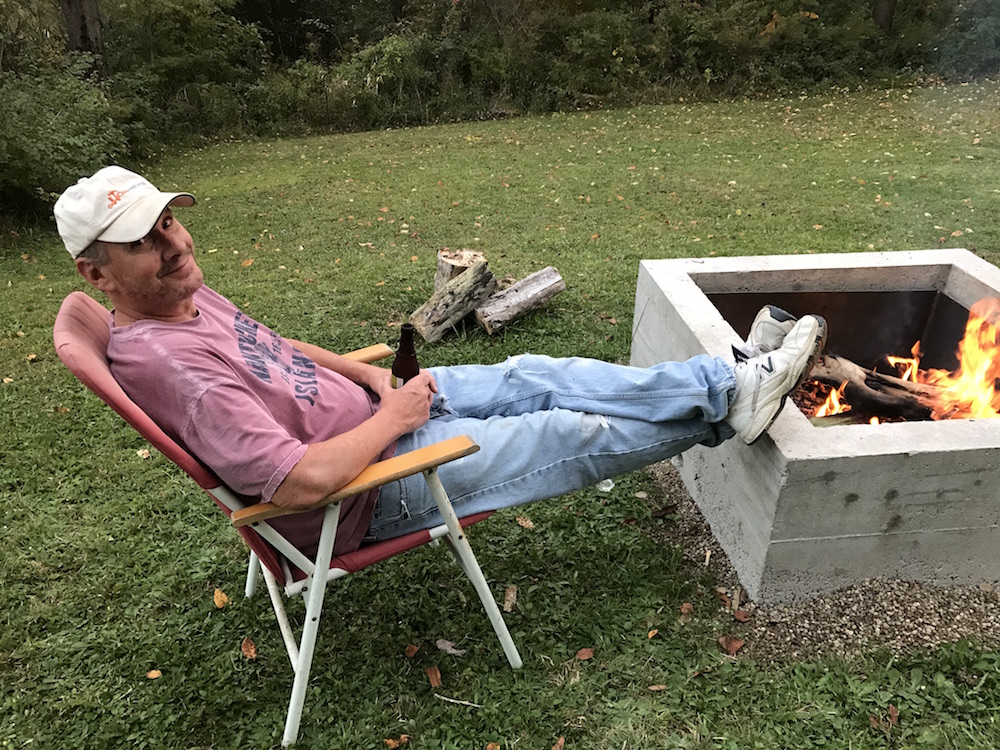
![]() Go to any gathering where people are congregating outdoors, and look for the biggest group. Odds are, they’re gathered around a fire. Either that, or you’ve found the grill and the keg. And THEN they’ll be heading for the fire! People tend to naturally gravitate toward a fire. It takes the chill off your bones, and provides enough heat to toast a marshmallow or roast a hot dog. A fire also offers a relaxing place to hang out and socialize, or just to gaze into the flames, contemplating the great mysteries of the universe. If you’d like a great gathering spot for your family and friends to congregate, a concrete fire pit is a solid choice. We’ll show you how to build one over a weekend, using readily available materials.
Go to any gathering where people are congregating outdoors, and look for the biggest group. Odds are, they’re gathered around a fire. Either that, or you’ve found the grill and the keg. And THEN they’ll be heading for the fire! People tend to naturally gravitate toward a fire. It takes the chill off your bones, and provides enough heat to toast a marshmallow or roast a hot dog. A fire also offers a relaxing place to hang out and socialize, or just to gaze into the flames, contemplating the great mysteries of the universe. If you’d like a great gathering spot for your family and friends to congregate, a concrete fire pit is a solid choice. We’ll show you how to build one over a weekend, using readily available materials.
Although it may seem intimidating, building a concrete fire pit is actually a pretty simple DIY project. It requires only very basic skills and tools, along with a bit of heavy lifting. The beauty of it is that you can customize your design, making it as large or small as you want. The cost is reasonable, and when you’re finished, there’s the satisfaction of kicking up your feet on the edge of something you built yourself.
Location, Location, Location – Where’s That Concrete Fire Pit Gonna Go?
Before you start schlepping bags of QUIKRETE™ and digging holes, give some serious thought to where to locate your project. Once your concrete fire pit is built is a bad time to realize that it’s 18” over the property line, or four feet away from an old, dry pine tree.
In addition to keeping your fire pit away from anything flammable, consider the prevailing winds, and make sure it’s far enough away from any dwellings, so you – or the neighbors – aren’t getting a houseful of smoke whenever it’s lit. Try to find as level a spot as possible, to minimize any regrading, and provide for comfortable seating around the fire. If you have a spot with a great view, that’s an excellent place for your concrete fire pit to reside.
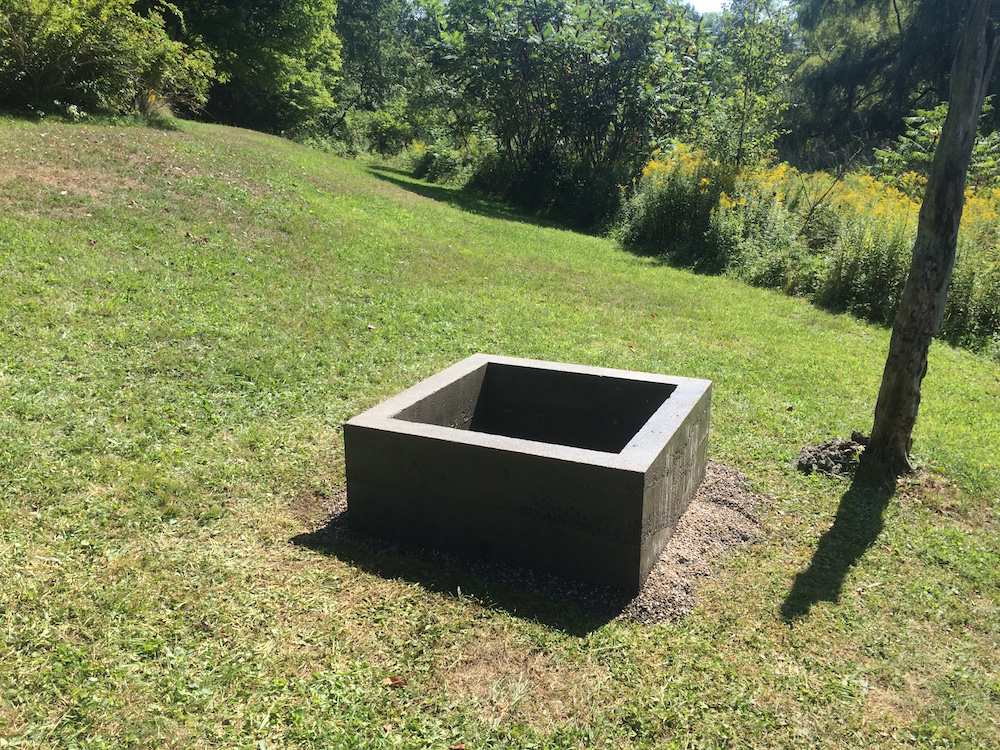
A few years ago, we bought a small farm, with an old farmhouse we are slowly renovating. In the yard is a rinky-dink fire circle, left over from the previous residents. It’s basically a bunch of weed-choked, random rocks arranged in a ring, set on top of the grass, almost directly under an apple tree. Since we love sitting around the fire, I decided to build a permanent concrete fire pit, so we’d have a somewhat more attractive place to hang out. Some place we weren’t likely to get bonked by a renegade apple.
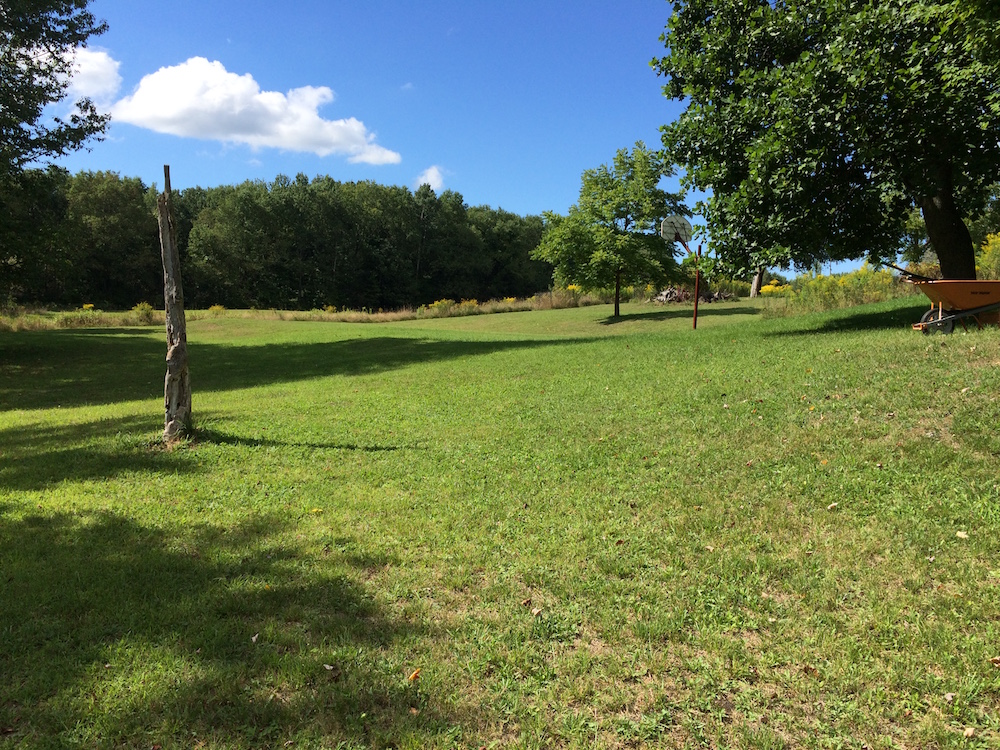
The spot I chose is about 100’ downwind from the house, and 50’ from the closest tree line. There’s a nice view in three directions, and the ground is fairly level. The only impediment is an old, dead tree trunk, which serves as a target holder for shooting practice. Removal of that tree trunk is next weekend’s project. I don’t think it will take long.
Anatomy Of A Concrete Fire Pit
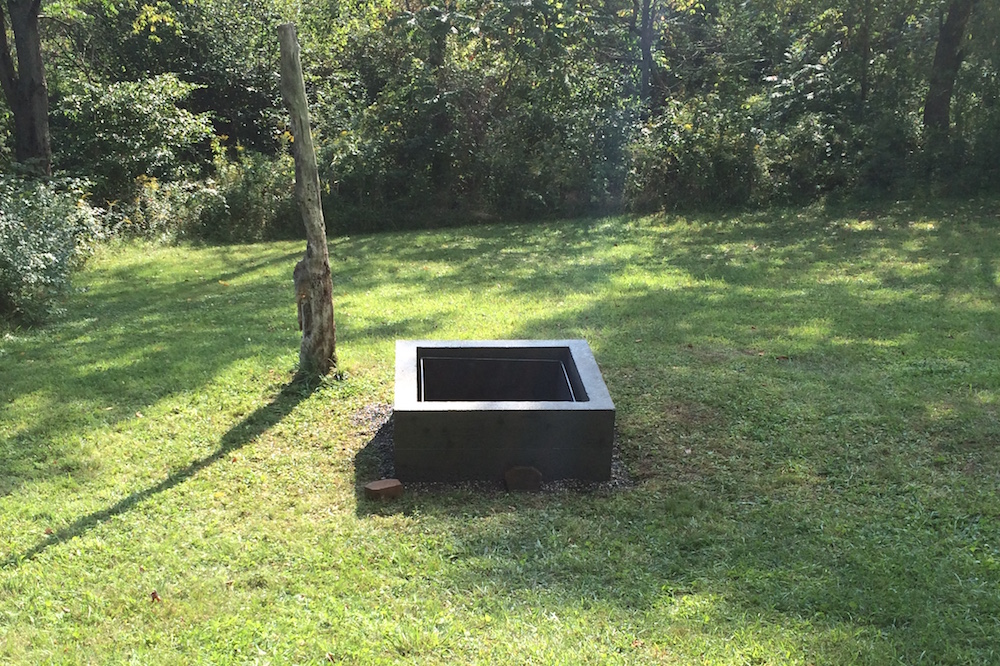
Once you’ve decided where to plunk your fire pit down, there’s just one more decision – how big to make it. I decided to make ours four feet square. That will comfortably accommodate at least eight s’mores makers, and allows for a decent-sized blaze. If you have an extensive social circle, you can make that sucker as big as you want!
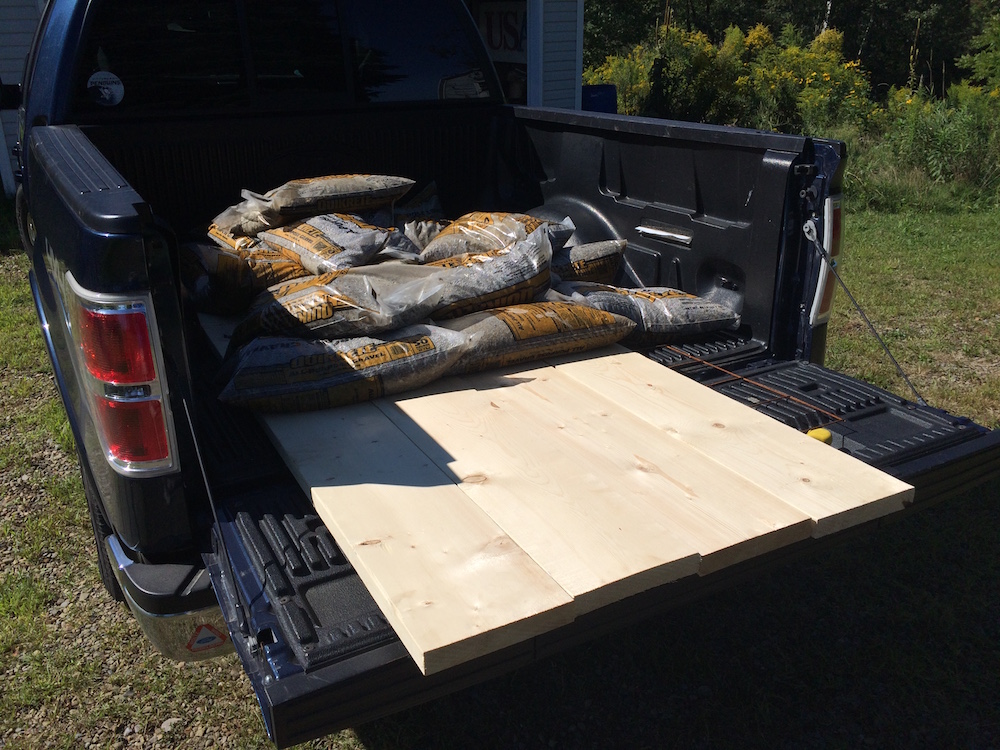
Here’s the material list for my 4’ X 4’ concrete fire pit:
8 2X10X8’ for walls
4 2X4X8’ to tie 2X10s together
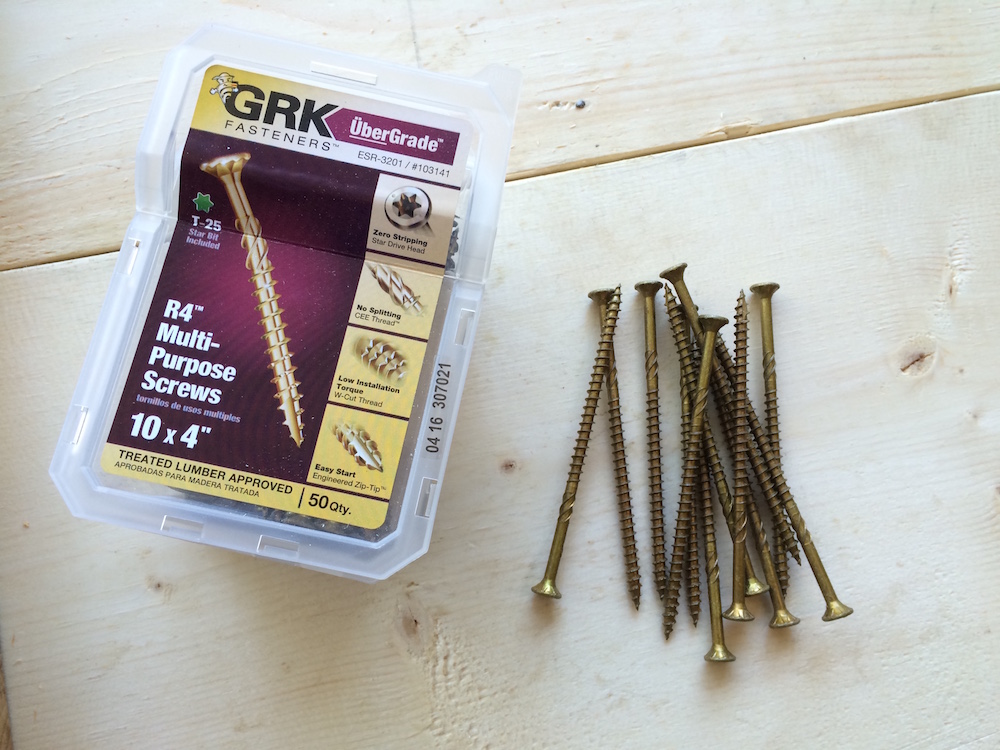
1 box of 50 4” large-head GRK exterior screws, GRK R4 or similar
2 lbs. of construction-grade 2-½” screws to attach wall supports
20 50-lb. bags QUIKRETE all-purpose gravel
20 60-lb. bags QUIKRETE Concrete Mix
Steel heat shield insert (See “The final step” below)
Steel rebar, sixteen 24” pieces
One sheet of steel remesh, 42” X 84”
Wire ties for the rebar
2’ piece of 2” or 3” PVC pipe
Lava rock
And here’s the tool list:
Shovel
Tape measure
Level
Rake
Tamper
Circular or miter saw
Drill driver/impact driver
Hole saw slightly larger than your piece of PVC
Portable cement mixer or wheelbarrow
Trowel
Wood or steel float
Pry bar
Hammer
If your concrete fire pit will be a different size, the QUIKRETE site has a handy calculator to help you figure out how many bags of concrete your project will take. A HomeFixated word to the wise: Buy an extra bag or two, just in case. You can always return the surplus, but if you run out when you’re almost finished, it will probably cause you to utter many family-unfriendly adjectives. I bought 25 bags of QUIKRETE, and returned five.
Also, to save a bit of time (and back strain), ask the store where you’re buying the QUIKRETE to load the bags on a pallet and put it in the truck with a forklift. That’s what I did at Home Depot; they charge a deposit on the pallet, but you’ll get a refund when you return it.
Another key piece of advice: If you don’t have a pickup, make sure you’re on good terms with someone who does, or rent the delivery truck from Home Depot or wherever. You do NOT want to haul concrete, 2X10s and/or gravel home in your Kia. Most of the project can be done solo, but some portions definitely require a helper. Your various body parts will be very grateful if you share the magic with some friends, preferably big, strong friends who will work for pizza and beer, and a ringside seat when the concrete fire pit is complete. Let’s get started!
Prep The Site For Your Concrete Fire Pit
Once you’ve selected your shovel-ready build site, the first step is to mark out the dig zone. There are a couple of ways to do this. Method one is the fastest and easiest – just take the outer walls of your form, set them in position, and mark a perimeter about 8” around the outside of the form walls.
Of course, this requires you to have already built the form. (For instructions, skip down to Fun Form Fabrication). In my case, I wasn’t picking up the materials until the next day, but I wanted to get the site prepped, so I did it the old-fashioned way: I measured it. Since my concrete fire pit dimensions were 48” per side, I just added an extra 16” to the length of each side, and staked out a 64” square. Just make sure you check for square by measuring from corner to corner; both diagonals should be equal.
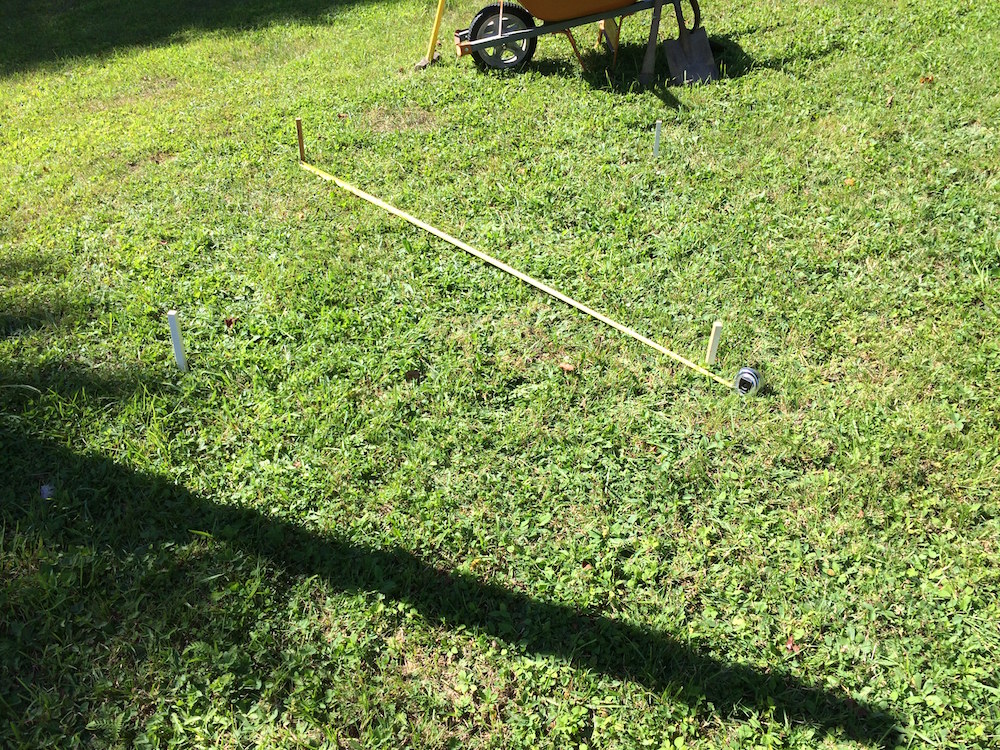
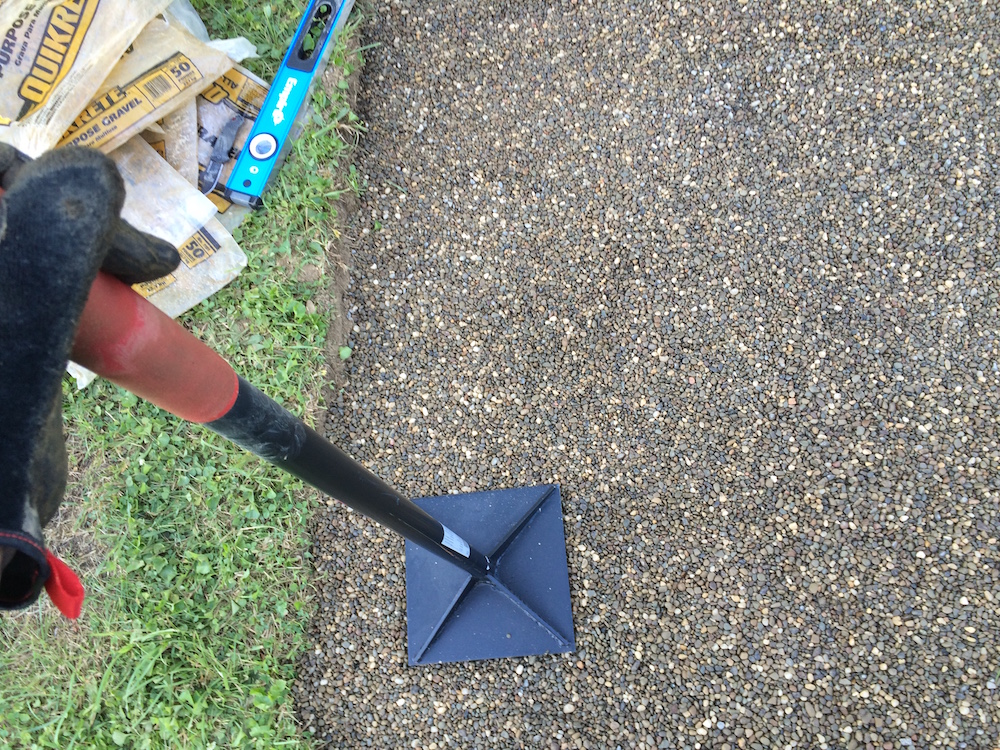
Now get digging! My site had a very gradual slope, so I ended up digging about 5” deep at one end, and 6-7” at the other end. Get the site as flat and level as you can. Once you’ve done that, grab your tamper and get the ground packed as hard as possible.
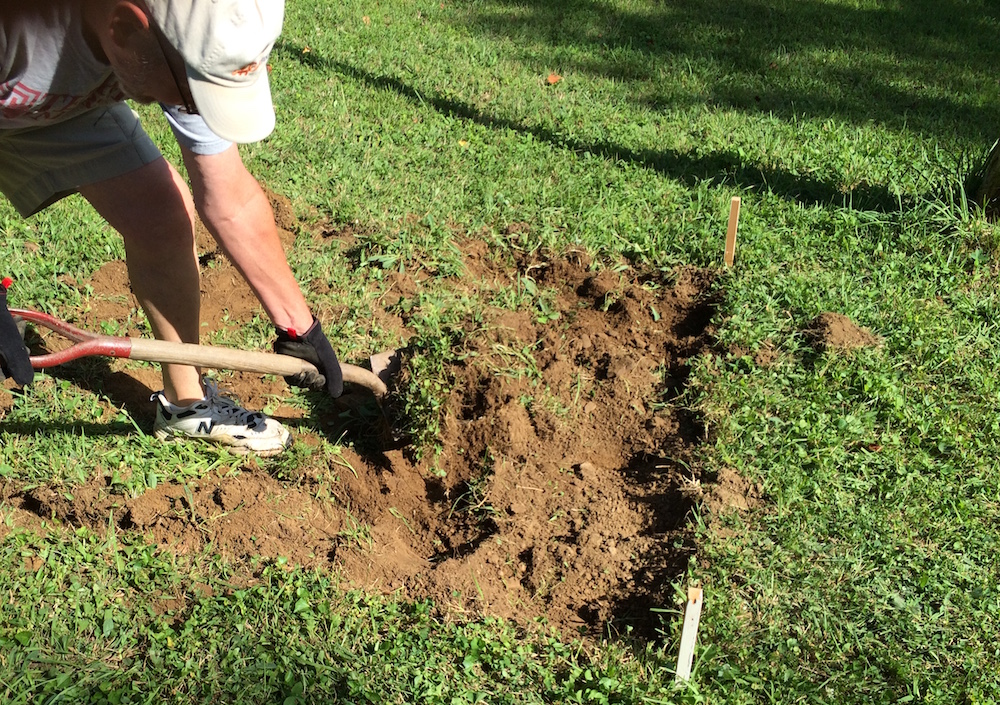
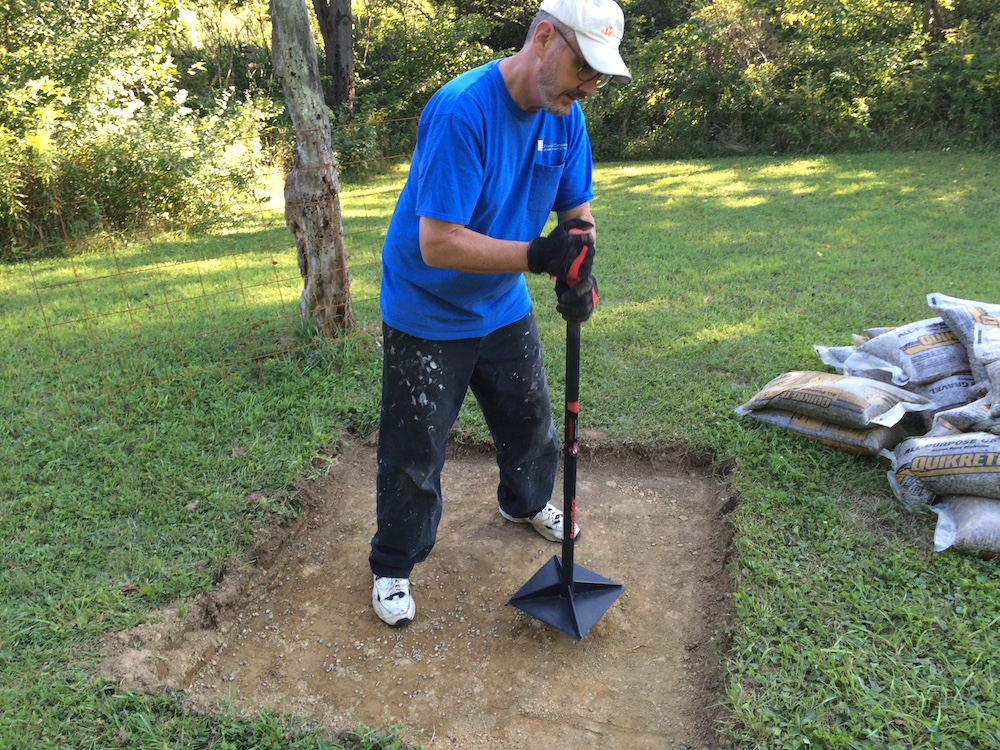
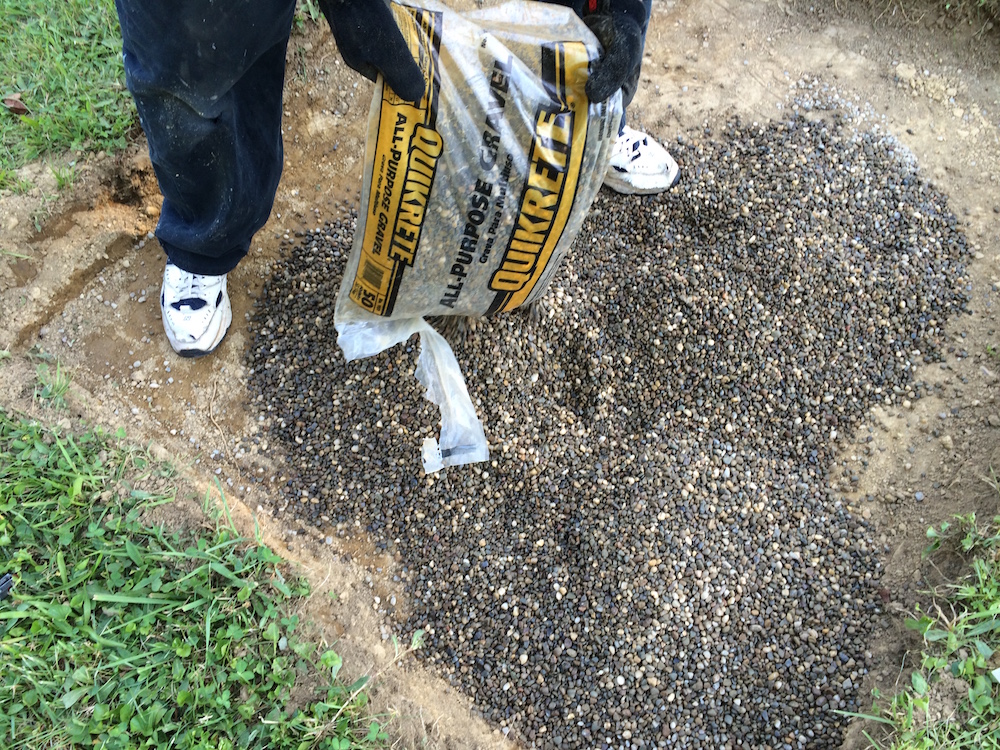
And now the moment you’ve been waiting for – time to start hoisting bags! Grab your bags of QUIKRETE gravel and fill up that hole. The store you buy it from will have a guide for you to estimate how many bags you need per square foot for various depths. Rake it out, grab your tamper again, and flatten it out and compress it as much as you can. Don’t forget to check for level, and fill in any high or low spots, as you go. Now you’re ready for forms!
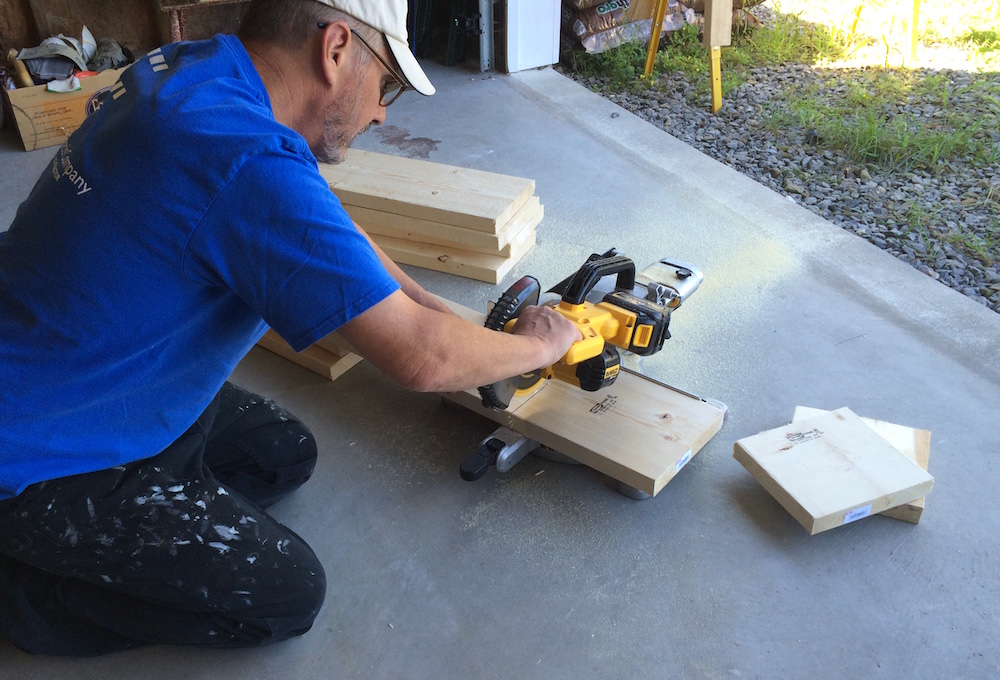
Fun Form Fabrication
Your concrete fire pit will require two forms to hold the concrete while it sets: An inner and an outer. They’re quick and easy to construct, and you can make either one first. If you’re using the outer form as a guide for your digging, you might want to make that one first; that way, maybe one of the big, strong friends you invited can start the digging while you make the inner form.
For my concrete fire pit, with exterior dimensions of 48” and 5” thick walls, here is the cut list for the 2X10”s:
8 pieces 49-½”
4 pieces 35”
4 pieces 38”
Each 8’ 2X10 yielded one of the 49-½” pieces and enough left over to make one of the smaller, inner form pieces. If you want thinner or thicker concrete walls, just adjust the size of your inner form. For instance, if you want 6” thick walls, make the longer inner walls 36”, and the shorter walls 33”.
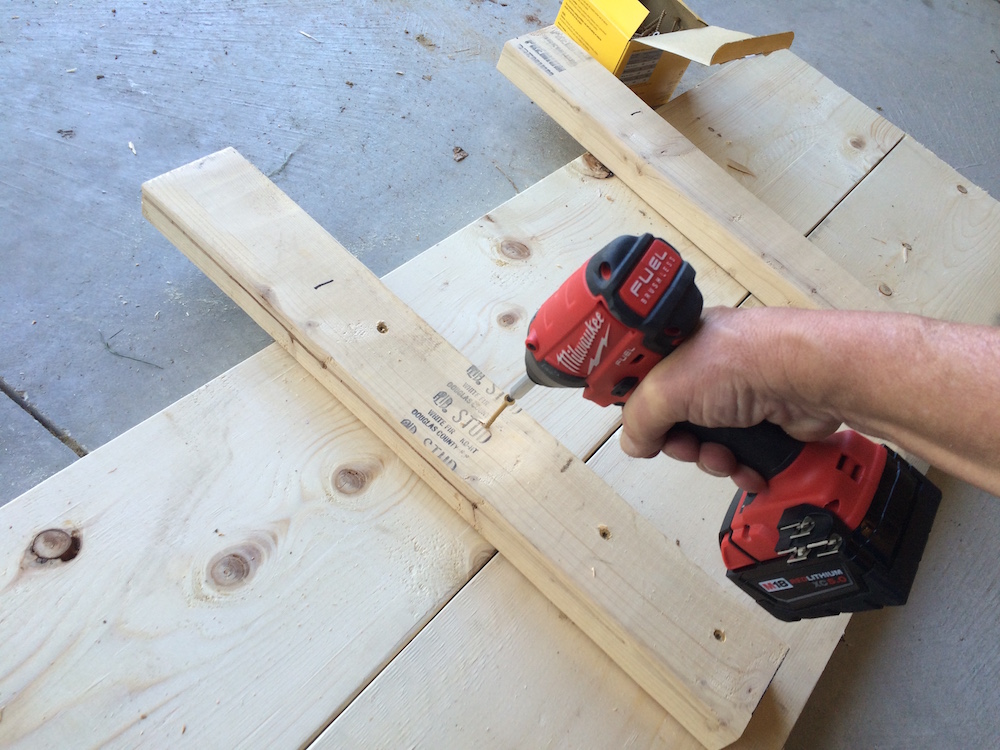
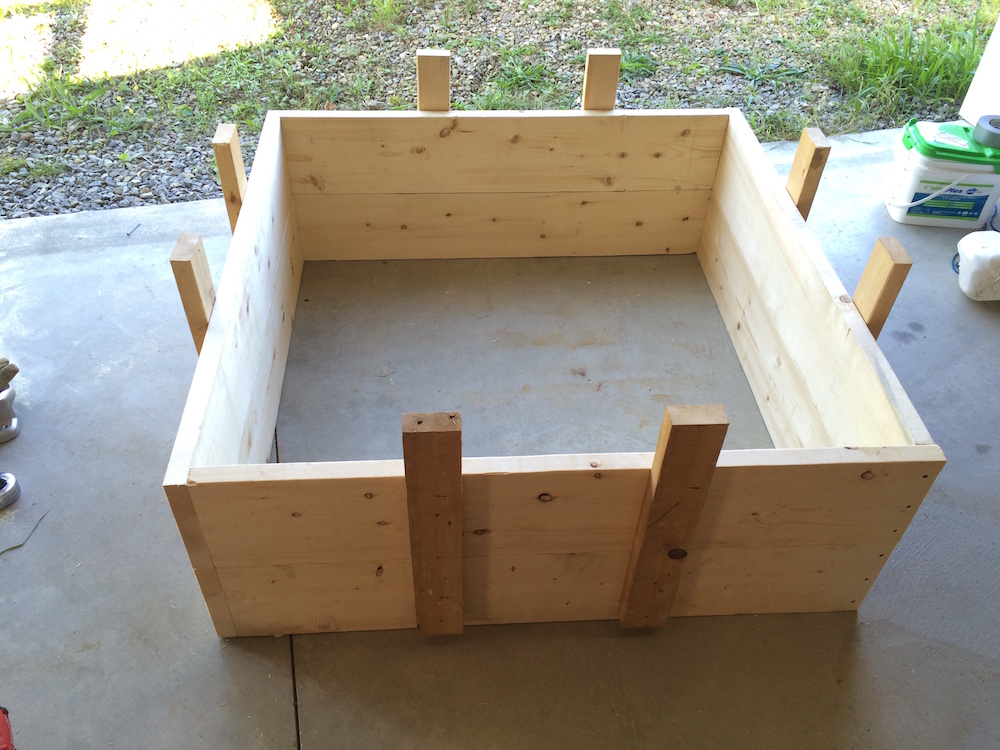
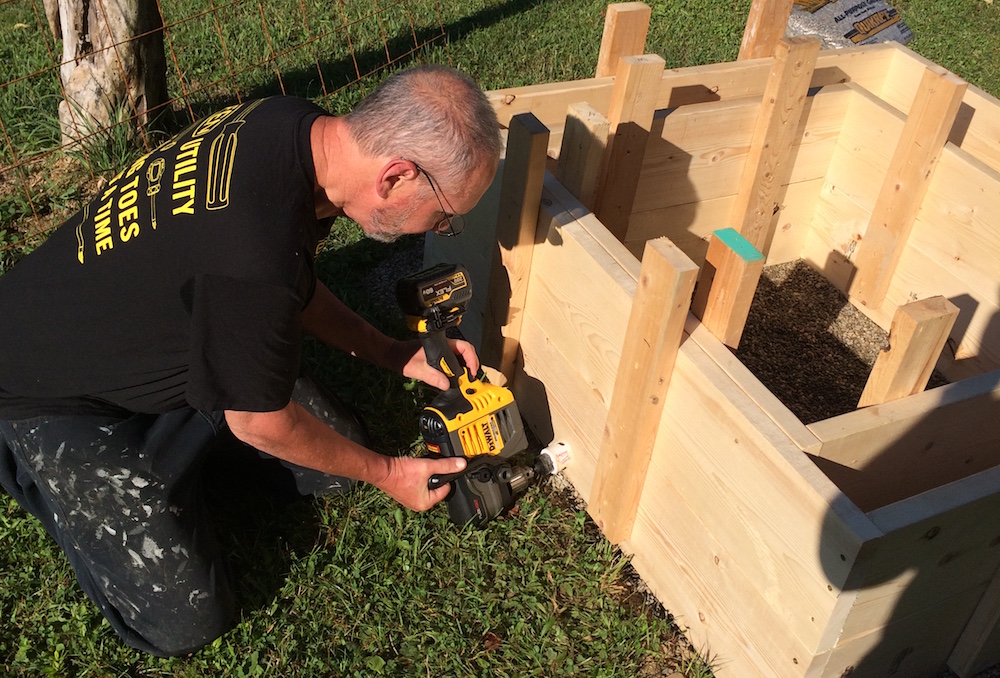
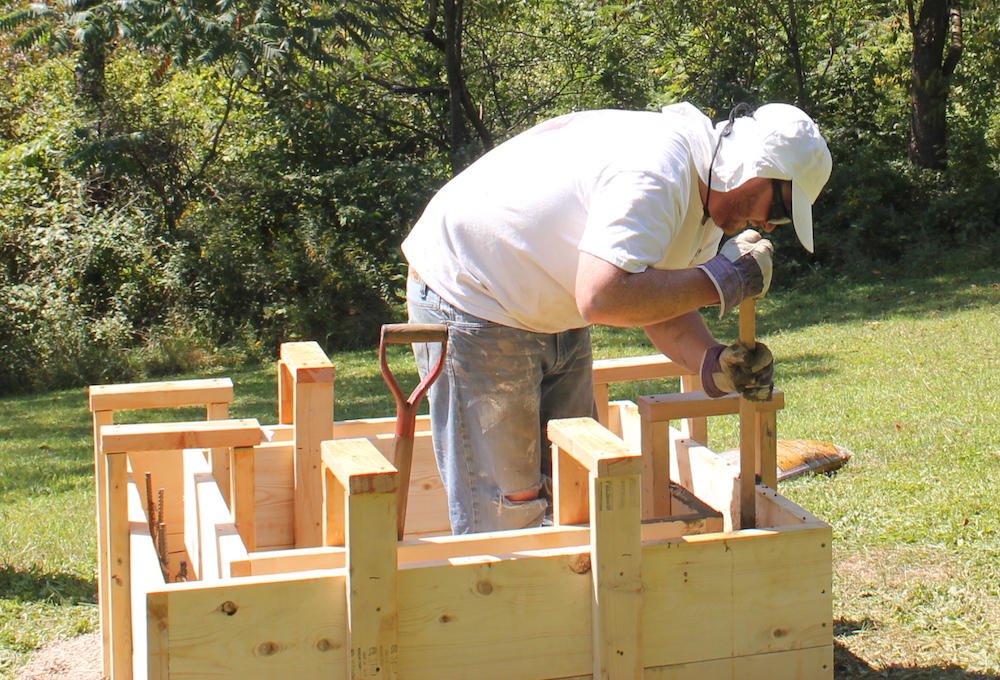
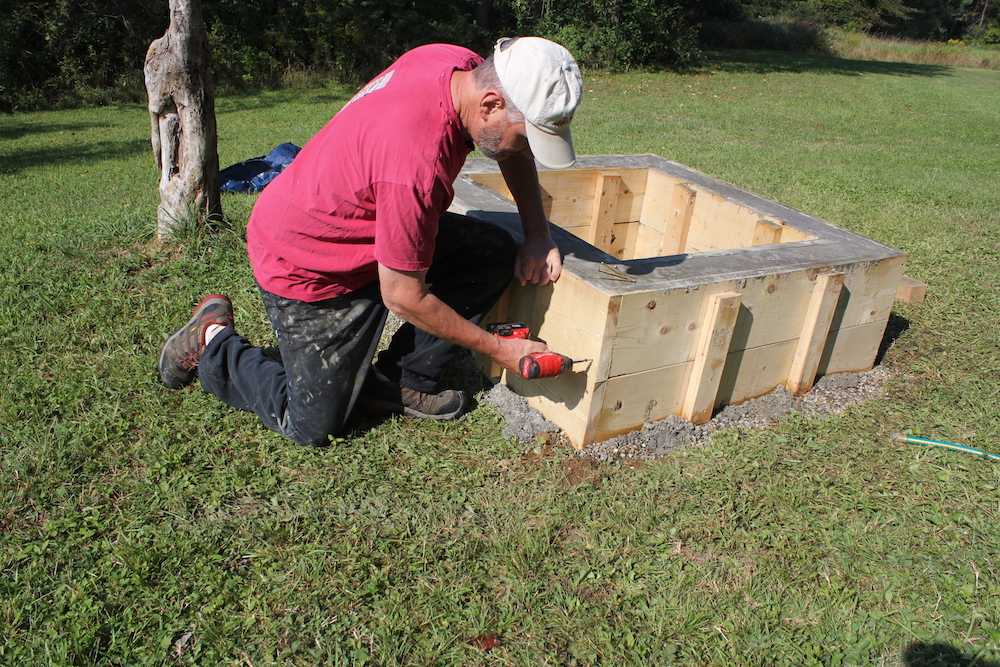
Make all four sides for each form first, then screw them all together. To make the sides, lay two pieces of the same length side by side. Make sure the ends are aligned, lay two pieces of 2X4” across the two boards, and secure each one with four 2-½” screws. Note: I left a 6” extension on the top of each of my 2X4s, to allow me to secure the forms to each other when they were placed into position. If you do so, make sure the inner form extensions line up with the outer extensions; just mark the center point on each side, and measure over the same distance on either side. Don’t forget – the 2X4” supports go on the OUTSIDE of the outer walls, and the INSIDE of the inner walls.
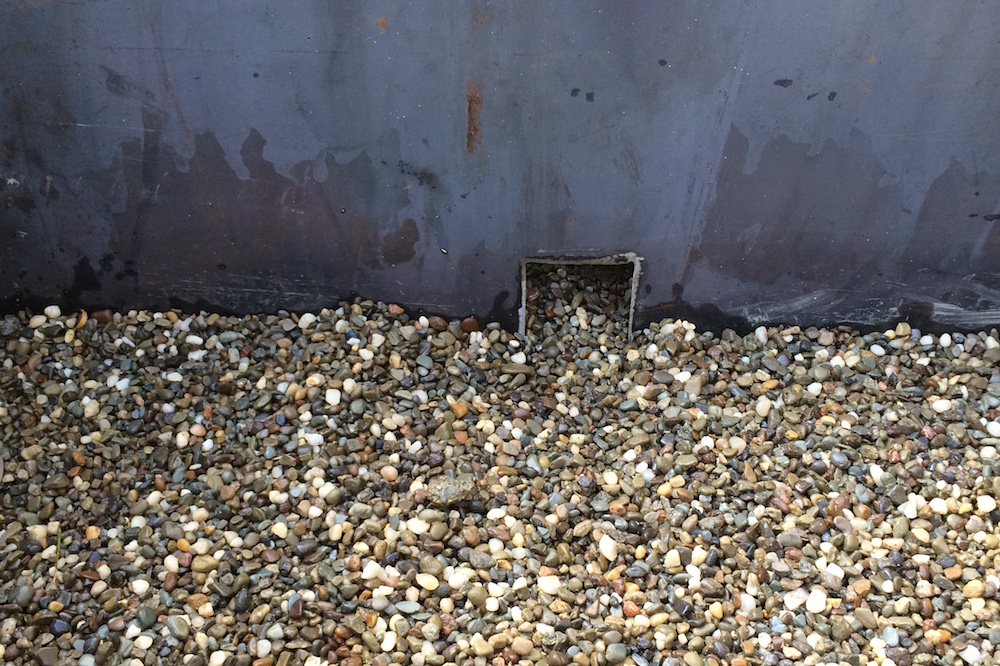
One other beneficial feature for your concrete fire pit is to have a point for excess water to exit, and combustion air to enter. This is where your piece of PVC pipe comes in. Either now or after the forms are in position, drill a hole just large enough to accommodate the pipe through both the inner and outer forms, about two inches up from the bottom. Center it along the length of the side, and do the same thing on the form walls directly opposite.
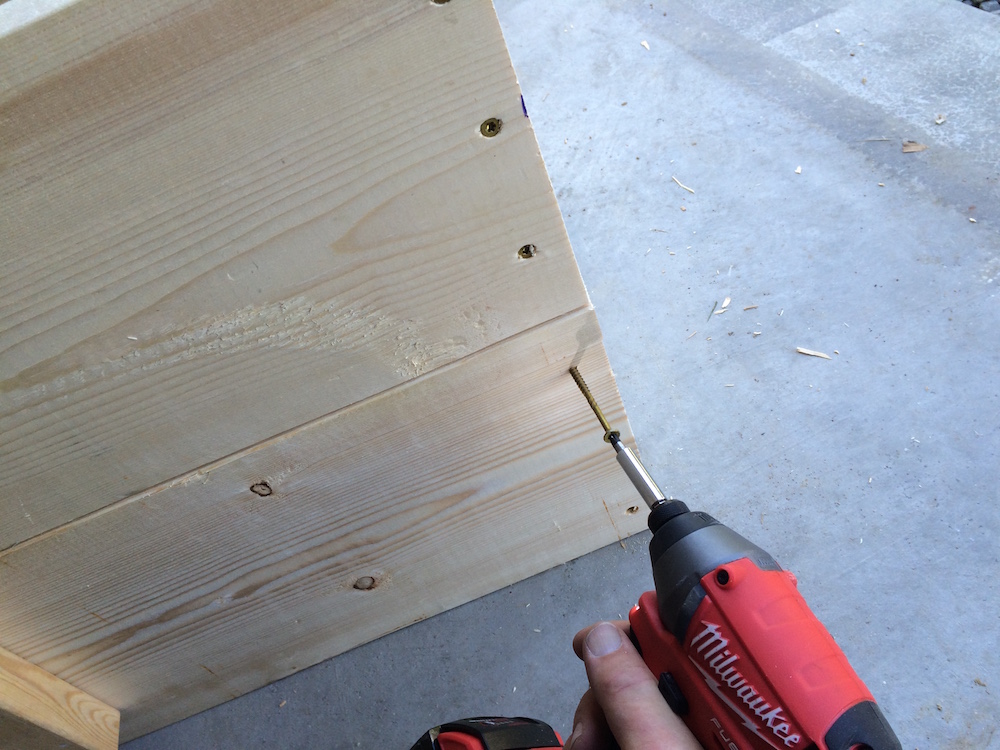
Once the sides are built, it’s time to screw ‘em together. You could use L-brackets, but they’re pretty expensive when you figure you need 16 of them. This is where your 4” screws come in. I used GRK R4 10X4” screws; they have a large head to prevent pullout, and a special thread to prevent splitting. As a bonus, when you strip the outer forms later, you’ll be able to reclaim all those screws.
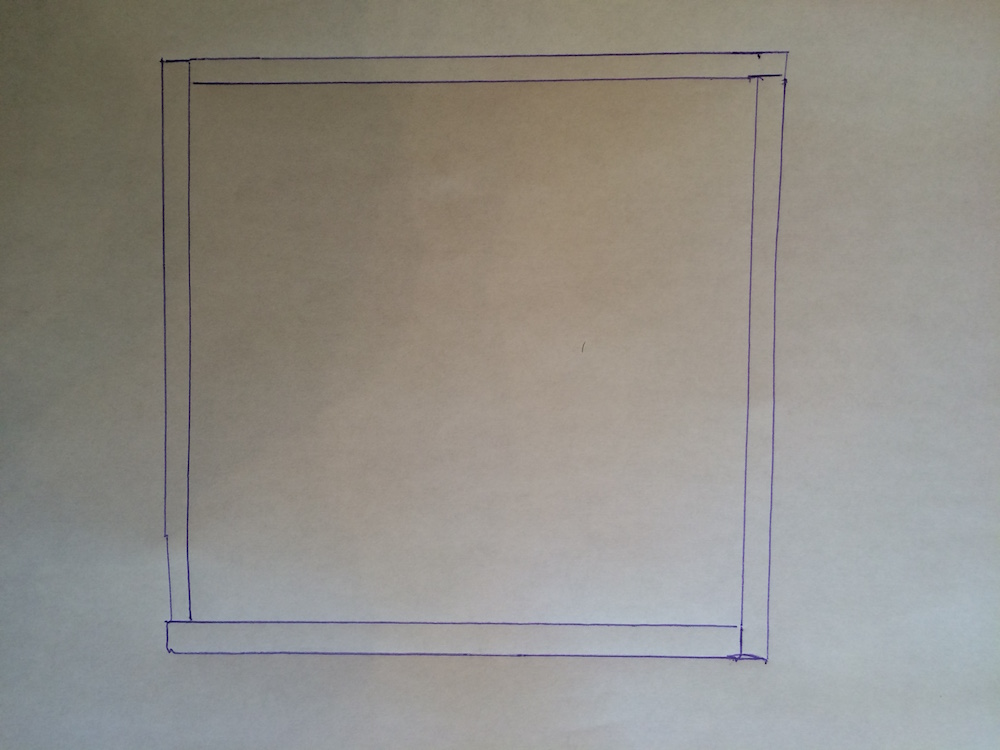
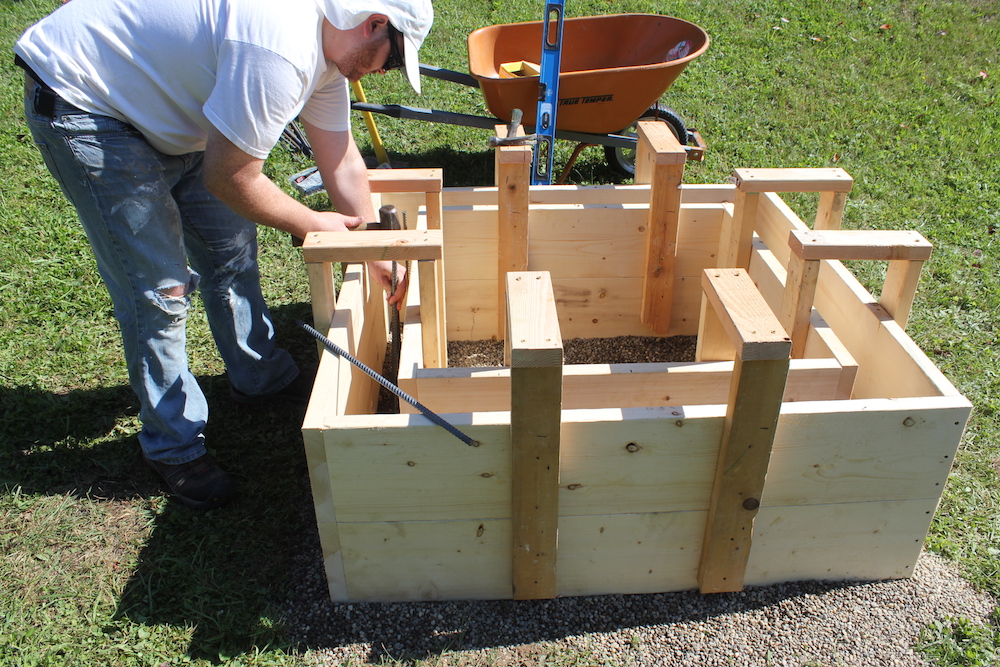
Align two of your sides at a 90° angle, and screw through the flat side of the boards on one side into the end grain of the adjoining side. Put one into the top area, and one into the bottom, to keep it aligned, then add four more screws, for a total of six into each corner. For the assembly pattern, the shorter walls on the inner form get sandwiched between the longer sides. For the outer form, no pieces are sandwiched. Each side overlaps the end of the previous side, making the interior dimensions 48” all around (see the semi-professional artist’s rendering below).
If your concrete fire pit is no larger than the one I built, there’s an alternative way to assemble the inner form that will make it easier to remove after the concrete is set. With the outer form, you’ll have access to the screw heads later on; not so with the inner form, they’ll be on the dark grey side of the form. You could use the aforementioned L-brackets, or you could just use some 2X2s. You can buy them, but you can also just rip a 2X4 down the center and make your own.
With the 2X2 method, the easiest way to get everything aligned and screwed together would be to assemble it with two screws on the outside of each corner, one near the top and one near the bottom. This will hold the forms in position while you put your 2X2s into the inside corners, and screw them with six screws into each wall (total 12 screws per corner). When all the 2X2 screwing is finished, don’t forget to remove your temporary screws.
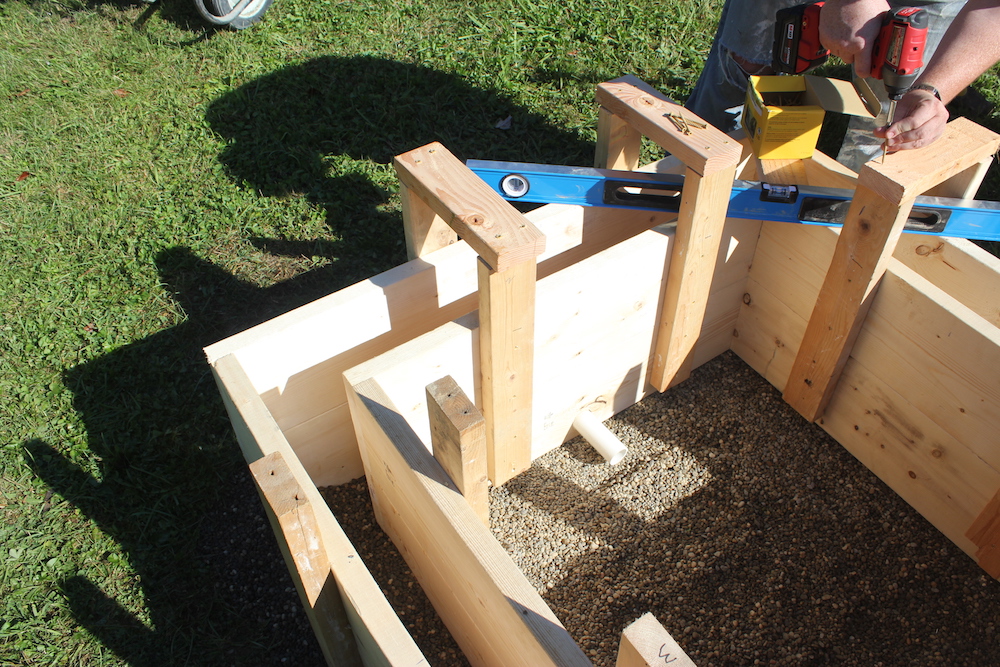
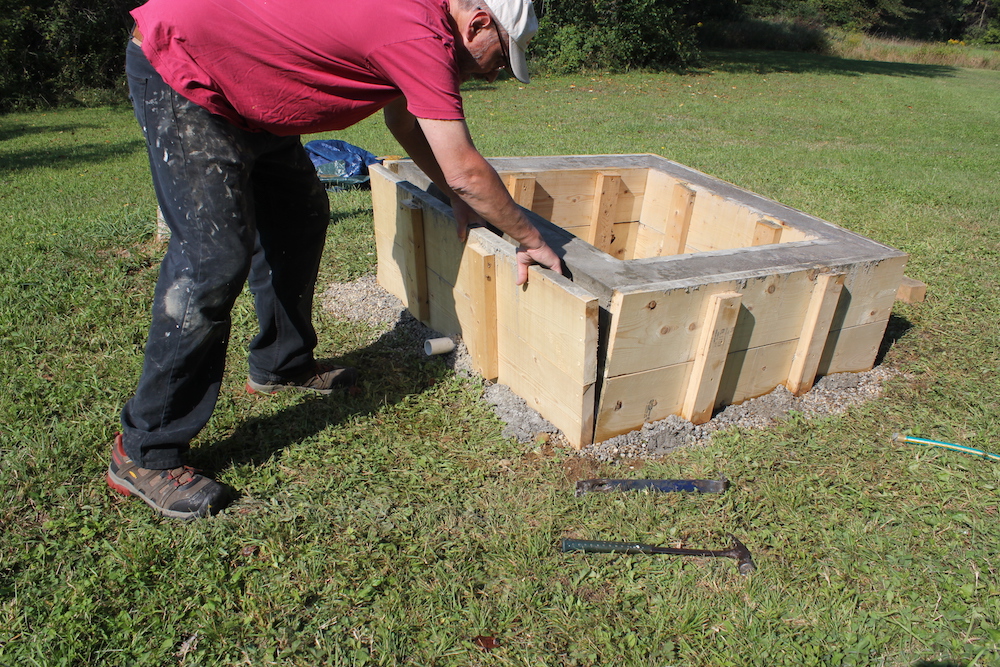
Once both forms are built, relocate them to your fire pit site. Center them on your bed of gravel, being careful not to disturb it more than necessary. Check with a tape measure to make sure your inner form is centered within the outer form. You also want to make sure everything is level, and that the top edges of the inner and outer forms line up. You can make minor adjustments by tapping down any high spots with a sledgehammer. If you built the extensions, take some scraps of 2X4” and screw the two forms together. If not, lay a couple of 2X4s face down across both forms, and screw through the 2X4s into the top edge of all four walls, to lock the forms together.
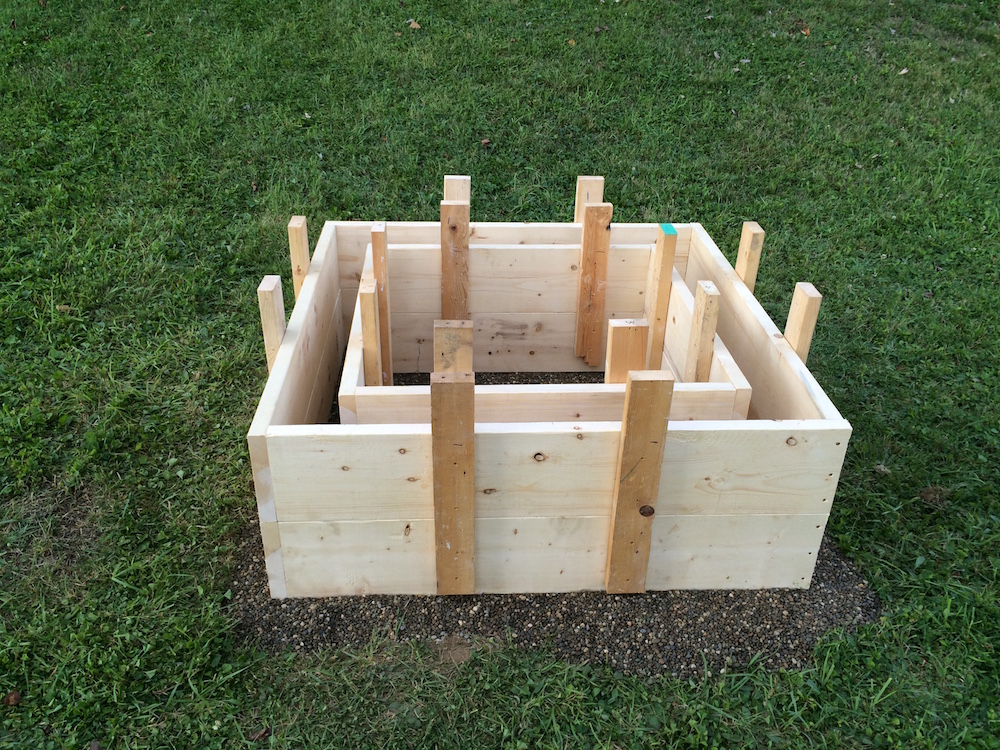
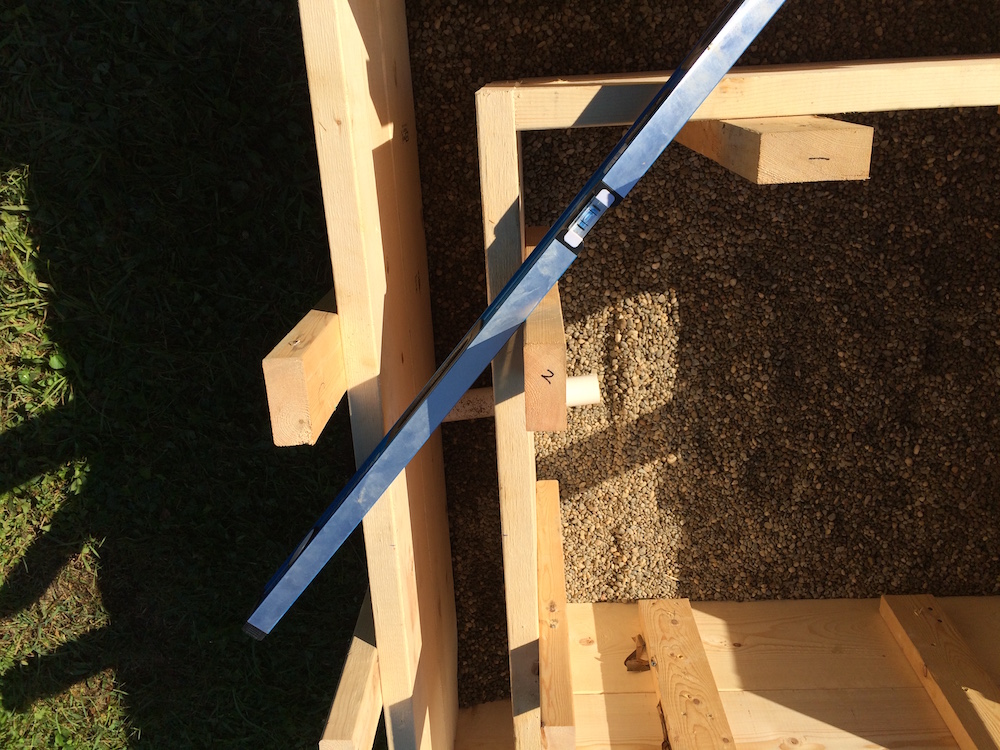
If you didn’t already drill your drain/ventilation holes, now’s the time. Once the holes are drilled, cut your PVC so each piece is about one foot long. To keep the concrete from sticking, put a light coating of oil on them, and slide them through the inner and outer holes on both sides of the fire pit.

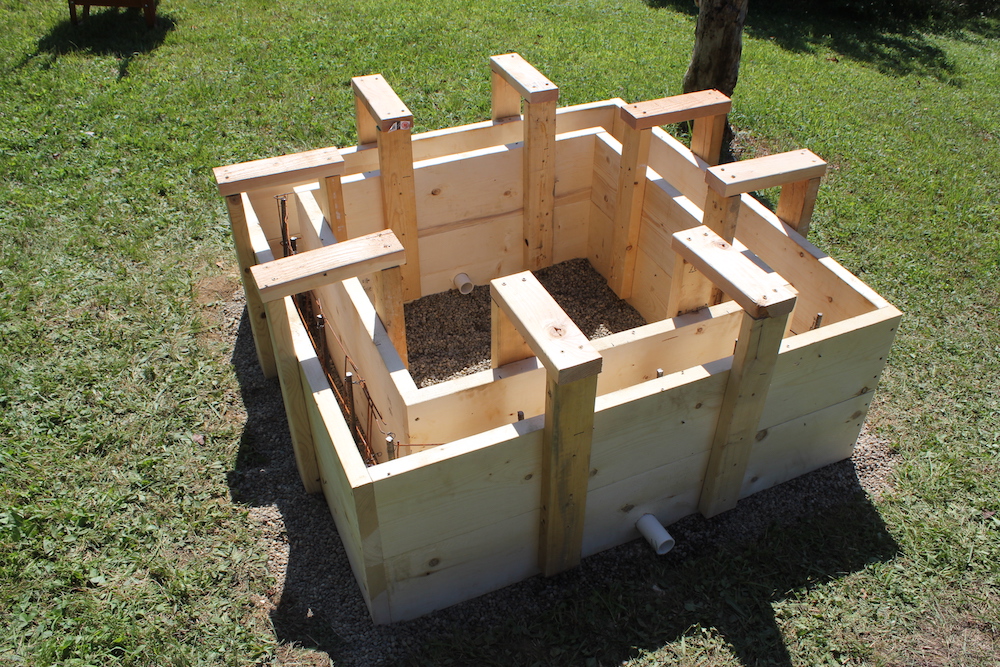
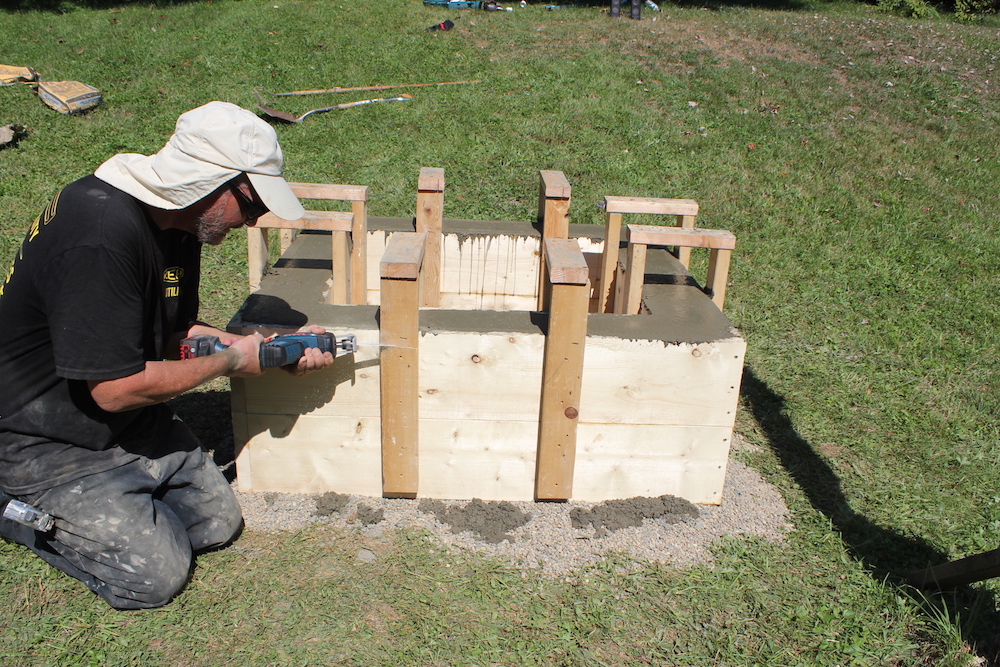
Once the forms are set, it’s time to add the rebar. This will tie everything together, and make your concrete fire pit strong like bull. Drive a piece into the ground into the center of each corner, and centered between the forms approximately every foot around the perimeter. Make sure the top of each piece is two or three inches below the top of the wall.
Cut your remesh into 14” widths along the length; this will give you three pieces 14” X 84”, which you can cut to length. Use a piece on each side, securing it to the pieces of rebar with wire rebar ties. Again, make sure the top is below the top of your wall, and the bottom doesn’t contact the ground, to prevent an access point for water. Congratulations – you are now ready for the concrete portion of your concrete fire pit project!
Pour It On
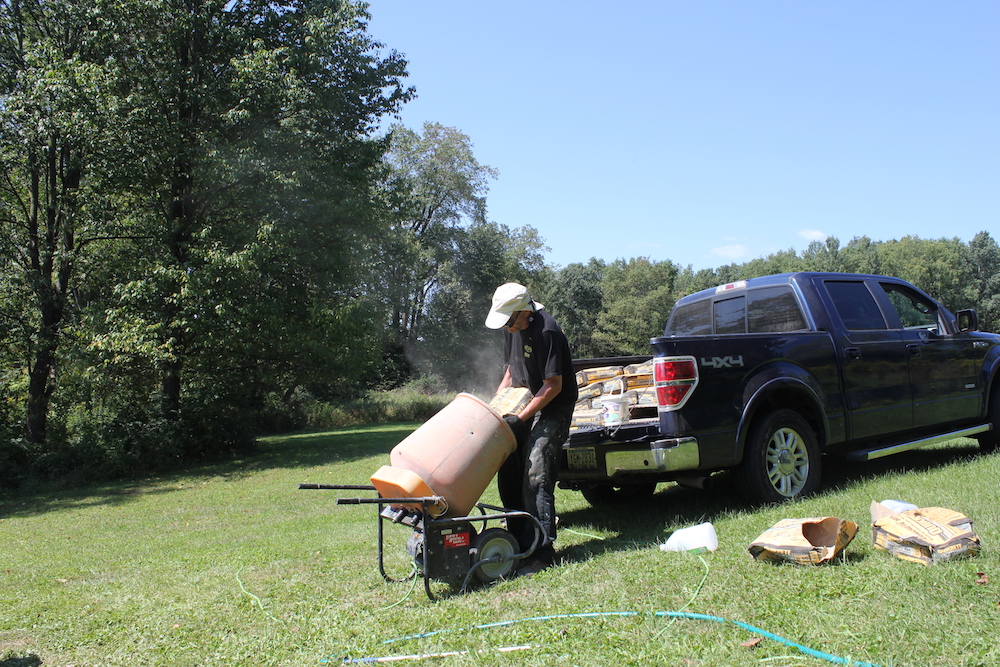
This is the portion of the festivities where your friends will earn their pizza and beer. Bring your supply of QUIKRETE as close as possible to your concrete fire pit site. If you can get your truck in there, you’ve got it made; if not, have a contest to see who can bring the most bags in each wheelbarrow load.
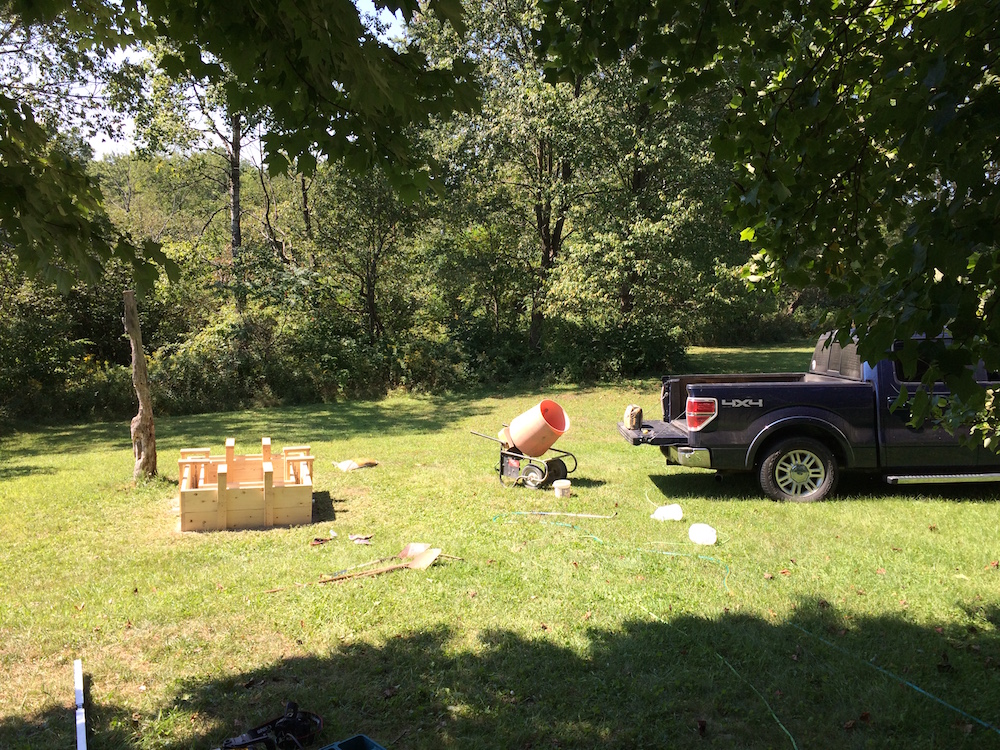
We ended up using 20 bags of QUIKRETE in our fire pit. That’s a fair amount of concrete to mix up, especially when it’s 88° and very humid. You can do it by hand in a wheelbarrow, but it’s a whole lot faster – and easier – to rent a portable mixer. They come in various sizes; our rental center had a tow-behind model that mixes six bags at a time, and rents for $55 a day, and a two-bagger that can ride in the back of your truck or large SUV for $35. We cheaped out and got the double bagger, and it was money well spent.
Instructions for the ratio of QUIKRETE to water are printed on the bag; the recommended dosage for the 60-lb. bags is one gallon of water for every two bags. We ended up using a bit more water, to get a slightly more liquid mix. That makes it a little easier to work, and slows the setting time a bit. Once you start, you need to hang in until it’s all finished; if it sets up, you need to wait a day or so to pour the rest.
Before you start filling the forms, it’s a good idea to give them a blast from the hose, to prevent sticking and help keep the QUIKRETE damp. After each batch of concrete is mixed up, dump it inside the forms and spread it around. With a two-person team, one should stay with the forms and work the concrete. Spread it out, and use a stick or other implement to stir and tamp it down. Your goal is to make sure there are no air pockets, and to get the concrete into every nook and cranny. Be sure to get it fully under and around your PVC vent pipe.
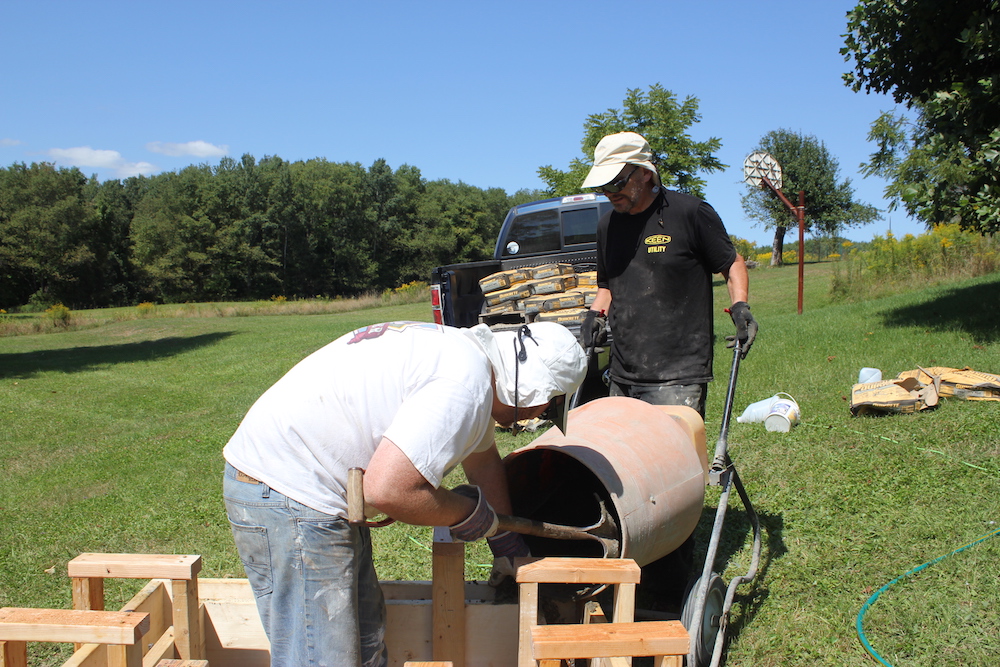
If your budget permits, a concrete vibrator does an excellent job of this; if you rent a mixer, they will likely have a vibrator for rent, too. If you have access to a Sawzall or rotary hammer, a DIY method is to move it along the outside of the forms, with no blade or bit.
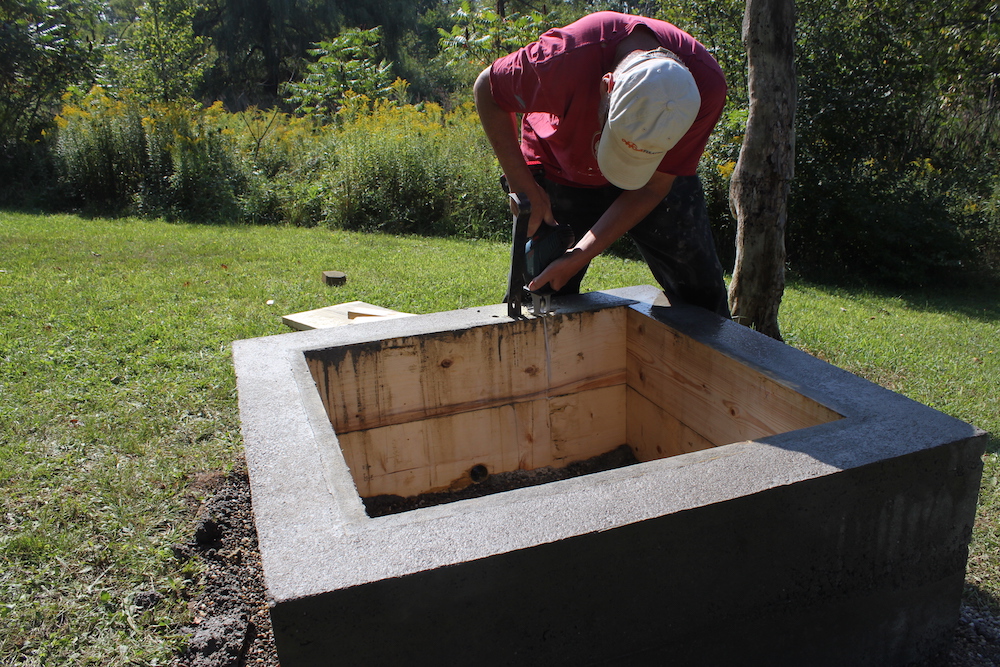
Keep mixing QUIKRETE and dumping it into the forms, until they’re full all the way, and bulging just a little over the top of the forms. If you had the top of the forms tied together by 2X4s, it’s time for them to go away. Take a circular saw or Sawzall and cut them off an inch or so below the top edge. Woohoo – the hard part is over!
You can’t sit down with that pizza and beer just yet, though; it’s time to screed. No, that doesn’t involve clearing phlegm from your throat, or dragging your nails across a chalkboard. Screeding is the first step toward getting a flat, smooth surface for the top of your concrete fire pit walls.
Take a 2X4” or other straight board with a smooth edge, and place it across the top of your wall, straddling both forms. Moving it back and forth in a sawing motion, bring it slowly along the wall. It will smooth the surface quite a bit, and excess concrete will accumulate, which you can knock off the edge. Keep going around the entire perimeter, and keep at it until you have a pretty decent-looking surface.
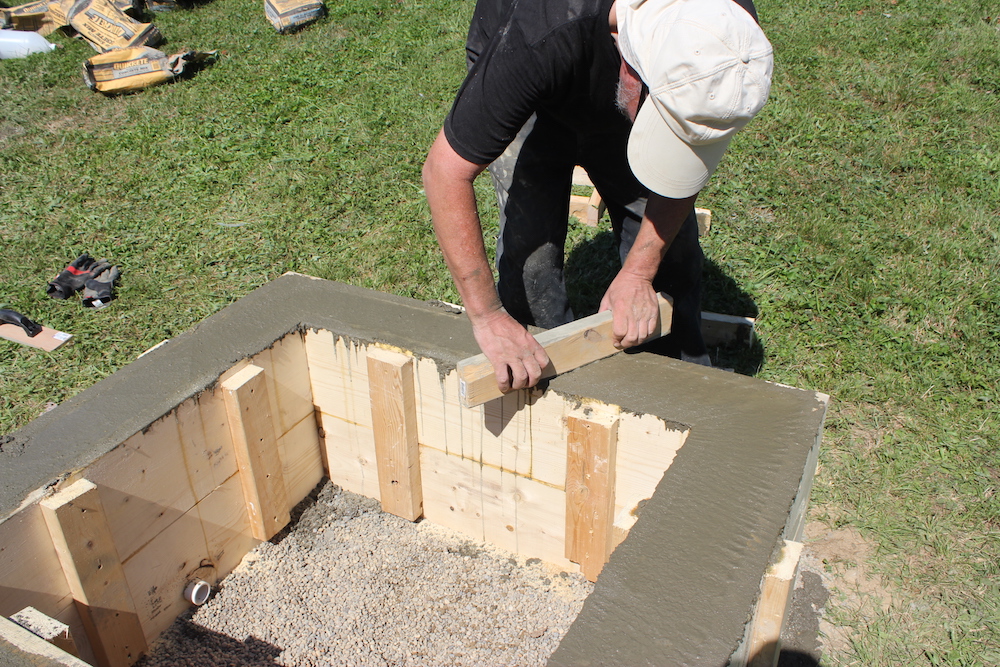
When you’re finished screeding, wait about 20-30 minutes, then grab your float. Spend some time going over the surface, again trying to get it as smooth and level as possible.
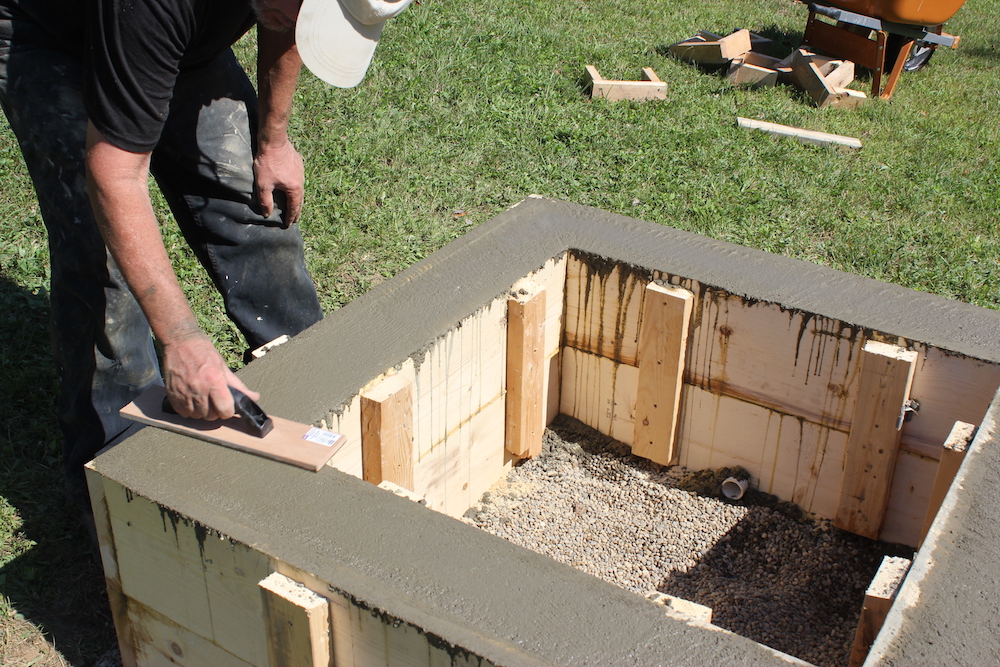
Once you’ve got the surface looking pretty good, and feeling pretty stable, let it sit for 30-60 minutes. Using your steel trowel, go over the surface, getting it as smooth as possible.
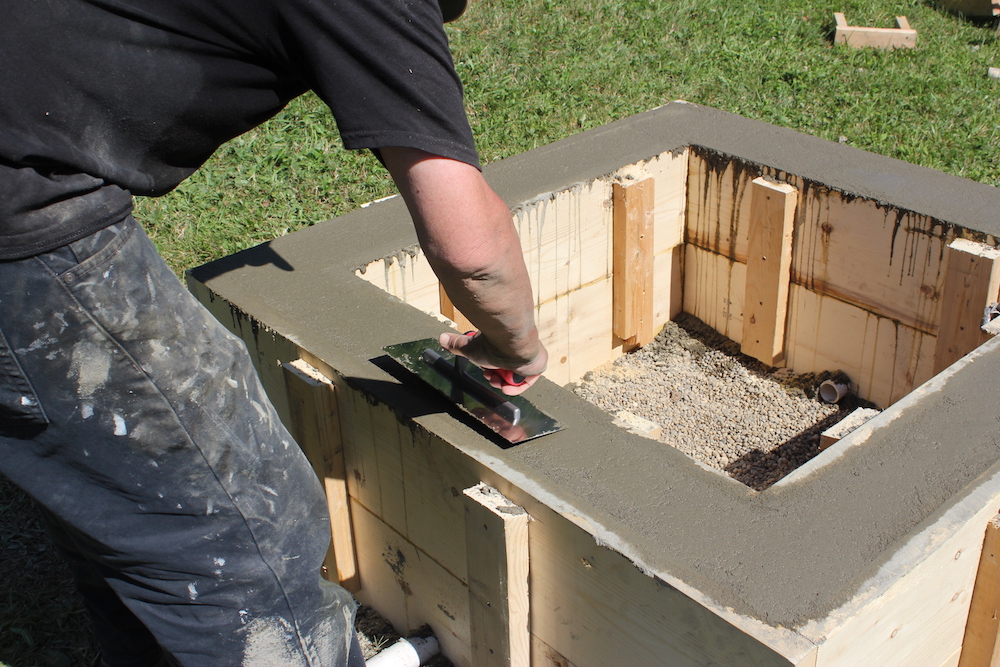
Once you’ve got the surface looking as good as you can, you’re almost finished – just a couple more quick things to do. Concrete starts setting up fairly quickly, and once it does, it can be challenging, shall we say, to remove it. If you rented a mixer, hose it out and clean it up right away. Same with any tools you used for the project – shovels, wheelbarrow, trowels, etc.
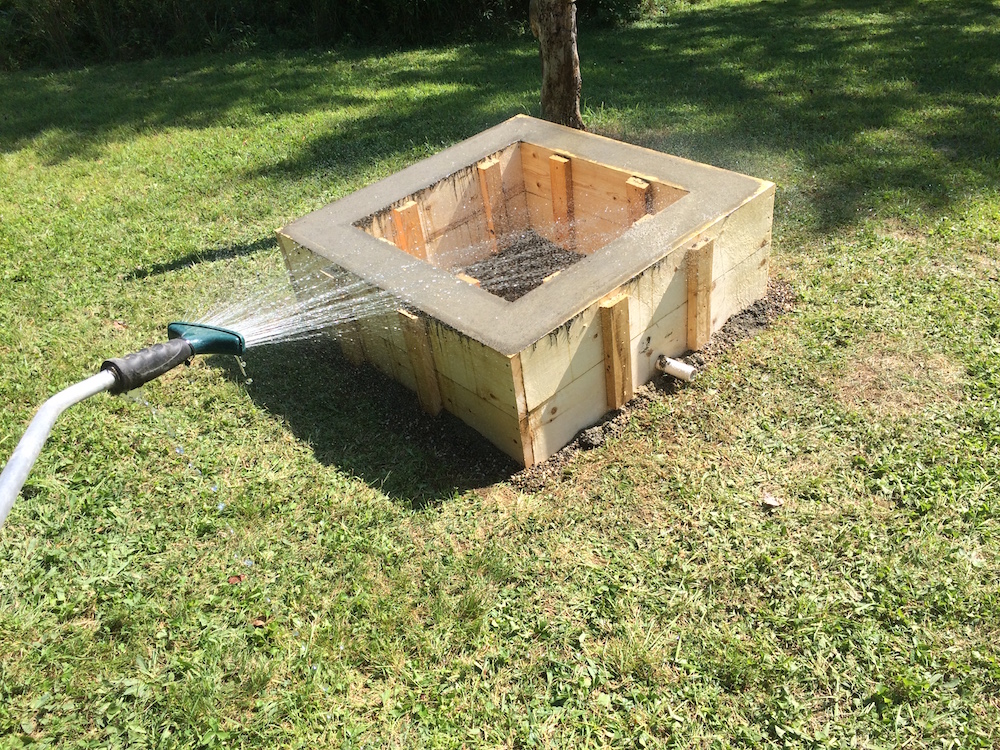
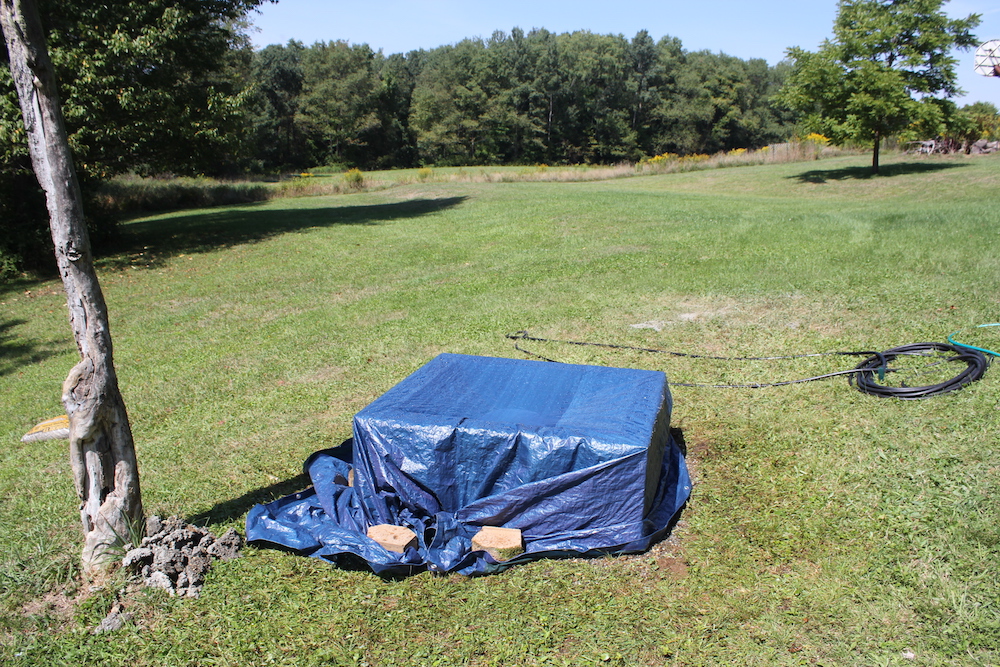
The final step is to make sure the concrete cures properly. There are a couple of ways to make this happen: Apply a sealer, or keep the concrete wet for a few days. The QUIKRETE sealer is a water-based acrylic product that can be applied directly after finishing. Once it’s applied, that’s it – you’re done! The other method requires you to grab the garden hose a few times each day, give the concrete fire pit a wash-down, and then keep it covered with plastic or a tarp. Once you’ve initiated the curing process, it’s time for that pizza and beer!
Tales Of The Form Deconstruction
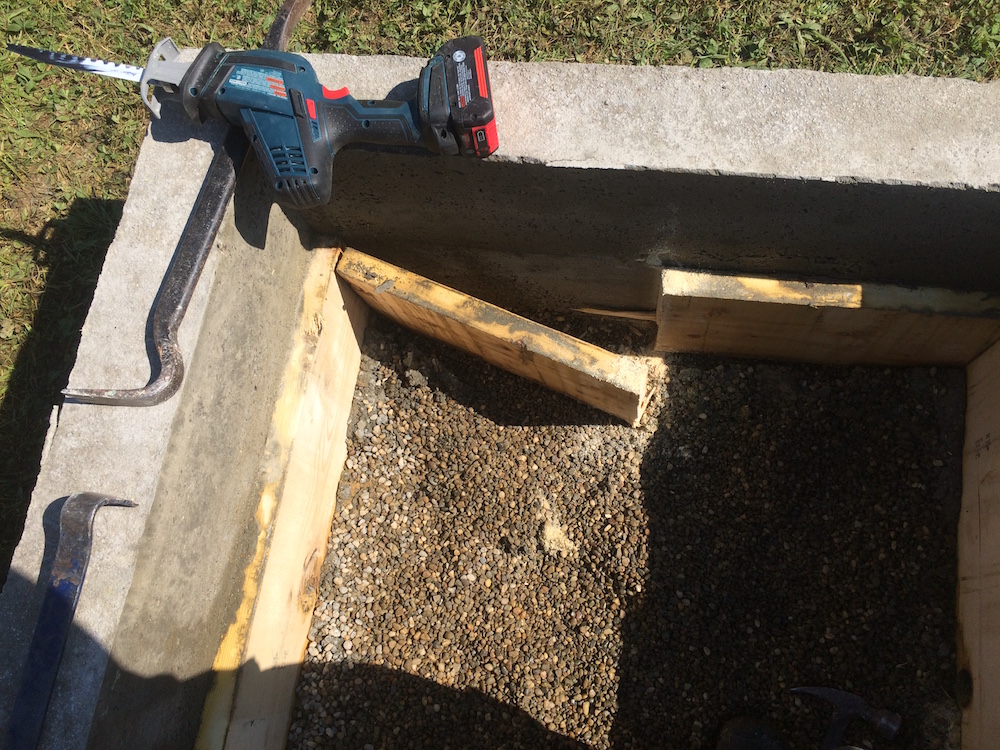
The final step before you can feel the burn is to strip the forms off your concrete fire pit. Wait at least 24 hours before proceeding, to make sure the concrete is pretty well set up. The outer forms are easy; just remove the screws from each corner, smack a pry bar in where the forms overlap, and pry them loose. They should pop off pretty easily.
Stripping the inner forms will range from simple to “minor pain in the butt,” depending on how they were built. If you used the L-bracket or 2X2 method, easy peasy – just remove the screws, pull out the L-bracket or 2X2, and gently pry the shorter inner form walls away from the concrete with a pry bar.
If they were screwed through the outer part of the corners, like mine were, you’ll need to do some minor surgery. Take a circular saw, and set the depth of cut to just under that of a 2X4, normally 1-½”. Make vertical cuts down the center of each inner form, going down as far as possible. The saw’s shoe won’t let you get all the way down, but you’ll get most of it, and should be able to snap the last little bit. If you have a reciprocating saw, you can get all the way down; that’s what I used for the entire process. Just be very careful not to gouge your beautiful new walls!
Once the cuts are made, get your pry bar in, and carefully pry each piece out. Once the first piece is out, the rest come fairly easily. Once the forms are all off, clean off any dust and debris, and either use your concrete sealer or keep the whole shebang moist for a few days.
The Final Step Before You Flame On
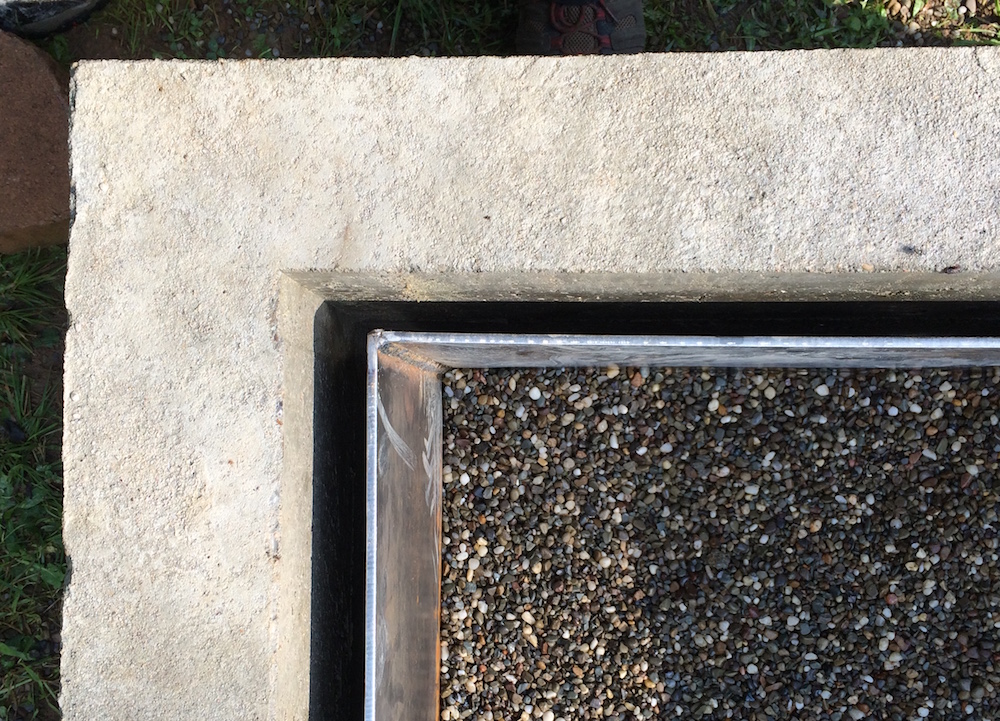
If you haven’t already done so, now’s the time to get your steel insert ordered. Concrete is very strong, but it’s also porous, may contain air pockets, and retains water. It would be dangerous to have a fire in a concrete fire pit without something to protect the concrete from direct flame; it could crack, or even explode. The alternatives are either building an inner wall using firebrick, or dropping in a steel insert.
Firebrick is relatively expensive, and involves a more complicated building process, including special fire-resistant mortar. Having a steel insert fabricated costs about the same (our insert cost $125), and is much less complicated: Have the insert made, bring it home, and drop it in! Do an online search for “steel fabricators yourcityname” and call two or three to compare prices. Our farm is in a very rural area, and we still had three shops to choose from, within a 15-20 minute drive.
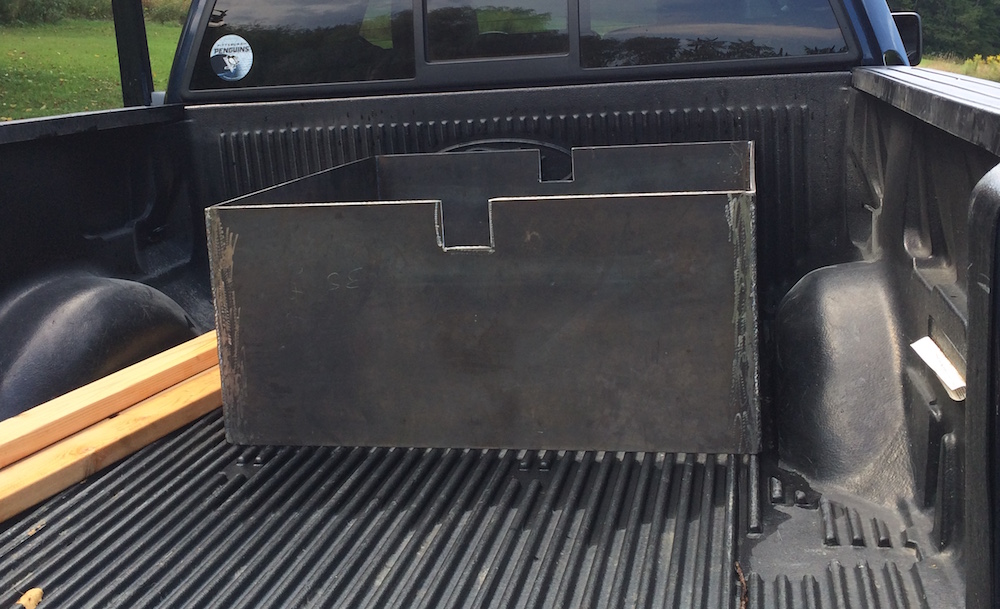
Order your insert 2-3” shorter than your inside fire pit dimensions; for example, our opening was 38” on each side, and I ordered the insert with 35” sides. This allows for some air space all around, makes it easier to get it in (steel is heavy, too), and protects against minor measurement errors. Don’t forget to have them cut 3” notches at the bottom of two opposite sides for your drain/vent hole.
Depending on how busy your fabricator is, it might take a couple of days to a week or more to get your insert made. That’s fine – you shouldn’t burn anything in your concrete fire pit for at least 30 days, to make sure it’s properly cured. Once the insert is ready, fire up the pickup one last time, and go fetch it. This is another good opportunity to bond with one of your big, strong friends. Wear work gloves, and watch your fingers. When it’s in and centered, dump in enough lava rocks to create a layer about 2-3” deep all across the floor of the fire pit.
And that’s it – time to fire it up! After 30 days or so, the concrete should be cured enough that you can grab your marshmallow sticks and gather ‘round. Try to keep it from getting too crazy, especially for the first several uses – no super-jumbo-mega bonfires. Your concrete fire pit will undoubtedly become the spot everyone gravitates to on those crisp afternoons and evenings – just remember to save primo spots for your strong, QUIKRETE-mixing friends!
This is a sponsored conversation written by me on behalf of QUIKRETE. The opinions and text are all mine.


What would be your overall average price on what you spent to make this beautiful fire pit?
what gauge steel?
I used 3-gauge steel (1/4″ thick). It’s one heavy hunk of metal! To answer your other question, I never did get around to adding lava rock. The pea gravel and air vents we put on the sides provide good drainage and combustion air, so I figured the money would be better spent on s’more fixings…
did you add lava rock in the center
Couldn’t u put a con create table top on top with stain ?
Sure. There are all kinds of ways you could fancy it up. A stained topper along the edges would look great. You could also add a brick or stone veneer. We may do some of that down the road, but in the meantime we’re really enjoying the fire pit in all its basic glory!
I can do this. With a nice new shinny drill
Almost looks like I could do this. Does make a nice looking fire pit.
You COULD do this! Just don’t be shy about asking some friends for help, preferably some friends who enjoy a little exercise. The beauty is, you can make your fire pit whatever size you want, and if you want to take it up a notch, even add some concrete stain in the color of your choice. Enjoy!