
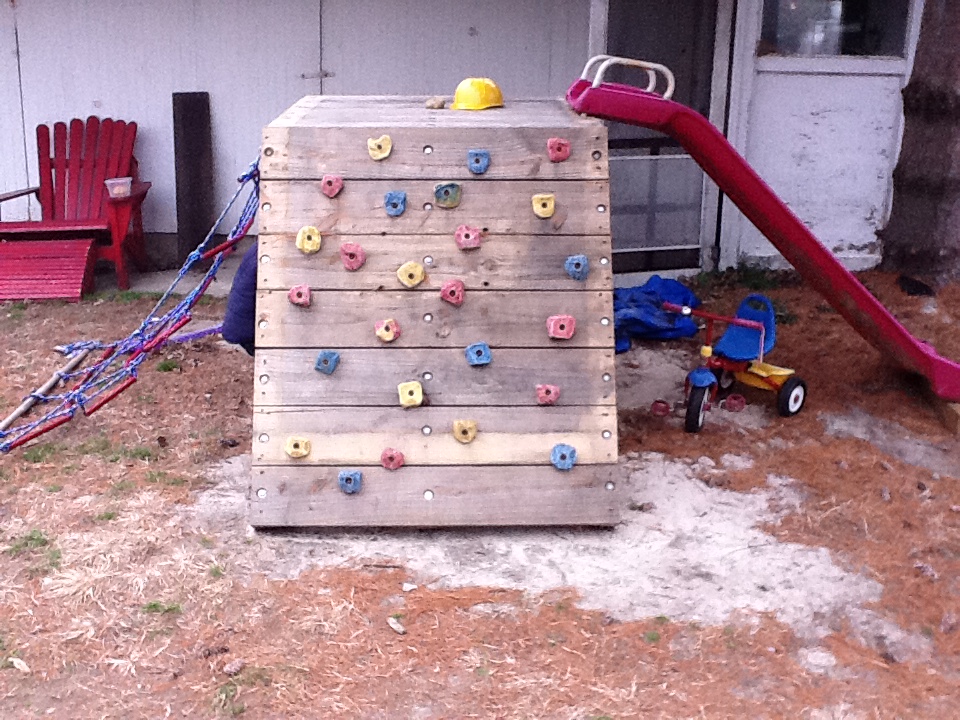
 Earlier this summer I built this playground set for my son. Actually, the bulk of the wood is from a recycled ultra-pallet that was going to be thrown away at work, and as you may remember I have an affinity for reclaiming lumber. The other parts actually came pretty easily as well (not to mention cheaply). The rope net I made from rope and a piece of ½” PVC pipe for a grand total of about $20. The rock wall was part of the pallet, and the rocks came off of ebay for about $25. The slide was given to me by a co-worker. The only thing that I put any amount of money into is the sand box, which ran about $80, and if I had been a little more prudent I probably could have built it using other reclaimed wood. The bulk of the playground set actually fell under my two tenets for work, 1) I am very lazy and 2) I am very cheap (and more so the latter).

I built this playground set over the summer for my son. It became evident that he needed an ‘outlet’ to climb when I came home from work one day and he exclaimed, “Look daddy, I climbing,” as he grabbed a curtain with two hands and tried shimming up. However, shortly after I put the playground in the backyard, my wife and I noticed that our little guy enjoyed playing under the platform as well as climbing it.
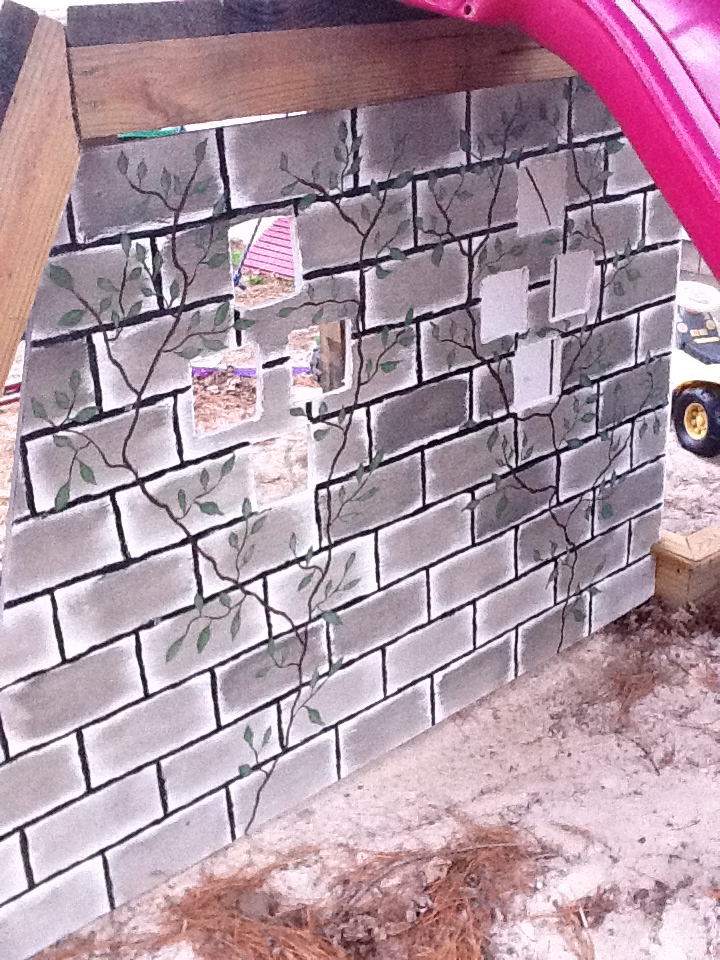
And what better thing to have under a playground set than a fort, or in this case a castle? As you may notice, this only has two sides, and while I’d like to say that it fell under my two tenets, it really was simply more practical to do it this way. We left the cargo net side open so toes and feet could sit on the rungs without banging the wall (although it did save time and money). The far side of the fort was already covered by the rock wall, and who needs to awesome up a rock wall anyways?
The Material and Tool List for My Ultra Cheap Kid’s Playground
The list of materials and tools needed for my playground is pretty straightforward and short:
- One sheet of project grade plywood (not hardwood)
- Circular saw
- Kilz primer Fast cap square ‘n’ tape
- Six different paint colors
- A straight edge
- Jig saw
- The whizz paint roller
- A drill and drill bit (5/16”)
- Two hinges and a gate latch
- Assortment of paint brushes (most of which came from the kiddie pack we bought for our son)
Here’s a bonus: The primer and most of the paint (white, black, light green and chocolate) I already had. In fact, some of you may remember the chocolate and green from another ill-advised project I did. The great thing was that I was able to get the ‘Rainforest Green’ and ‘Slate Gray’ in ½ pint sample sizes for about $2.50 apiece.
How I Built My Self-Designed Playground
Now for the how-to part. It’s really pretty simple, because I did it with no previous experience and I am a lousy artist. First, cut the plywood to the dimensions you need. I cut a 45-degree angle in the edge so that there would be a nice fit and the walls would line up at the corner. Next I drew the door and windows and cut them out. In case you’re wondering, I used the drill to make holes in all four corners of each window and then used the jig saw to cut them and the door out.

Now it was time to prime and paint. I primed everything well, especially the edges. Since this was going to be outside, it needed to be sealed. Next, I put a base coat of white exterior on everything. This is an added sealer and covers the wood very well. After the white exterior was dry I drew light penciled lines every four inches horizontally and every eight inches vertically. These vertical lines were staggered four inches every other line in order to give the appearance of blocks being staggered. I then painted these lines with black paint, but only used the lines as a guide, allowing the paint to wave up and down to look like mortar lines. I then waited until all the black was dry before painting the blocks.
My Playground Included a Lot of Free-Hand (But Easy) Painting
To get that uneven color across each block was actually quite simple. I took just a little gray paint on a two inch angled brush and fanned it out across the entire block. This fanning action spread the paint out unevenly, creating a variety of shades and tones for the blocks. I then painted the door chocolate and free painted the vines, also using the chocolate. The leaves were pretty easy as well and were all free painted. I used the darker green for the base, and while the paint was still wet I used just a little light green and spread it around to get a variety of shades and colors. Finally, I painted black lines and fake hinges and handles to make it look as if there was wrought iron hardware on the door. The very last step was to attach the real hardware over top of the painted hardware and install on the playground. (Quick note: All the colors except the white were interior paints, so I clear coated everything when I was done. You may want to get exterior grade if you plan to purchase the paints.)

When the finished playground was installed and ready for action, boy, was our little guy excited. I was too, but unfortunately I found it pretty difficult to fit through that door as a full sized man. The playground did make me, at least for two minutes, the coolest dad in the neighborhood – and isn’t that what it’s really all about?
P.S. I know, I know – I’ll be building the railing for the top soon. I’ve heard enough from my parents already.


Nice playground set…. and for not a lot of money!!!
Just wanting to know how the Square ‘N Tape from Fastcap worked out?
Worked out well. . . review coming soon Tom.