

Pocket doors and I get along like the guests of a Jerry Springer episode—minus the baby mama drama. To say I loathe them would be an understatement, but no matter what job I do, somewhere along the way, someone has a pocket door they either want repaired or installed. While it’s not too tough to install a pocket door when new construction is in play, it’s not always the easiest task when it’s being installed in an existing house. In fact, it can be a downright pain in the ass. Wires, plumbing and bearing trusses all make this seemingly innocent job even more difficult. Throw in uneven tracks, inferior products and wobbly doorways and you’ll need to get your blood pressure checked.
Oh and did I mention I hate pocket doors?
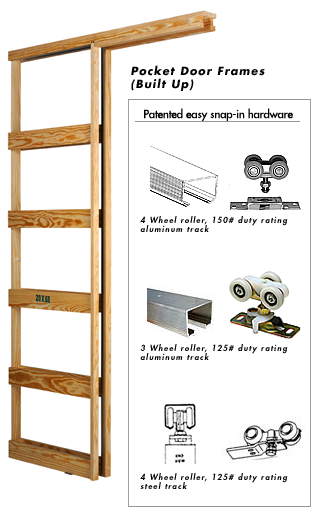
Installing a New Pocket Door
A 2×4 framed opening for a pocket door is a lot like installing a regular interior door. You need a basic header, but instead of at the usual 81” for the opening height, you’ll need to make it 83”. This allows you to add a 1×4 plate underneath of the pocket door for support and for floor clearance. You’ll also need to make the width of the opening twice as wide as the door to allow for the pocket.
Assemble the pocket door and track, and then attach the door to the back, floor plate and header using some 6d nails. The trick to getting a pocket door to work right is a level. A level header track and pocket face makes sure that the door works correctly throughout its life.
Once you’ve got the rough framing done, you can install the drywall. But before you go nuts and start screwing away sheets of drywall to your pocket door, be sure to get the right sized screws for the pocket frame. Regular drywall screws penetrate through the ¾” rough frame. Once you install the pocket door, the screws will hit the door when it goes in the pocket ensuring future scratches and furious cursing will ensue. Only use 1” drywall screws or you’ll be asking for trouble.
After finishing and painting the drywall, you can install the door and attach trim. Attach the hanging hardware to the door and cut out the door slab for the handle according to the manufacturer’s specs. Insert the roller wheels into the track and attach the door slab hanging hardware to the roller wheels. It helps to have a helper tilt the door back at an angle to get these two roller wheels to attach to the door hanging hardware without making your hair turn grey.
Once the door is on the track, you need to adjust the roller wheels to make the door level with the pocket face. Use the goofy bent wrench that’s supplied with hardware to raise the door slab up or down on each side. After your epic struggle, you can attach the trim.
This is the easy part. Attach the new jamb to the rough door opening using some 8d finish nails. Use a few shims to make sure it’s level with the pocket door face. Use the door slab as a guide to ensure that the jamb and door slab are all equally plumb. Now add the opening trim on each side of the opening. Use 4d finish nails so you don’t penetrate into the pocket cavity and hinder the doors movement.
Next, attach ¾” trim around the interior of the pocket opening and jamb. This pads the pockets face out so the door won’t accidentally swing out of the pocket when it’s fully closed. It also allows the jamb to have a small pocket for the closed door slab to fit into the door tightly.
Last but not least, attach the door handle, lock and track guides on the base of the pocket face. If you did everything right, you’ve got a pocket door that slides open and closed with one finger.
Considerations for an Existing Install
While the instructions above might be enough to make your head spin, installing a pocket door in an existing structure might be enough to have you committed under the Baker Act. There are a few things you need to think about before installing a pocket door in your existing home.
- Electrical and Plumbing Lines- No matter what room of the house you plan on installing a new pocket door, electrical and plumbing pipes will have to be moved to accommodate a pocket door.
- Bearing Walls- While a bearing wall doesn’t necessarily mean you’ve got no choice about what type of door you install, it does make the price go way up for a pocket door installation. Framing a 2×12 header to support the weight of a bearing load is crucial to keeping your roof from caving into your newly installed pocket door.
- Price- The cost of pocket doors range considerably. Don’t be cheap—opt out for a more costly but well-built pocket door. It can go a long way in keeping you sane as your pocket door ages.


Eric, i share your disdain of pocket doors. In another career a long, long time ago, i trimmed a house with 9 (yes, nine) pocket doors; 2 of them were doubles. I made the mistake only once of
nailing the baseboard and pinning the door in the pocket… man that’s a huge mistake. I’ve seen many others make that mistake as well but it doesn’t really make me feel any better. Even if you are smart enough to keep the door out of the pocket while nailing… if a nail is even a little too long you can end up with an ugly (but very straight) scratch across a door; a big sanding job if you are staining… less so for painting.
I have also done many “revisits” to even the pricey pocket doors to dig them out of the pocket after the rollers fell off the track or sometimes off the door. Also homeowners mount pictures or other decor to the pocket walls with too-long fasteners; same trap as i fell into on the baseboard.
I just don’t like them and commonly refer to them (as contemptuously and disparagingly as possible!) as “trailer house doors” which, while reading this as i’m typing, i am now renaming to “trailer trash doors”. (Hopefully since i’m only a commenter i can’t be liable for slander! although i am not inaccurate. is it slander if it’s true?)
Furious cursing is the order of the day for these. I wish they weren’t such GREAT space savers!!!
billw
Well put Bill! But to say they are “trailer trash doors” is an understatement. I’ve worked on trailer doors that were better constructed than some of the pocket doors I’ve installed.
I also know all about putting a few finish nails into the frame that scratches the door. As Gordon Ramsey would say “Bollocks”!
I like to put that 1×4 down on the floor so I have a solid place to hit with finish nails for the base as well as hold the door frame in place. 4d’s and some caulk are the only way to go when installing pocket trim and base!