
 As my wife will tell you–it is a pretty safe bet that I will find a way to build something new, destroy something, or otherwise make permanent any new electronic gadget I get. I kid you not, I was looking behind the car console to see if I could use my Dremel Multi-Max to permanently install an iPod in the car, and hard wire it to our stereo. Unfortunately, Apple has yet to make the wiring that will keep the iPod powered off the car battery. I am sure I could find a way to do this–but my wife won’t let me near raw electricity. This is another reason I am still alive today. She is smart like that.
First things first–you need to get the right wall mount hardware for the TV you have. Pretty simple. Quick internet searches will show you that there are about a billion wall mount brackets for each TV. That is a good thing.
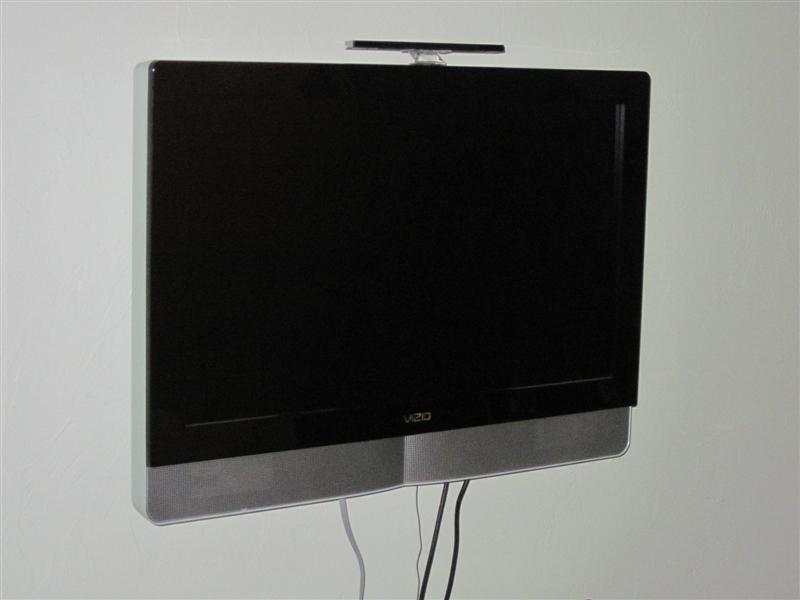
Once I had the right wall mount, I just unscrewed the base of the TV using my trusty 6 in 1 screwdriver. In an act of rare foresight, I taped up the loose screws, and taped them to the bottom of the base in case (Also rhyming with base in case: Ace of Base) we ever want to put the TV on a table, or entertainment center. Or–when my bride gets me this TV for Christmas, I’ll put this tiny one in the shop. For now, it’s on the wall.
Because my TV is sort of important, and weighs a good amount: I wanted to make sure I was actually reading the instructions for the wall mount hardware. For these reasons, I located a stud using my handy dandy stud-finder. (See prior awesome stud finder) jokes and comments. Once I located the center of the stud, I figured I was safe going 16” either direction for centering purposes, and aesthetics. Generally, studs will be 16” apart from each other, excluding something on the other side of the wall that is framed funny. However, keep in mind 16″ is the rule, but it has many exceptions, especially if you’re like some of our readers and are renovating a house that was built roughly at the time of the pilgrim’s landing. By the way, Pilgrims clearly did not have kick a$$ TVs, or they would not have spent 2 months in a ship getting scurvy, only to leave their flat screens behind.
If it’s plaster and lath you’re dealing with–you may need to get a bit creative on the stud finding part. I have done this the “old fashioned” way, and just tapped around on the wall with a hammer until I had found what I thought was a stud and made small exploratory holes with a finish nail until I got solid wood. It works, but is just lamer and definitely not as technologically advanced.
The recommended height for the wall mount was about 48” to the center of the TV. Basically, I just sat in my favorite chair, and looked at the wall until the mounting bracket looked like it would be in a good spot. Not too high, and not too low. It was actually pretty surprising to me to see how low it looked once I mounted it. Mounting to the wall is where most of my astounding carpentry skills came into play. Getting the bracket tightly bolted into the stud was pretty easy. Of course, I used my torpedo level to make sure my mounting bracket was level. Why mount a TV if you need to look at it with your head cocked all the time? Then again, maybe some of you prefer an angled mount to coincide with your lounging angle on the couch.
The hard part was feeding the @#$!&in’ screws into the part of the wall mount bracket that went onto the back of the TV. Seriously…come on guys. The design on this was pretty poor on the model we had, and I was close to seething with rage as I tried to get the threads to grab. Not cool. Also–be careful not to over tighten the screws. Not sure on different brands of TVs…but on my Vizio the threads were actually just little sleeves that were either glued in–or just put in with tabs. I am pretty sure I might have gone a bit nuts on one of them–I blame Vizio however.
Once I finished that bit of engineering magic–I was able to put the TV on the bracket, and tighten the set screws. That was also a bit hard, as I had to fit my arm, and essentially my head behind the TV to see enough to tighten them. I do definitely recommend the extra step of installing the set screws (if your model is like mine). The set screws will keep your TV from being bumped, and potentially falling to its doom. Small step to take to protect your investment. My mounting bracket had the ability to adjust the tilt of the screen–but since I put it at eye level, I didn’t really have to do much.
All in all, the project took me about 15 minutes or so, and I have to admit I like the look. It looks all techno-gadgety and makes my office look like a sports bar place where I spend all my time working on Home Fixated articles. For safety’s sake: If you have a hog of a TV, make sure you have a partner that can help you lift it on the bracket until you’re sure it’s secure. I’d hate to hear of a ‘Fixater killed by their TV, or, almost as bad, a TV killed by a ‘Fixater. (My wife made me write that. Actually, just the first part). After selecting your LCD TVs here, you can find a wide range of TV wall mounts
starting as low as about $25.


1 thought on “Wall Mount TV Installation How-To: Wall Hanging the Awesome”