

Crown molding is one of those luxury items that many people would like to have installed in their home. Despite its desirability, many find that it’s either too hard to do themselves or costs way too much to hire a pro to do the work for them. Even some professional woodworkers find that this project is a bit out of their comfort zone. And, just about everyone in the trades has a favorite way to do it. But you don’t have to be sad if you don’t think you can do the work yourself or afford to hire someone to do it for you. Turn your crown upside down and install your own crown molding using these tips to perfect crown molding.
The Three Major Cuts that Make Crown Work
There are three basic cuts that almost all crown molding projects use and are as follows:
- Scarf Joints-
No; it’s not what hungry hippies do to their stash. A scarf joint is where two pieces of crown molding join together against a wall. When one piece of crown isn’t long enough to go from wall end to wall end; you’ll need to make a scarf joint. Simply cut two opposing 45 degree angles on each piece of molding so they mate perfectly. - Outside Corners-
This is where two pieces of molding meet at the walls’ outside corner. These are the most difficult cuts to make because they need to be tight. And as Gold Member would say — toight like a tiger. - Inside Corners-
These cuts look difficult but are really fairly easy. You’ll need the first piece to be a butt cut—or square cut. The next piece of crown fits into the butt cut by creating an inside miter. The inside miter is back cut using a coping saw so it mates neatly with the profile of the butt cut. There are other ways to make this cut, but for this article we’ll be focusing on this method.
Turning your Crown Upside Down
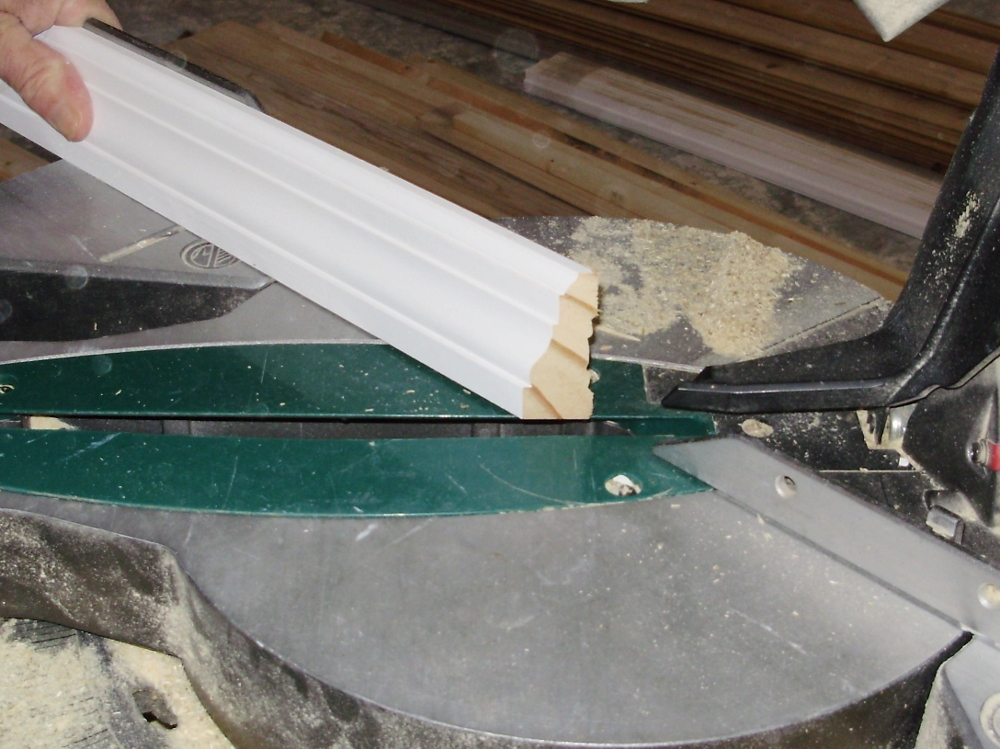
This is where it gets tricky. To accurately cut crown molding, you’ll need to flip the crown upside down. This means that you’ll need to treat your miter saw’s fence like the wall and the bed or table of the miter like the ceiling. It can easily make your measurements go all wacky if you don’t remember to flip the measurements as well.
Marking the Saw
Since crown molding varies in the way that it sits against a wall, I like to mark my saw with a scrap piece of crown to keep it on track when I make the cut. First, I take a scrap piece of crown molding and set it against the wall and ceiling. I make a small pencil mark on the ceiling and wall. After that I transfer the measurements to my miter saw fence and table (don’t forget to turn it upside down). Some people like to fasten a scrap of wood to the table to keep the crown cuts consistent. As long as you keep it in the same spot each time you cut, you can’t go wrong.
Accurate Measurements
I find that when it comes to measuring crown, a tape measure isn’t always going to be accurate. I prefer to place the material against the wall and mark it with a sharp pencil where it needs to be cut, especially where an outside corner comes together. However, when it comes to inside corners, you can’t do it without a tape measure. I also like to start on the right side of a room and work my way around counter clockwise. This allows the bottom of the molding (where the measurement mark is placed) to face up on the saw, making cuts easy and simple.
Crown Molding Coping Tips
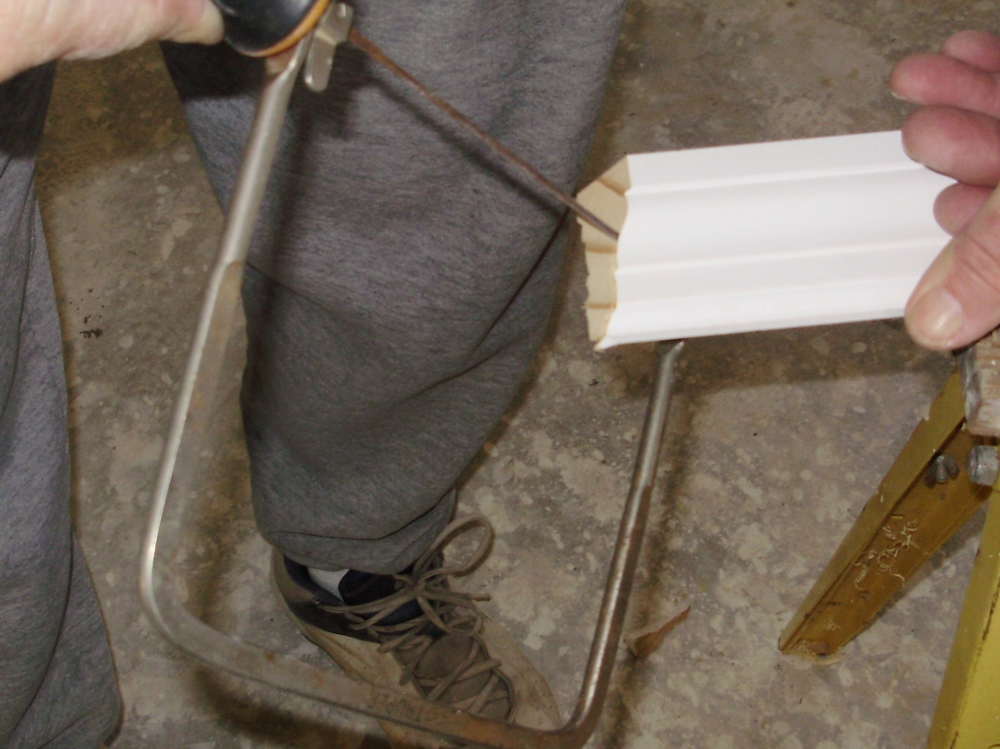
It’s pretty easy to cut inside corners when you cope them out. Lots of people like to cut the corners so that they fit together with two opposing 45 degree cuts. This can be a waste of time and money, especially once you find out that the corner isn’t really a 45 degree angle at all and you’ve already cut the piece to length. In fact, I don’t think I’ve ever had a true 45 degree angle on any wall that I’ve ever dealt with. Coping also works well for 22 ½ degree walls too.
After you attach a complete piece of crown molding to the wall, you can measure to the next wall or corner from the bottom of the attached crown. Next, leave a square or butt cut on the left side of the next piece of crown and make a pencil mark on the bottom at the correct length. Place the crown into the saw upside down as described above and make a 45 degree face cut and 45 degree inside cut so that the long point of the face cut is at your mark (whew).
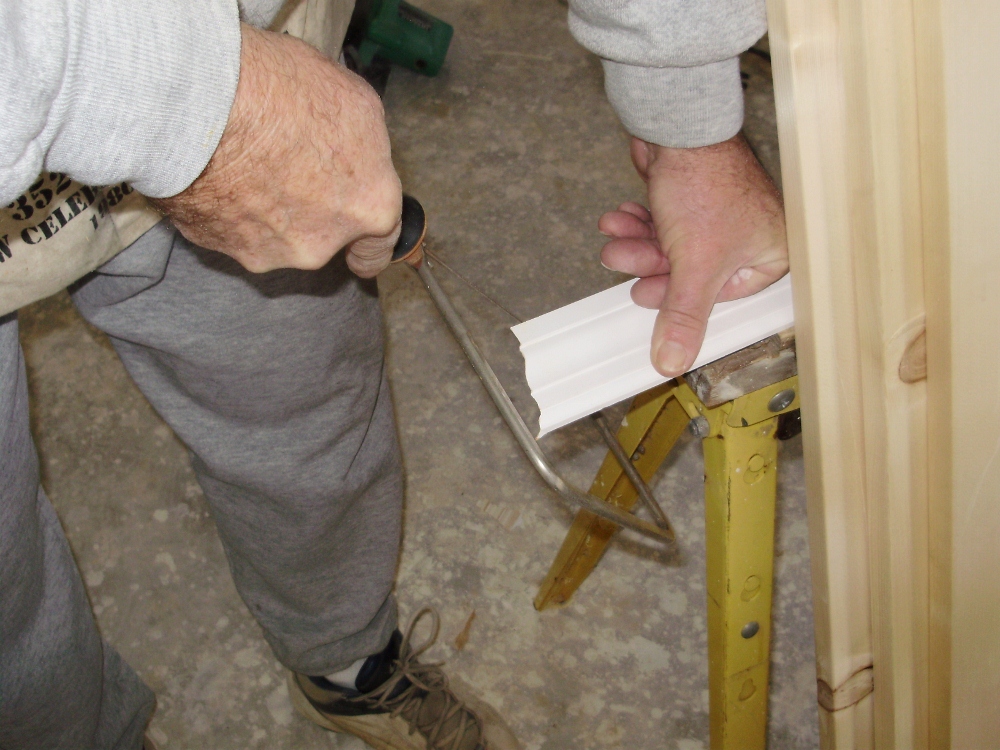
Finish the cope by cutting out the back of the inside miter against the face of the crown. Now the two pieces will theoretically mate perfectly. If you’re unsure of your cutting ability, leave a ¼” extra on your overall length. You can easily cut off the extra ¼” from the butt cut to make it fit perfectly.
Have any favorite crown molding tips and techniques? If so, let us know in the comments section below (as a bonus you’ll be entered into this month’s Free Stuff Giveaway!
No mater how hard I’ve tried to get tight miters it has always been a challenge until I found the Angle One Shot.
http://www.diamondtoolstore.com/index.php?main_page=product_info&products_id=1027
Without a doubt you cant miss on getting perfect professional results using this tool. There are online videos, although production quality is not the greatest, the operation is explained very well. My first use was installing crown molding on the top of kitchen cabinets with my brother and every joint was tight and on the mark. This device divides the angles equally so there is no guesswork. No need for coping. In my opinion it was well worth the $69.00 for the tool. High quality aluminum construction and should last a long time. I think there is a plastic model for about half the price but I wanted the longer lasting aluminum.
Check it out.
Hey Doug. . . thanks for sharing that link. . . definitely an interesting looking tool. We’re all for taking more of the confusion and anguish out of crown!
If your right handed, cope the right side of your molding. Vice versa if your left handed. It makes the job so much easier. Also, when coping cut the straight sections of the molding profile first. It will act as a relief cut, and also make it easier to turn the saw for the next cut.
thank you for the write up. Installing crown moulding is on my to do list this year and this will come in handy.
Eric, very nice!
I don’t cope any more on painted trim; only if i’m doing stained trim.
Just saves me a lot of time. And depending on the skill level of amateurs that ask for advice, i might recommend those nice inside/outside corner blocks that make all the crown cuts then become square!! Adds some intricacy to the finished product.
I don’t prefer them myself; i think they need a higher ceiling to look proportional, at least a 9 foot (just my opinion.) And they just don’t work in every application.
On inside corners, I always added 1/16th inch(proud) to the measurement on my coped trim and would spring the middle out when fitting the piece; then push it into the wall when both ends were positioned; this forced that sharp coped edge into the square butted piece like a knife! Any inconsistencies would then be invisible. When you get to that last piece of trim in a room with no outside corner, coped on both ends, add a little extra – 1/8th. The smaller the crown molding and the longer the run, the easier it is to use this “fudge factor”. Short pieces of 3+ inch crown… forget it; this will not work!
It also helps to mark the wall where the bottom of the crown should go to ensure consistent installation angle. And add a mitered nailing block behind the big stuff to ensure you hit wood all the time. Or run a baseboard upside down to add more complexity and provide more nailing surface.
Crown molding!!! Great stuff!
billw
Great tips Bill, thanks for sharing them!