
 Much to the dismay of my lovely other half Carrie–I recently broke my ankle playing hockey. Trust me–the pain has been worth the benefits. I get to lounge around having palm fronds waved at me, grapes fed to me by hand, and I don’t even have to take the dog out. This has given me time to think of things like: What if Yoda was a carpenter? Help you I can, yes. With expanding your Jedi finish carpentry training. Talking trim we are.
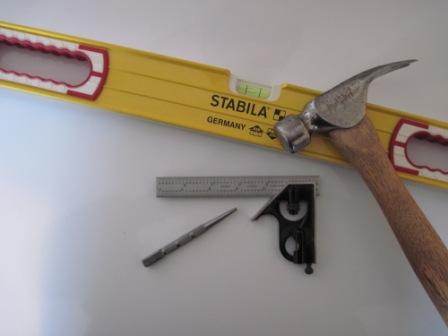
Imagine–if you will–a planet where a door needs to be trimmed. It is just waiting to be cased out, and you are just the Jedi to do it. I attack door trim with the following: Miter Saw, 4′ Level, 36” level, tape measure, trim hammer, tri-square, nail set, flush cut hand saw, pneumatic finish nailer, and a pneumatic pin nailer. Don’t fret if you don’t have access to the air tools. They certainly make the job a lot easier–and can be rented fairly cheaply if your tool armory doesn’t require them. Check around for tool co-ops as well. I know there is one where I live where you can check-out tools–much like the library. Cool, huh?
First things first. Check the door jamb for plumb, level and square. I like to install door jambs with 3 1/8” torx head screws–and screw into the jamb where the door stops will cover them. It makes for really easy adjustment–and you can take out bows and dips in your jamb pretty easily by simply backing out, or driving in the screw. I start at the bottom, centering the jamb in your rough opening, and tack a screw into each bottom and go up from there. Shim behind the jamb where you put your screws. Use the 4′ level to keep things as plumb as possible, while using the straight edge of the level to make sure you don’t suck the jamb in too tight–or bow it out. Same thing for the top of the jamb–just downsize to the smaller level. When you are satisfied with the jamb, use the flush cut saw to cut off the exposed shims. If drywall stands proud of your door jamb–that can be a problem when you go to case out the door. Slight stand-out can be corrected the old fashioned way. Beat it down. Hammer the edge of the drywall being careful to keep your hammering toward the edge of the drywall–and inside what your trim will cover. Extreme cases might require you to “back-out” part of your trim. Unless you are pretty comfortable with a table saw–this is definitely an advanced maneuver–and I would recommend re-adjusting the jamb at this point. Once the jamb is successfully in place–onto the trim.
 Before you go firing up the miter saw–take the time to set your tri-square to your desired reveal. The reveal will be how much of the door jamb remains exposed once you have applied your trim. I make about five light pencil marks for each “leg” of trim. Starting at the bottom of the jamb and then up , 1/4, 1/2, 3/4 and top. Don’t worry about measuring. These marks are just for you to be able to stay consistent with your reveal. Do this on both sides, and on your header–or top of the jamb. Now, measure your header. If you are mitering the trim–your measurement will be the width of your leg material + the reveals. This will be the measurement on the long point of your 45° miter. For square cut headers–the same applies only make sure to add how much you would like the header to “stand proud” or stick out beyond the width of your leg trim. Make sure and add the stand out for both sides. I only tell you this from years of forgetting to do so.
Now we get to fire up the light saber–er saw. Cut your header first. On trim–I always cut the side of the trim that will be the finish side. Let the saw get to its maximum RPM before making the cut. This will help ensure a clean cut through the finish side of the trim. I like to use the pin nailer to nail the bottom part of my header into the door jamb first. It sets my reveal–and there isn’t much need to check for level–as we did that with the door jamb. Use your reveal marks and carefully pin nail the trim to the jamb. Be careful of “blow out” and getting too close to the edge of the trim piece. For hand nailing (shudder) it isn’t a terrible idea to use a drill bit that is slightly smaller than your nail size and drill where you will nail–as this will prevent splitting the trim piece.
Next–nail the top of the header piece with your finish nailer into the framing. Use nails of adequate size to get through the trim piece, and drywall in order to find the meat that is your framing. With the header in place–you can now measure the legs. For 45° miters–use the long point and measure to the floor–or where you need to stop to accommodate for flooring. (Typically hardwood is 5/8” from the sub-floor and carpet is around 3/4”–but don’t take my word for it–double check) For square cuts the same applies. On square cuts–I will use a small piece of material and put it under the material to be cut. (About 1/16” thick) This makes a slight bevel on the material–and allows for a nice tight joint to the header. I also will typically cut my legs about 1/16” of an inch long–as that extra length really can make a great looking joint.
Before nailing–check both legs. Make sure they are up to your standards. The extra 1/16” will often allow them to friction fit, so you can step back and admire your handiwork. If satisfied–the same nailing procedure is the order of the day. When I nail door trim with the finish nailer–I’ll set it so it doesn’t drive the nail all the way into the wood, avoiding any marks from the nailer mechanism actually hitting the wood. Once all nailed off–I’ll go back and set each nail by hand with the nail set and hammer. Whew! The door is cased!
Not quite case closed–now we need to cover up where we screwed the door jamb into the framing. Cut the door stops starting with the legs first. You will be cutting a 45° bevel on the top of your legs. A bevel cut is like the miter cut we made earlier–but a bevel is through the thickness of the material as opposed to the width. You can also measure and make the door stop header cut here as well–cut it a 1/16” long. Here is where a lot of doors can get wonky. Take a piece of material 1/16” thick to use as a spacer and close the door. Put the spacer against the door, and with slight pressure against the door–nail on your door stops–legs first. Where ever you nail use your spacer and apply that slight pressure. To install the header door stop–simply place one end into your beveled leg cut–and flex the door stop so it fits in between. The door should now close with a satisfying “thhwonk!” against your door stops.
The Force is strong with you Finish Jedi. Trimmed your door you did.
Great information! Thank you for posting this invaluable guide. You saved me an immense amount of head scratching and consternation. I found this information to be well organized, complete and explained in a manner that I found very easy to follow. The tip for using a 1/16″ spacer when cutting the trim, helps make the finished product look as if a seasoned craftsman did the work, not a DIY’ER like me.
Hi Bob, thanks for the feedback – we’re thrilled it was helpful!
It’s a good idea to remove at least one screw in the top hinge and replace with a longer one to screwed into the cripple/jack stud.Use the same color finish This method helps eliminate any sagging of the door. I usally replace the top screw closest to the trim stop.
Thanks for the tip Troy!
will do matey thanks for that 🙂 !