

About one appliance warranty and a few months ago we bought a new Samsung refrigerator. We had a bit of an odd-sized space, and the particular Samsung model we purchased was one of the few French door styled fridges that would fit in our kitchen without major modifications. The Samsung fridge went in easily, fit nicely, and other than a few peculiar mechanical noises it likes to make periodically, has been serving us well. Until, that is, we started noticing water building up in our crisper drawers (also known as your fruit and vegetable drawers). At first, we thought things just got a little too humid in there. Maybe some of the fruit got frisky with the veggies? It soon became apparent there was a more serious problem going on. While this little appliance repair adventure isn’t for everyone, if you have a Samsung refrigerator that’s been more humid than a muggy summer night in Miami, this how to repair water in your crisper drawers article and accompanying video is definitely worth checking out and MIGHT save you a costly appliance repair call.
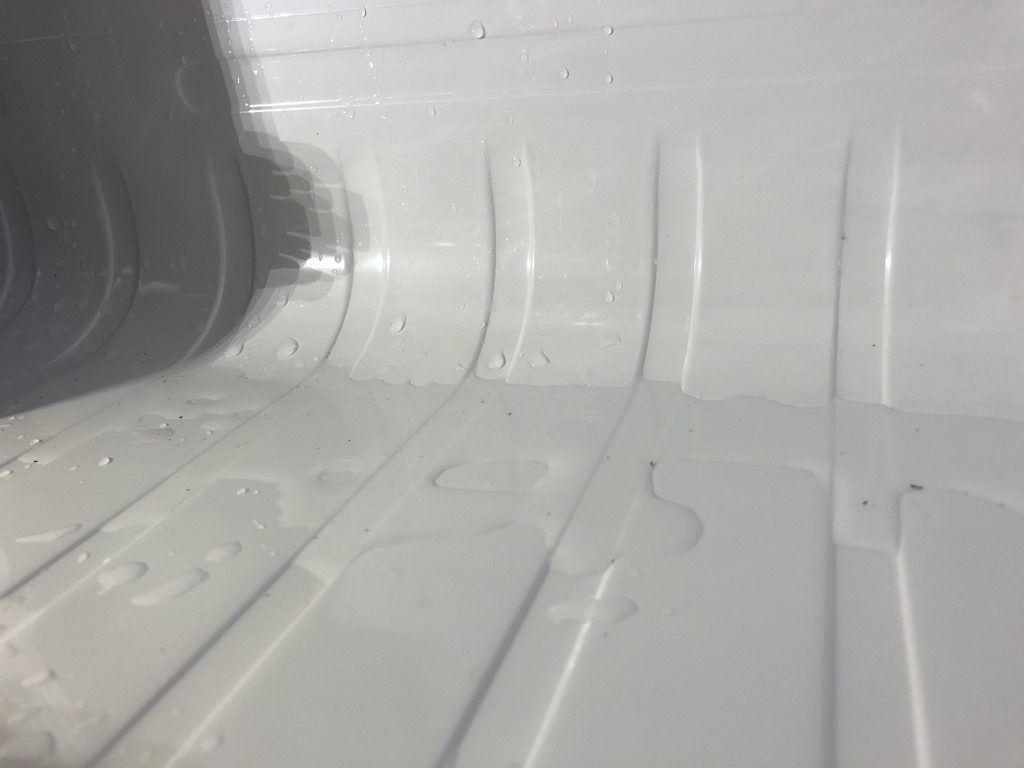
Water was not only filling the bottom of our Samsung refrigerator’s crisper drawers, but there was even water pooling up in the bottom of the refrigerator, under the drawers. It didn’t take long for it to get out of hand. We had little islands of produce increasingly surrounded by rising waters. Even after pouring out the water and drying everything out, somehow the water kept coming. So naturally, rather than calling an appliance repair company like most sane people might do, I instead turned to Google, determined to see if I could DIY repair my way out of this veggie and fruit drowning catastrophe. We had lost too many strawberries on my watch, it was time to take action!
What I found in my research was that I was not the only one to have this problem. After watching multiple videos and reading tutorials, I found most of them glossed over some parts of the repair and others spent too much time detailing more obvious parts of the process. My hope is that you’ll find both the video and written step-by-step on how to repair water in your crisper drawers to be clear, concise and helpful. A few things before we start. . .
This article and accompanying video assume you are reasonably handy. It also may not work for all “water in your crisper drawers” scenarios, or even for different brands of refrigerators. I went into this repair assuming there was a decent chance I’d break something and then have to shamefully call an appliance repair person anyway. Luckily that didn’t happen, but it might on your repair adventure. If you have all the basic essentials below, you might luck out like I did and complete the repair for a whopping $6 part.
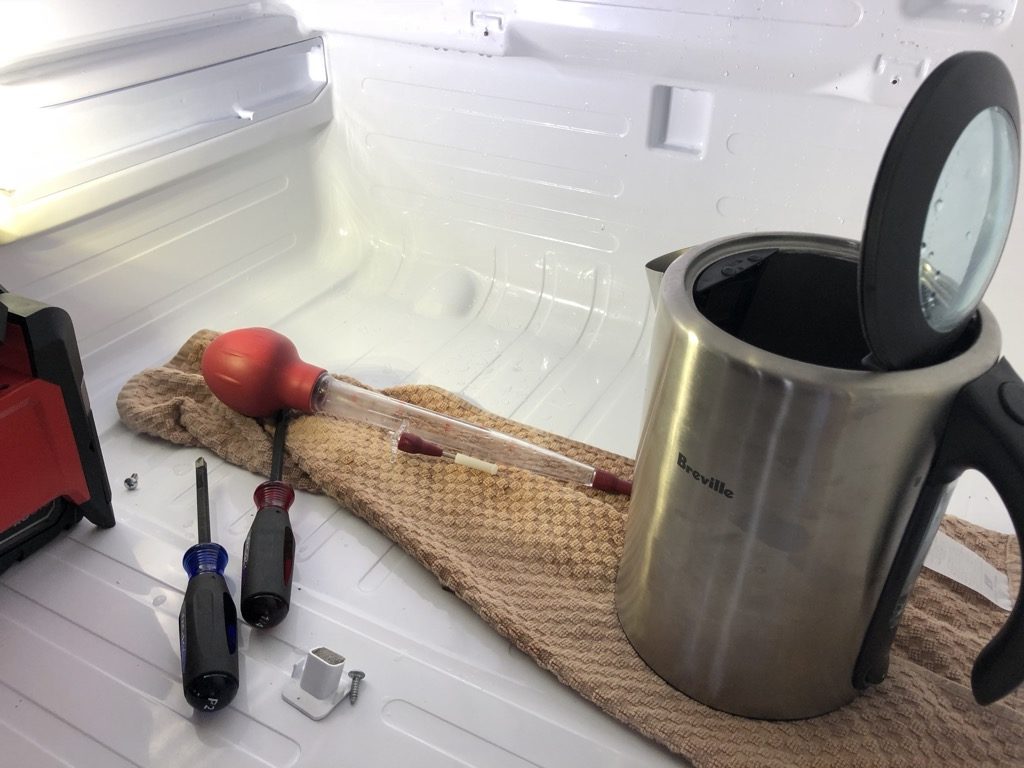
I would recommend you watch the video below first. However, because I might have missed a thing or two in the video, I would encourage you to also read the step-by-step how to repair water in your crisper drawers in the article below. Before we dive into the video, here is a quick list of tools and supplies you’ll need:
- Phillips Screwdriver
- Portable Light (Optional but helpful). We used the Milwaukee Rover.
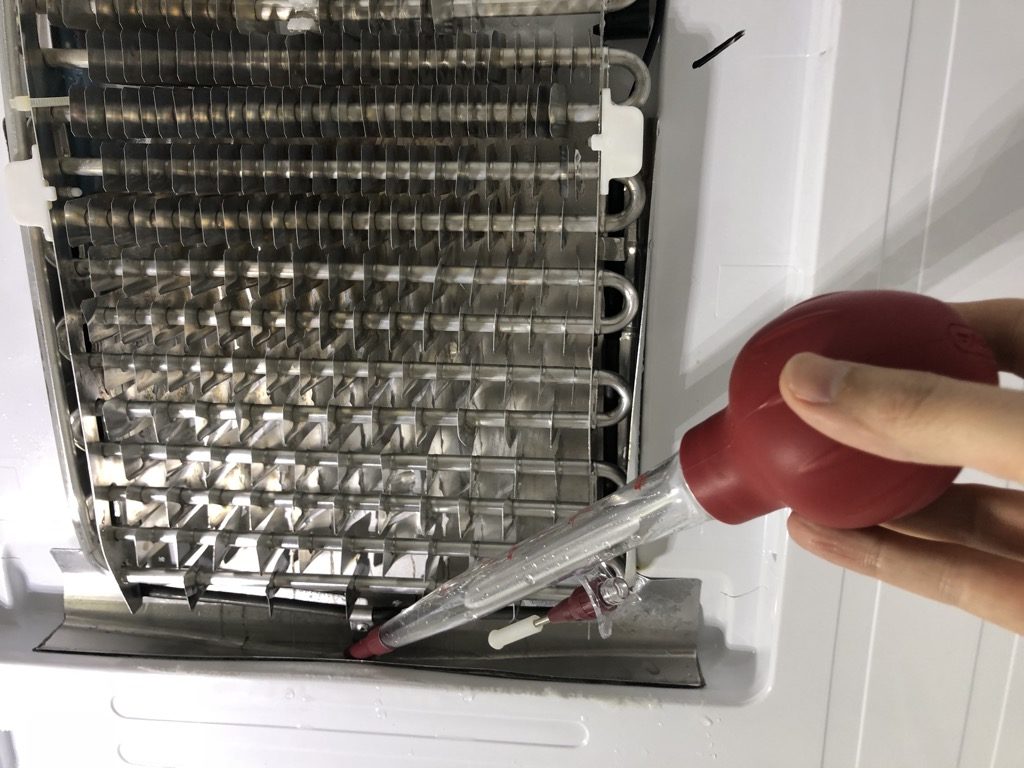
- Turkey Baster
- Hair Dryer
- Hot Water
- Wire Snips to Cut the Old Evaporator Clip Off
- New Evaporator Clip (link later)
- A Cooler and Ice
- An Andean Flute (OK, you don’t actually need this, although the music might help you stay calm)
Now that you’re geared up and ready to go, let’s dive into the video segment of this repair.
How To Repair a Samsung Refrigerator With Water In the Crisper Drawers – Step by Step Video
OK Samsung refrigerator repair expert, let’s walk through the details below. It’s as easy as one, two . . . five.
Step 1 – Unplug and Then Empty Your Refrigerator
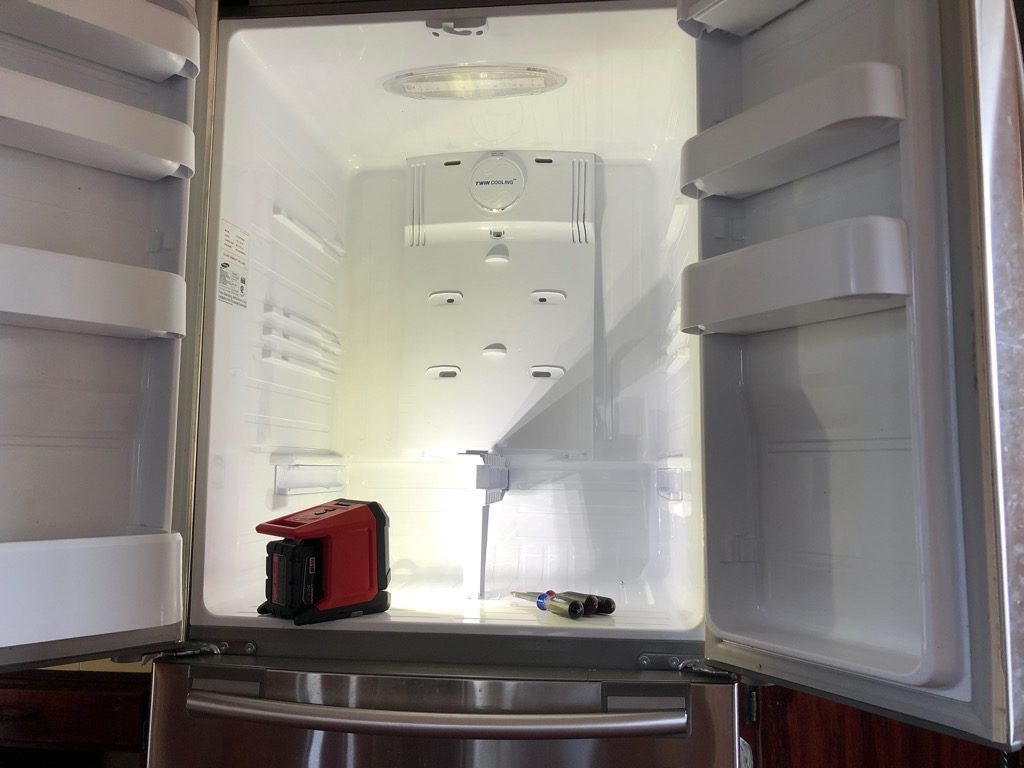
First and foremost, unplug your refrigerator. You do not want to be tinkering with it while there is still power running to it. Unfortunately, this next part can be expensive, emptying your fridge. Ideally, I’d recommend buying a little ice and loading up all your perishables in a cooler or two. I made the risky choice of leaving the freezer closed and full. I reasoned it was well-insulated and already had a bunch of ice in it, and I hoped my repair would be swift. In my case it worked out, but if you’re worried about losing perishable food, I would recommend stowing it temporarily in a cooler, or in a tolerant neighbor’s fridge / freezer (good luck with that)! Once the refrigerator was empty, I removed all of the shelves and drawers and put them somewhere out of the way.
Step 2 – Remove the Panel
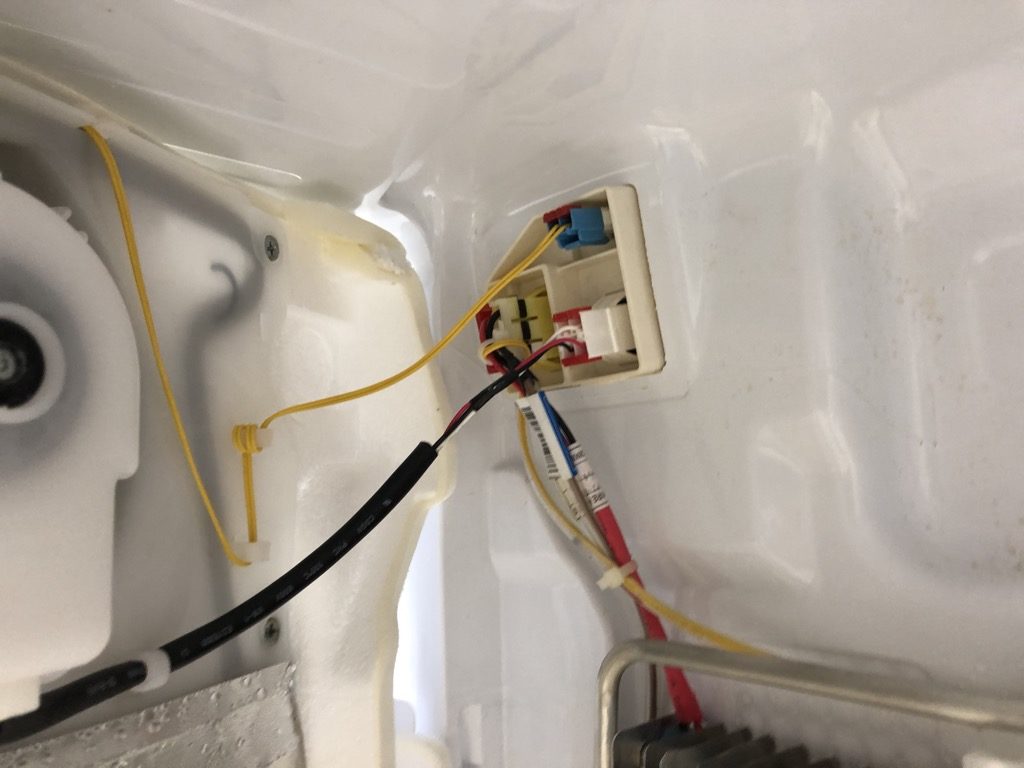
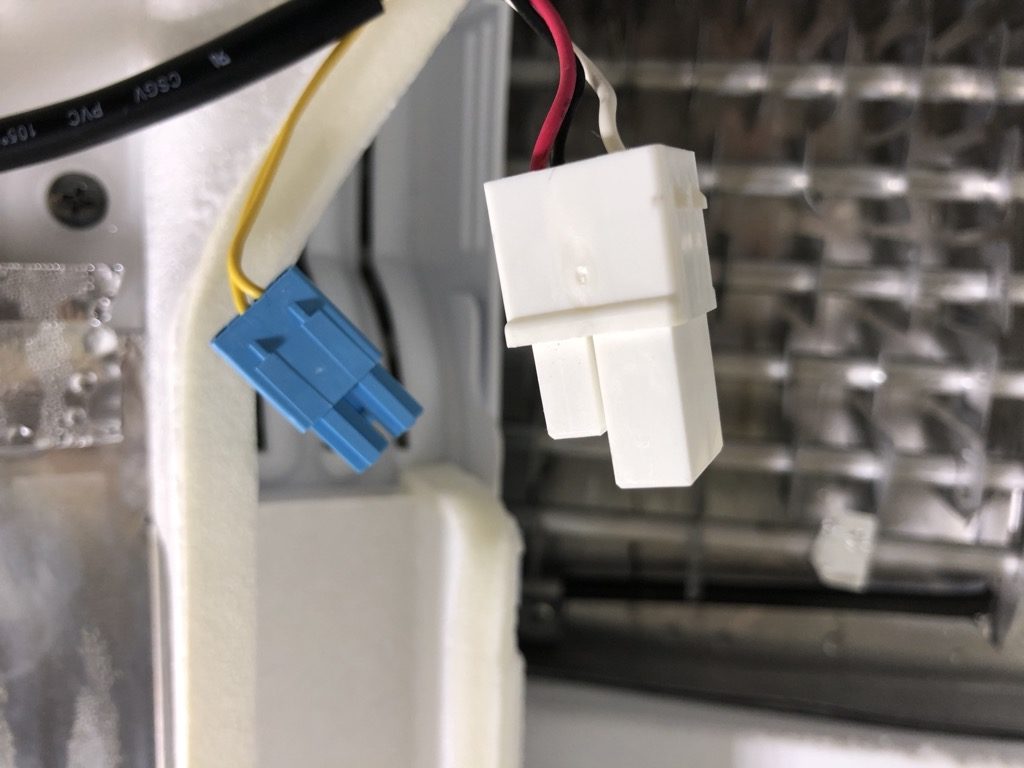
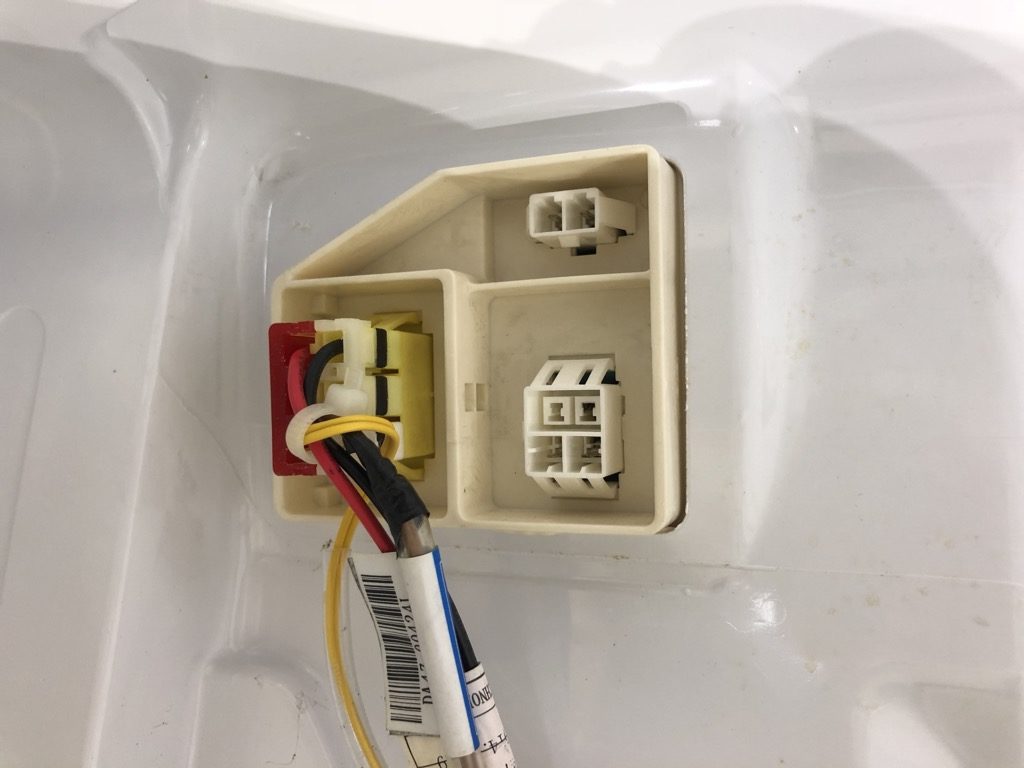
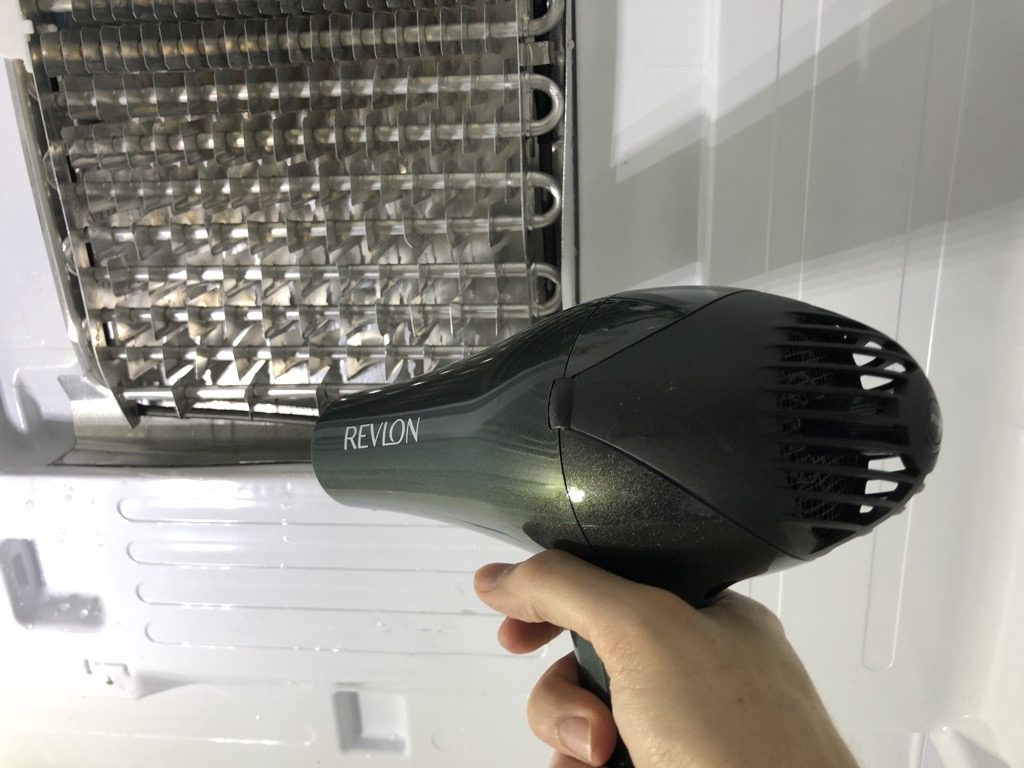
This part is one of the most challenging. If you have the same problem I did, chances are good the back panel is frozen solid to the cooling fins behind it. Some people advised that you just let the refrigerator sit overnight and let all that ice melt naturally. These people probably do not care about cold food as much as we do. Since I had places to go and people to see, I opted for the expedited technique which involves a hair dryer. Yes, this might be the first time we treated a hairdryer as a “tool” on Home Fixated. Don’t judge! Without overheating the plastic, I used the dryer’s low setting to blow warm air on and around the panel. Eventually I could get a little play around the edge and pull some of the edge out to allow more warm air to be directed behind the panel. Finally, after almost all the ice melted, the panel just popped loose. Don’t rush this process as the panel is fragile and has styrofoam on the back. You’ll then want to remove the couple wire bundles attached at the top left.
Step 3 – It’s All About the Bas(ter)
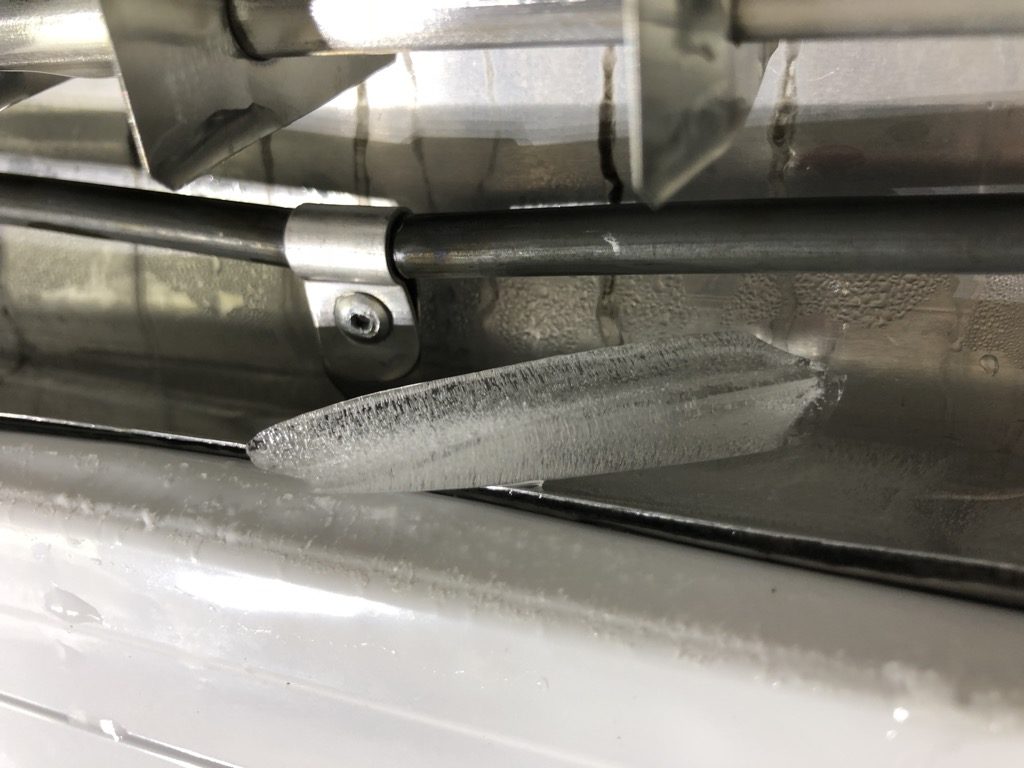
Next up, heat up some water and use your turkey baster to squirt a little in the icy drip area. After a short time, suck up the now cold water, discard it, and then apply more hot water. Keep doing this until eventually you’ll be able to hear that the water can flow all the way through. I was a little concerned I wouldn’t know when I had actually melted through the ice, but as long as you’re paying attention it’s pretty obvious. The main clue is you’ll go from the water level staying at however much you put in, to the water actually flowing.
Step 4 – Clippity Snip Snip
Now that you’ve ended the involuntary ice-age in your drain line, it’s time to replace that tiny drain evaporator clip that came stock on your Samsung refrigerator with the more beefy version from Samsung. I found the Samsung Clip Drain Evaporator REF OEM Original Part: DA61-06796A replacement part on Amazon for around $6. To remove the old clip, I surgically cut the clip with some small wire snips and then pulled it off the larger heating element it’s attached to.


Putting on the new evaporator clip is ridiculously easy (well, at this point it is). Just loop the clip over the top of the heating element, making sure the long part extends into the center of the drain hole. Then, just wrap the two aluminum extension on each side around the heating element to secure it. The effects are like cranking up global CO2 levels on a fjord – no more ice!

Step 5 – Picking Up the Pieces
Phew! Now that you (hopefully) successfully tackled that repair, it’s time to put all the pieces back together. First, carefully connect up the two wiring harnesses/plugs that ran to the interior panel. Carefully clip the back panel back into the back of your fridge interior, making sure you line-up the screw holes. Once everything is clipped back in, re-insert the screws to secure the panel and cover the center hole with the decorative cap if applicable. Re-install your shelves. Plug your refrigerator back in for power and pray you didn’t damage anything new in your repair process. Once you know things are hopefully fully functional again, then it’s time to grab your food from the cooler and get it back into the fridge pronto!
Fixing Your Fridge When You Find Water in The Crisper Drawers – DI WHY?!
You’ve answered how to repair water in your crisper drawer of your Samsung refrigerator and now you may be wondering why this repair was ever needed in the first place. I found myself wondering that too. With so many people running into the same problem with various models of Samsung refrigerators (if you have any doubts just visit YouTube or read the 200+ reviews on the evaporator clip on Amazon), it’s pretty clear to me this was a design flaw. While I understand that sometimes a design flaw makes it through to production, it’s my humble opinion that when it does, it’s up to the manufacturer to step up and readily assist consumers with resolving the problem. End of rant.
If you’ve had the same misfortune we have with your refrigerator, we hope this how-to gives you the info you need to get it resolved, whether you tackle the repair or you leave that to a pro. It has been over six months since I did this Samsung refrigerator repair and our fruits and veggies in the crisper drawer have remained high and dry! My triumphant repair provided me with at least several seconds of admiration from my wife. I also scored several “awesome husband points” which are redeemable for. . . absolutely nothing. Even so, every time I pull out one of the crisper drawers, I smile with the knowledge I prevented countless vegetables and fruits from meeting an early watery grave.
Editors Update – 2021
After feedback from 10’s of thousands of youtube views and many comments, I would like to add:
1) Our initial fix as shown in the video and detailed in the article above lasted for YEARS.
2) When we ran into the issue again years later (one crisper drawer started to get water in it again), the first thing I checked are the drain tubes at the back of the fridge. Several commenters have reported those tubes at the bottom back of the fridge (you’ll have to roll your fridge out), can get clogged and cause the same crisper drawer water issue. I checked ours and they were clear.
3) I then adjusted the fridge temp 2 degrees warmer and after about a week, we were back to normal and no longer having issues with water in the crisper drawers again.
Samsung Drain Evaporator Clip for around $6:
I have a Samsung RF197ACRS with the same problem. Replaced the heater clip but that didn’t work. Checked the drain tubes which were clear, still same problem. What I did notice before this problem started, when I’d close the freezer drawer, I could hear either a little motor or noise for about 3 seconds then stop. This particular function stopped about the same time the water started forming in the fridge. Any idea what that noise is?
Thank you! Good clear, complete instructions.
Only ice I ran into was on the upper screw holding the panel. Made no sense why ice would be there.
I believe the water in the crisper drawers because the drain gutter was pushed in (towards the back of the fridge). I rolled them out, hopefully it resolves the issue.
I have cleaned my drain tubes they were not clogged, widened the gap on them also. I replaced the clip and the yellow temperature wire but I am still getting water. Any other ideas on what I can do to solve this issue? It’s very frustrating. TIA
Not the problem with mine. No ice build up and no plugged drain tubes but water still leaks under the crispers.
Did it end up working ? I’ve got the same problem with my Samsung fridge (that looks identical to yours).
Thanks
We’ve had the same problem since we bought it. Did everything u guys have done to no avail. Had a tech look at it, changed clip, cleaned drain hose. Nothing works. Called company several times. Even if we’re gone for 3 weeks with no one opening the door, we come back to 1/4 inch thick ice under drawers, almost to the point of the drawers being frozen in place. Next thing that will happen is the drawers will break as we try to open them while they’re frozen in ice. Junk junk, will never buy another Samsung product ever.
Hi Oli. Happy to report, yes, our repair worked long-term.
same problem/ water under crisper//been putting up with this for about 3-4 years. have been cleaning it out , put on the clip. same old problem called samsung told me to level it i did same problem…co. will not do anything about the problem. Why will they not do anything? They know that this is a big problem.as long as they get your money they could care less about our problem.
I have the same water dripping problem, but whenever I open up the cooling coil compartment I never find an ice dam. I’ve noticed that the fan in the panel assembly doesn’t ever seem to come on. I think condensate is forming between the plastic panel and the thin insulating panel that directs moisture down to the trough. So the moisture collects in that small interstitial area an just falls into or near the crispers. Unfortunately, I haven’t been able to locate a new fan. All the vendors say ‘out of stock.’
Worked for a couple weeks but the water is back. I see a couple mentions of replacing the yellow temp wire — any video / instructions for that? Thanks!
Hi Kevin. Not sure about the yellow temp wire (we aren’t aware of that specific issue/fix). However we have heard from some readers that the drain tube accessible from the back of the fridge can get clogged and cause the same issue. you might make sure your drain tube is clear and free-flowing before diving into wire surgery. You can find a few comments on our youtube video that talk about this as well. Good luck and let us know here what you find out!
Water collecting in the fridge is because the drain tube is blocked. But drain tibe blockages are not always because of ice. The drain tube in my samsung fridge was blocked at the bottom by dirt rather than by ice at the top. The fix was to take off the lower back panel and remove, clean and replace the bottom section of the three drain tubes.One of them erupted and dumped water all over the floor as I removed it. Its a very quick and easy check to do before you start stripping out the inside of the fridge.
Thanks for the tip Peter. Most people running into this seem to need the replacement part to keep ice out. But we have heard from several folks that had clogged drain tubes that needed to be cleared or replaced to resolve the issue.
hi
i have the same problem with dirt except it was coming from the front top screw area shown in the evaporator clip replacement. Is there a video showing how to access and clean the back three drain tubes? Also, someone mentioned unclogging the drain pipe below the front evaporator clip. Is this an easy fix? Not sure where to buy the front replacement evaporator clip shown in the video. Do you know where this is sold. Local stores don’t have it where i live
Thanks for your help
rudy ferrara
After going thru the defrost process at lease 4 times previously I did replace the evaporator clip ,but unfortunately, I am still having issues with water forming in the crisper.
Some readers have reported that the drain tube running from the evaporator clip can get clogged. Please let us know what you discover.
Reminds me of the ice box we had in the 1930’s. Looks like a design problem. Send two clips to me as I have two leakers.
Jim Woelm Sun City AZ 612-718-2674
Hi Marc, thanks so, so much for the info on fixing watering the crisper drawer and the link to order the clip drain evaporator from Amazon. Did both However, in the process I broke a part of the styrofoam in the back of the panel at the bottom end (not completely, it is still attached to the rest). I put the panel back and did not have any water in the crisper drawer any more for few days now. My question: Do you think I should order a new panel? I am not sure what is the correct name and do not have link for it. My Samsung refrigerator model # is: RF217ACBP
Any info is greatly appreciated!
Silvia
I made this repair a few years ago (used copper wire instead of a replacement clip) and it worked perfectly, up until about a week or two ago. Nothing has changed (other than a hot summer) and it is far too much liquid to simply be condensation. Have you experienced this problem coming back years later despite the repair?
Hi Michelle. No, our repair has held up. You might try the actual replacement clip. . . not sure a copper wire is as effective. Good luck with the fix.
Thank you for your video and information. I used two 10-inch 12 AWG copper wires, inserted 3-4 inches into the hole, and then wound them tightly around the heater. I think it is better than the clip because it has more contact area to heater and melts the deeper ice in the hole.
Michelle, try thick copper wires and insert the wire to the hole deeply. Good luck!
I dont have a panel at the back of my fridge freezer. Its one of those fridge/freezers that is built in with doors to match the kitchen cupboards. Had this machine for at least 10 years and the water problem has only been prevalent in the last year. So to get at anything the whole f/f would have to come out. Maybe a new machine seems to be in order.
Hi Michelle. Nope, our repair has stood the test of time on our particular fridge.
Thanks for detailed pictures. Just finished. It took less than 30 min. Im a superwoman
Nice job Natali, errr, I mean superwoman!
Instructions were clear and on the mark. Frig is working now. Hope the cause for the freeze up has been eliminated with the new clip. Thanks
Thanks for the feedback Steve – I hope the fix resolves the issue for you!
Thank you for the informative video. Process took longer than expected since the hole for the top screw was full of ice and had pushed the clip halfway out. Had to melt that to get started. Next surprise: the tubing that the clip was on is not straight and angled down from both ends to the drain. That made it a little more difficult to get to the clip; freed the evaporator coils from their clip to get a little more working room. Of course the new clip doesn’t fit perfectly, but there is still much more surface area contact. Again, thanks.
Hi Fred! I think “Process took longer than expected” applies to just about every project I do on our house. Glad you got it sorted out and that the video was helpful for you!
thank you for your video and information. I changed the defrost clip and it seems water no longer frozen and clog there. however i still see water collected in the drawer. the water dripped from the corner of white cover. hired a repairman after cleaning up the mess several times. He replaced the drain hose (at the back of the fridge) and no luck. He came back 2nd time to replace the front cover (the big white cover with fen) and 2nd day i still see water dripping down. the drain hole and pipe was all clear with pouring water testing. still don’t know why! very frustrating!
Samantha,
Did you fix the problem? I don’t see the answer on here.
I am experiencing exactly the same. Heater clip replaced, can hear water drain to bottom/back tube (also replaced) and I see water collecting in pan under tube, indicating drain tube is fully functional. The water seems to be coming out of a crease below the main panel, but I can’t figure out why that would be.
Thanks,
Tony
Same problem. Done everything except replacing the cover
Hi Charles, did you ever resolve this. I am at the same point as you and Tony, replaced the drain clip, thermal fuse and defrost temp sensor, the freezer repair worked like a bomb, the fridge is still pooling water and sometimes ice at the back, I can see where is drip out from the back panel cover. Really don’t feel like replacing the back cover.
Thank you for this fix! We have just completed this and hope it works. When we took it apart we noticed that the previous owners had simply placed the new clip on top of the old without folding or anything. We removed the old clip, and put the new one on, so really hoping it works.
Just one question, I think a tiny piece of the old clip may have fallen through the drain (when taking it off). Will this be a problem? If so, any idea how we can retrieve that piece. Please let me know. Thanks for your help!
do you have a video of how to remove everything from fridge! thank you
I cannot for the life of me get all the ice to melt. Been at it for 2 hours. Time to put on the new clip and give up.
still getting water after changing clip,, worked for a couple of weeks,, what next ???
Change the yellow temp sensor cable and also remove the panel on the bottom left side of fridge.below you will see 2 pipes that are easily removable make sure they are clear of any foreign elements by cleaning them…you can also add to the ‘defrost clip’ aka ‘new clip’ by placing 1 or 2 (24 gauge) small copper wire (8cm in length) hanging from the heat coil into the drip hole.
Thanks for the detailed guide. I will be trying this again with my fridge. Unfortunately, I already had a repair man come out and do this.. they changed the clip and everything. One year later I am having the same problem again. Ready to throw this junky fridge in the garbage. I’m at a loss for why this keeps happening.
I feel your pain Jenny. Check out my comment from oct. 29th, 2019. We’ve tried everything and still have the problem . It makes a noise like an ice maker is kicking in, however, we don’t have an ice maker except under our crisper drawers. Mad as h…
Samsung has been nothing but trouble. From the customer service to the appliance itself…. it’s frustrating that this problem is reoccurring even after getting it “fixed”. I get about an inch of water every day.
Hi, Marc,
We just finished this procedure; thanks to your detailed instructions and video that showed each step perfectly! It took quite a long time to loosen the back panel but we used the “hot water in a metal cooking pot” procedure with the door closed for several rounds, and also the hair dryer around the edges of the panel. Just when we started to feel frustrated, it loosened just like that with mild pulling. Our trough and the drain channel were solidly iced but the very hot water and baster worked perfectly to clear it out. A little tricky to get the old clip off as our element dipped down almost to the hole, but we did it! So easy to apply the new style. Now keeping our fingers crossed as the refrigerator is plugged in and re-chilling.
MANY THANKS for your expertise and instruction! By the way, our Samsung is a little over 2 1/2 years old.
Hi Leslie! Thanks for your feedback and tips as well. So glad the tutorial helped you out. Nice work! Wishing you a long-term, successful fix!
Marc, Your instructions were spot on. I too earned countless “awesome husband points” which i am hoping appreciates in value. But, i’m not holding my breath. Seriously, thank you so much!
Frank
Glad we could help Frank! Good luck with those points! 😉
We had the exact problem as described in our 1.5 year old refrigerator. Followed the directions as above. Watched the video, ordered the part and read the directions again.
If you don’t have the luxury of an overnight defrost I used the following techniques. Heated water into a metal bowl. Close the doors, wait 20 minutes. Heat up more water BUT while waiting use the hair dryer. It took me about 1.5 hrs to get it all clear to include removing the back cover.
I appreciated all of the directions and video. Am now waiting on the unit to cool down.
THANKS.
Hi George, thanks for sharing your experience and tips!
We bought the defroster part and followed the video. It was helpful too. As it turned out the drain was clogged and it looks like it was made to clog. The pinched drain outlet was also connected in the center leaving a very small hole. I open up the center. All done the unit would not turn on….thanks Samsung. Looked on the internet and had to reset the unit. Aside from a broken flap, a broken drawer support and icing up calling a serviceman to replace two components it’s a great unit. Afterall I love spending a day dealing with fridge issues. One thing my daughter likes is the chime when the door is open. Who knows what’s next as the unit is about 4 yrs old.
Thanks so much for your easy to understand and thanks horough directions, which made me his an easy repair!
Glad we could help Walter!
What a head and change the evaporator drain clip to the new model, but I still have the same problem, any other suggestions?
LUKE,,, same with us,, it stayed nice & dry for 2 weeks , now we are seeing water again,, what do we do next ??????????????
I replaced the clip and it worked fine for about 2 weeks. Now there’s water again. What’s next?
Change the yellow temp sensor cable (check youtube) and also remove the panel on the bottom left side of fridge.below you will see 2 pipes that are easily removable make sure they are clear of any foreign elements by cleaning them…you can also add to the ‘defrost clip’ aka ‘new clip’ by placing 1 or 2 (24 gauge) small copper wire (8cm in length) hanging from the heat coil into the drip hole.
Can you please include the YouTube link? I couldn’t find the video with the temp sensor on your page.
I also got ice build up about 4 days later after changing it to the new clip.
Can you please explain why to change the yellow temperature sensor clip? Did you find it went bad? Check resistance and it was not good?
Thanks for sharing. I was wondering if after you installed this new part if you had any recurring issues? Or has it been fixed permanently? How long ago did you install the part and how long have you gone without getting any water leaking into the crisper drawers. Would be very helpful to know! I have read mixed reviews and we are planning on doing this to our fridge. Thanks for your help.
Hi Karen! The repair has held up for over a year at this point. No recurring issues so far.
We bought our Samsung about 2 yrs ago. Needed a certain depth and width frig so went with this one. Biggest regret ever. Does not have an ice maker but is making ice under the crisper drawers at a rate that would shock you. Called Samsung and they sent a repairman out. Just put in a bigger heater clip as the video describes. Worked for a month or so. They tried to bill us for a long time, Samsung finally straightened that out after a year and a half. Whatever he did, did not work. Called Samsung again. The lady said raise the front of the fridge. I said, even if it’s not going to be level?? She said yes, that will fix your problem…wrong!! Been clearing ice every month since we bought it. I defrosted it about a month ago, cleaned the drain hose, put in a bigger drain hose. Today I pulled out 1/4 inch thick ice from under the crisper drawers. Every so often it clicks like it’s trying to make ice, but it does not have an ice maker. If we hadn’t paid so much for it we would be using it for target practice. Will never buy a Samsung again. Time to trade it in, even though we will get almost nothing for it. Thanks for listening.
same problem,,, worked for a couple weeks,, water again
Change the yellow temp sensor cable (check youtube) and also remove the panel on the bottom left side of fridge.below you will see 2 pipes that are easily removable make sure they are clear of any foreign elements by cleaning them…you can also add to the ‘defrost clip’ aka ‘new clip’ by placing 1 or 2 (24 gauge) small copper wire (8cm in length) hanging from the heat coil into the drip hole.
Thank you for your detailed I took will be ordering the new clip. However do you know if there is a water filter required for this model? If so what is it and where does it go?
Hi Arion. I would recommend you contact the manufacturer directly to find out about water filter details based on your specific model number.
Just preparing to do this. Is there any reason why I couldn’t put the new clip facing the other direction over the old clip? Thanks
Hi Fred. I would think that could impact the performance of the new clip (particularly if the new one won’t have as much direct contact with the heating element). I believe the clip is intended as a replacement rather than an add-on.
Excellent video. I ordered the part from your link, it was a little over $5. My refrigerator is fixed!!! Thank you so much.
Hi Donna! Glad we helped guide you on a successful repair, congrats!
Would like to know where you ordered the new Evaporator Drain Clip. Cannot find on any Samsung or other site. Thank you for sharing the fix!! Very frustrating dealing with the water the first of every month before it runs out all over the kitchen floor!!
Very good article. I wish someone would write one on how to fix that piece of #$%^ icemaker in the Samsung refrigerators…
Thank you I just order two clips after video. I have called authorized Samsung repair shop no one knows what going on Samsung should be on the ball more .They know they had a problem . A BIG THANKS