

It’s that time of the year. The time of year when you realize that if you want any tulips in the spring you better get going before it is too late. The only trouble is now the mercury has dipped to ghastly cold levels and you have to convince yourself that the flowers are worth the effort it takes to trudge outside. If you don’t mind taking the risk, read on for instructions on growing tulips in the new year!
Planting Supplies for Growing Tulips

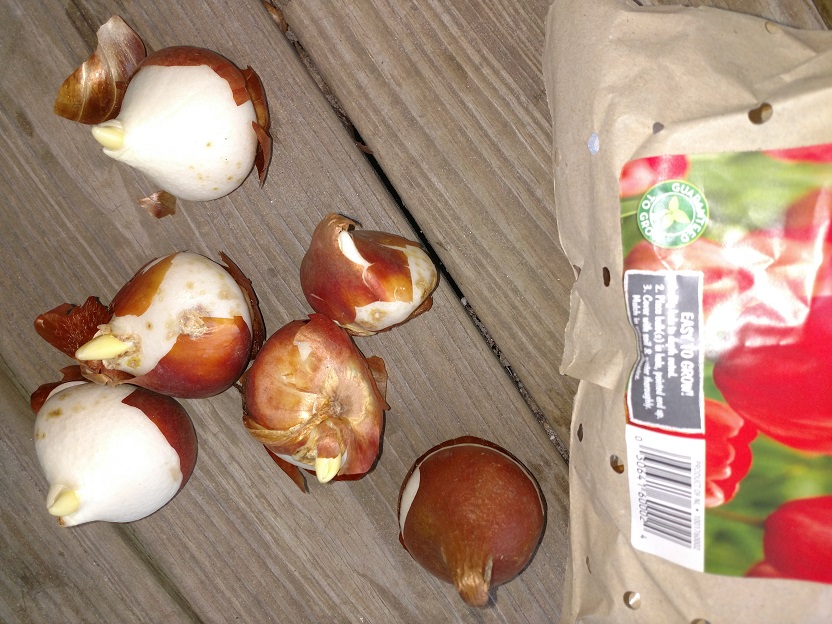
Tulip Bulbs
That’s really a no-brainer. Growing tulips is very challenging without having them on hand. I found a set of six at around $2.50 at Wal-mart. They also had large packs for $5. Tulips are also available at Lowes, but they came in large quantities and cost a little bit more. Most nurseries carry them as well.
Potting Soil
Since I was doing a small project this time around, I only got a small bag of Miracle Grow. Unless you’re doing a large container, you probably won’t need much more than that.
Containers
Bulb plants are prone to rot in wet conditions so make sure that the container in question has a good-sized drainage hole. It’s also a good idea to use plastic containers if you plan on growing your plants outdoors since terracotta can crack if it’s left outside in the winter. Wicker baskets are another good option.
Fertilizer (optional)
It’s an optional element but whatever kind that you have on hand will work. Just be sure to read the instructions carefully and follow them. Otherwise, you risk overcooking your plant.
Rocks or pebbles (optional)
If you have some on hand, feel free to put a few scoops in the bottom of the container to improve the drainage and top dress with the same substance. Horticultural sand or perlite might also work in a pinch. If you don’t have any of those things, you’ll just need to be a little more careful when you water your plants.
Tulip Bulb protection – Omit at your own risk!
This can be netting, chicken wire, or cloches. You just want something to keep the evil squirrels from descending upon your garden like the wicked little gluttons they are and making hash of your carefully plotted garden.
Growing Tulips in Nine Easy Steps
1. Make sure your bulbs have plenty of time to chill out before you plant them. Tulips need several months of cold weather. If it seems unlikely they’ll get it, store them in the refrigerator for 2 to 3 months before planting them. Don’t put them in the freezer.
2. Add rocks to the bottom of the pot if you are using them. Fill the container or containers you will be using with dirt until the soil line is at least a couple of inches below the pot rim. It’s standard to plant tulips about 6 inches deep in the ground but less than that is fine when growing tulips in containers.
3. Place the tulips in the container of your choice. Standard spacing is 5 inches apart when you’re dealing with in-ground plants. It is okay to plant them closer together in pots for a more spectacular showing.

4. Add granular fertilizer if you’re using it. Cover the plants with dirt until it reaches just below the rim of the pot.
5. Water the tulip bulbs until liquid comes out the bottom of the container. Put more potting soil on them and rearrange them, as needed.
6. Top dress your plants, if you like. Rocks, pebbles, and horticultural sand are all reasonable choices when it comes to doing this since tulips appreciate good drainage.
7. Put the tulips in a sunny spot if you live in the northern sections of the country. The further south one gets, the more likely that your plants will benefit from a little bit of shade.

8. Be sure to cover the bulbs up with something like netting, wire, or a cloche of some sort. (You can make cloches from old soda bottles or milk jugs if you need to.)
9. Don’t forget to water your plants on a regular basis if it doesn’t rain or they’re somewhere they won’t receive any.
More Tips for Growing Tulips
Tulips that have already sprouted by the time they’re planted run the risk of not blooming as well as ones that were planted at the appropriate times. Just be aware of this and make your plans accordingly. You’ll also need to avoid putting your bulbs near fruit because they give off gases that can cause them to ripen faster.
People that live in the lower South (zones 8 to 10) who want to reuse the same bulbs next year will need to dig them up and store them in the fridge once the plants have died back down to the ground.
Keep in mind that having your plants in above ground containers normally moves the species grown in them back by about 2 zones. This essentially means zone 9 containers can end up being zone 7 in the winter time. However, I’ve never had any major problems with this aspect thus far.
A word of caution: tulip bulbs are toxic. They can cause health problems and even death if they are eaten in sufficient amounts. Other parts of these plants also contain harmful compounds that could cause problems. To be on the safe side, definitely keep them away from your pets and/or children.
Did we miss any of your favorite tips for growing tulips like a rockstar? Let us know in the comments below!