

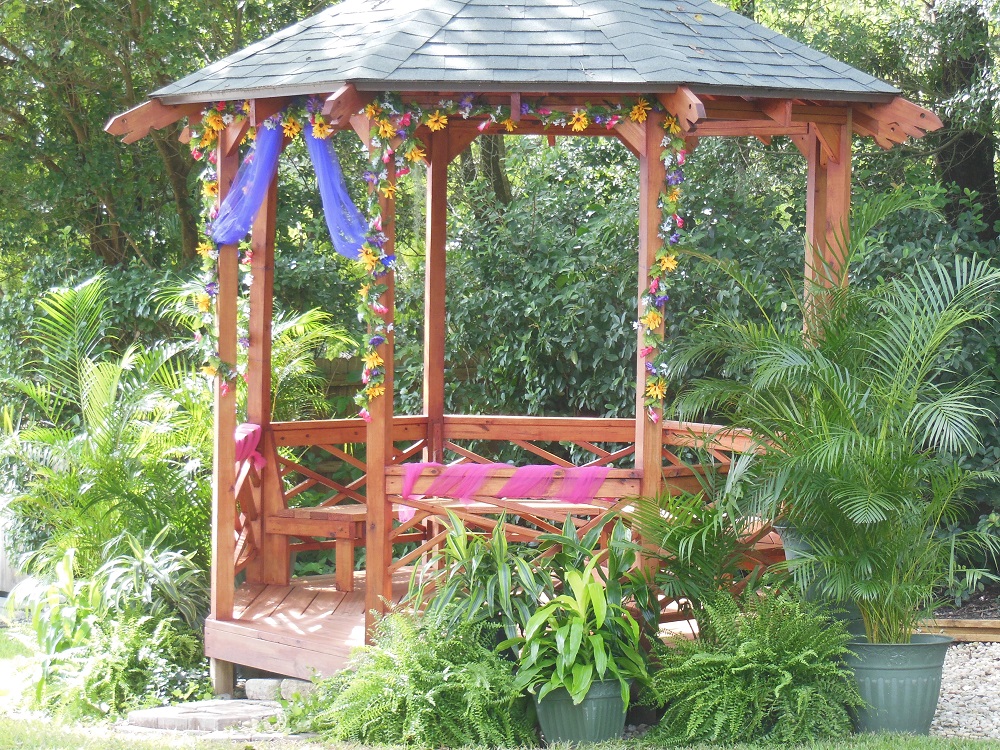
There’s nothing like a gazebo for relaxing in the yard with friends and family. Beat the heat and the high cost by building it yourself! Granted, the materials will run you hundreds of dollars and it is a lot of work. But you will save a ton in labor and the satisfaction of having built it yourself should about cover the materials. Give or take. Are you ready to build your own gazebo? Let’s do it!
I built the pictured gazebo mostly by myself, but I did get assistance with the concrete footings and erecting the corner posts. You probably will too; it’s not a one person job. And for my own safety and peace of mind, I had someone else shingle the roof for me. Oh, and it really is perfectly level; I promise. The picture is a bit deceptive.
This article will provide an overview of how to build a gazebo. It is not an exhaustive treatise of the entire process. Make sure you are familiar with local building codes and are comfortable tackling the job before breaking ground. It’s up to you to employ safe and proper construction methods and to obtain permits as required by the local powers that be.
QUICK NOTES: Inevitable variations in the building process will require most of the parts to be cut to fit rather than cut in advance. Any dimensions given are for this specific gazebo; yours may vary. All lumber is pressure treated. All hardware is galvanized (or otherwise rated for outdoor, PT lumber use). The roof sheathing is “CDX” rated plywood.
You Put Your Left Footer In. You Put Your Left Footer Out…
If you’re going to stand firmly you’d better have solid footing. This gazebo stands on – and is anchored to – 8 buried concrete footers. Mine is a 10-foot octagon built on a slope. But even on level ground, the footers are a critical part of the build. So take your time and get it right.
Before you dig, have the local utilities company come out and mark the locations of water, electric and cable lines. In my county, you can have this done at no charge, up to twice a year. A gazebo isn’t worth dying for; unless it has a built-in wet bar and a disco ball. This one has neither.
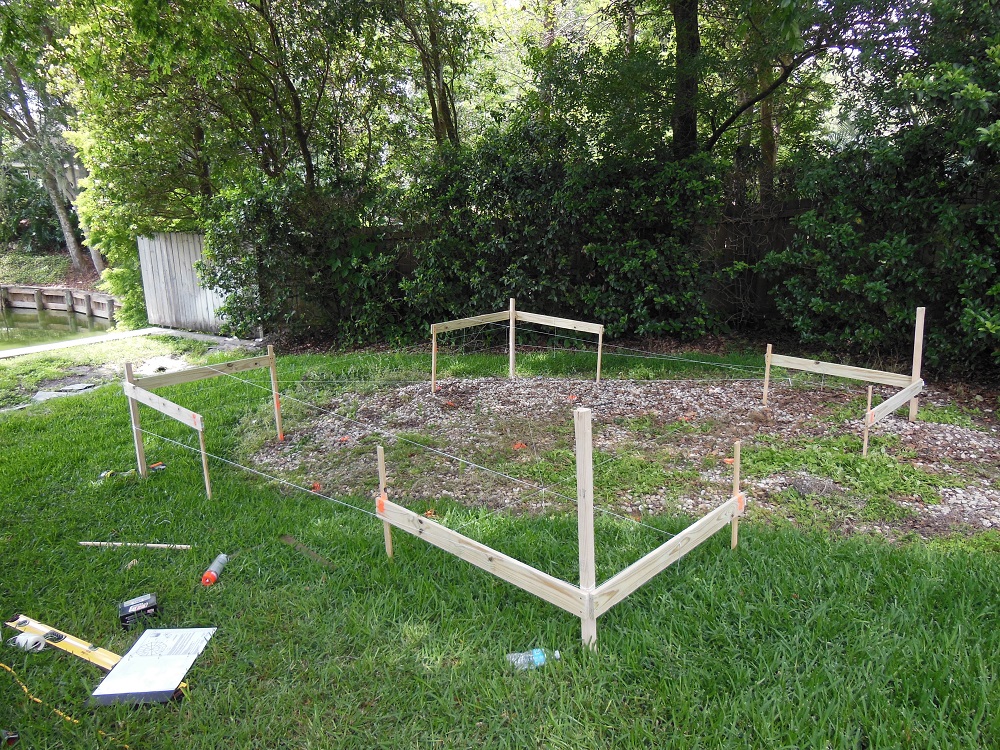
Layout is fairly straightforward. An octagon is really just a square with its corners cut off. Start by establishing a square with string tied off to wooden batter boards. Make sure to run your strings level, regardless of the contour of the land. Next, run lines from corner to opposite corner, forming an “X”, which locates your center point. Use another piece of string like a compass to sweep an arc from each corner and through the center point to determine the location of the 8 corners of the octagon. Mark your strings clearly to indicate where the corners go.
For clarity, I put together a little video to illustrate this layout method:
Put Your Best Footer Forward
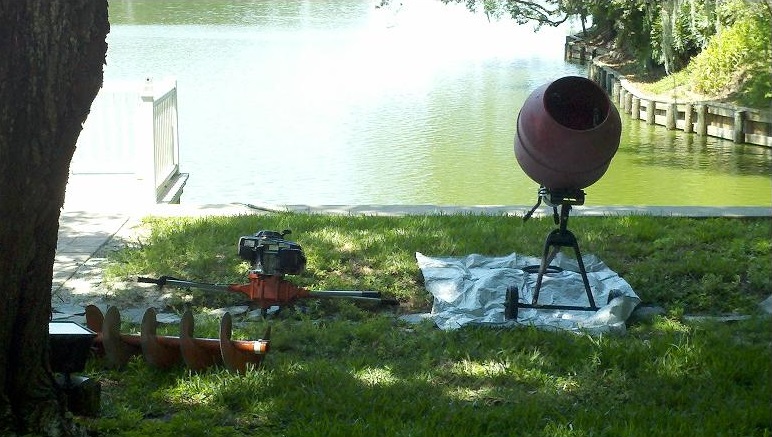
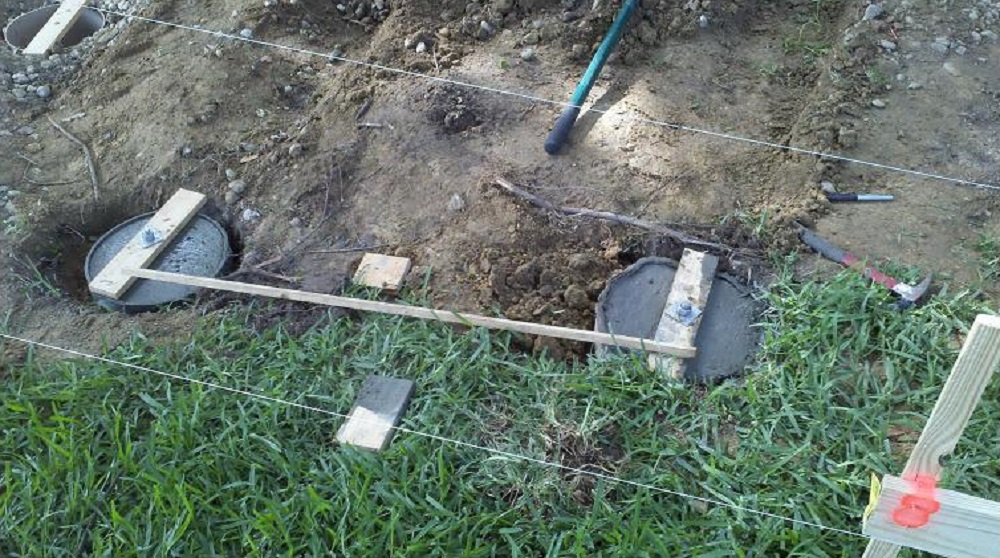
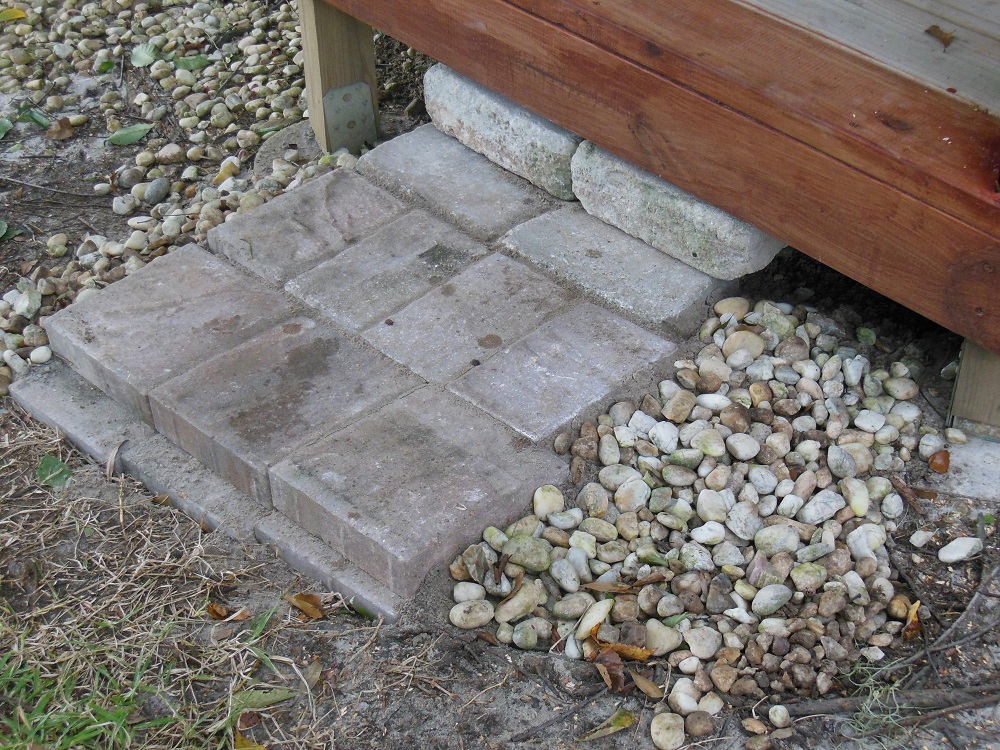
Transfer the 8 corner post positions to the ground with paint and a plumb bob. Once you’ve located your corners, you’ll need to bore holes for the footings. Temporarily slide your strings out of the way, but leave the batter boards in place. You’ll need to place the strings again later to position the post anchors. The footers require 12” diameter holes, 4 feet deep. A friend and I used a 2 man, gas powered auger rented from the local home center. Even with a helper, this tool really knows how to wear you out. In climates that freeze, make sure to bore at least 6” deeper than the frost line. Consult your local building codes for specific footer requirements.
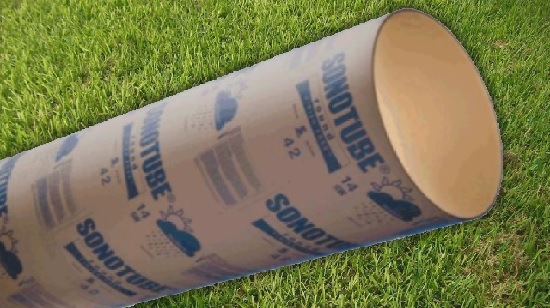
Fill the bottom few inches of the holes with gravel then insert 12” x 48” tubular concrete forms all the way into the holes. Use rebar and tie wire to build a reinforcing “cage” inside of the tube. Keep the rebar a few inches away from the inside of the form; you don’t want exposed steel peeking through the footers.
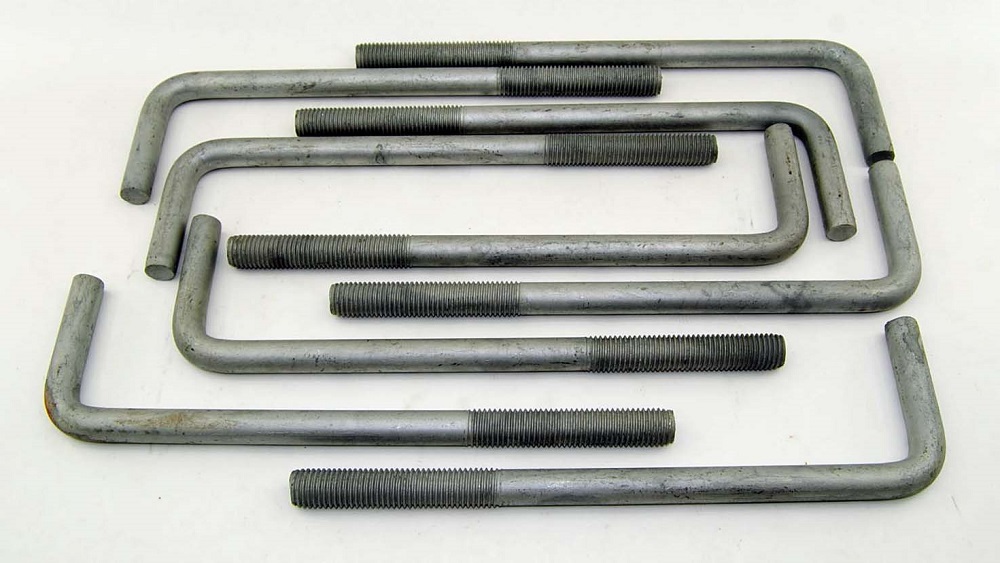
Reposition your layout lines then – one at a time – fill the tubes with concrete (mixed according to the manufacturer’s instruction) and insert an 8 inch or longer, 1/2” right angle or “J” anchor bolt into the top of the footers, leaving a couple inches of the threaded end exposed. With the post position markings on your strings as reference, use a plum bob to precisely locate the anchor bolts.
Once the concrete has set, you can pull and discard the batter boards and strings. Congratulations, you’ve completed the most strenuous stage of the build! You might want to rest your back for a bit; we’ve got a long way to go.
bLOG Posts
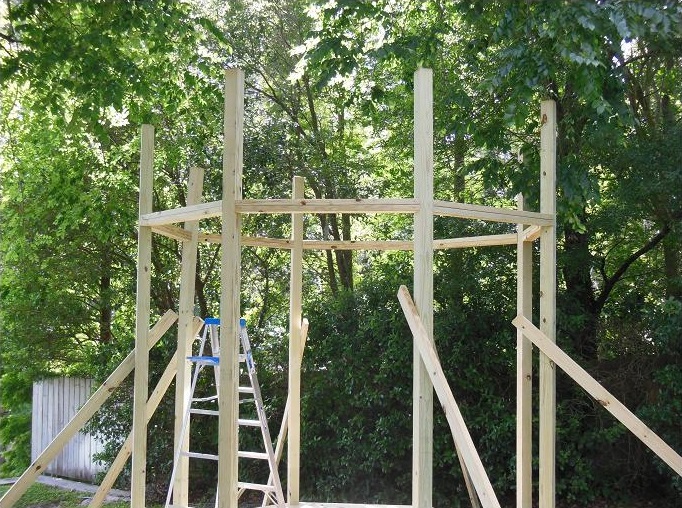
The 8 corner posts are what transfer all the weight – and there will be an enormous amount of weight – to the footers. The corner posts begin as 12-foot long 4×4’s. Begin by fastening post brackets to the anchor bolts in the concrete footers. Make sure the brackets are oriented so that sides of opposing corner posts will be parallel to each other. Use a long straight edge to align them properly.

Photo: HomeDepot.com
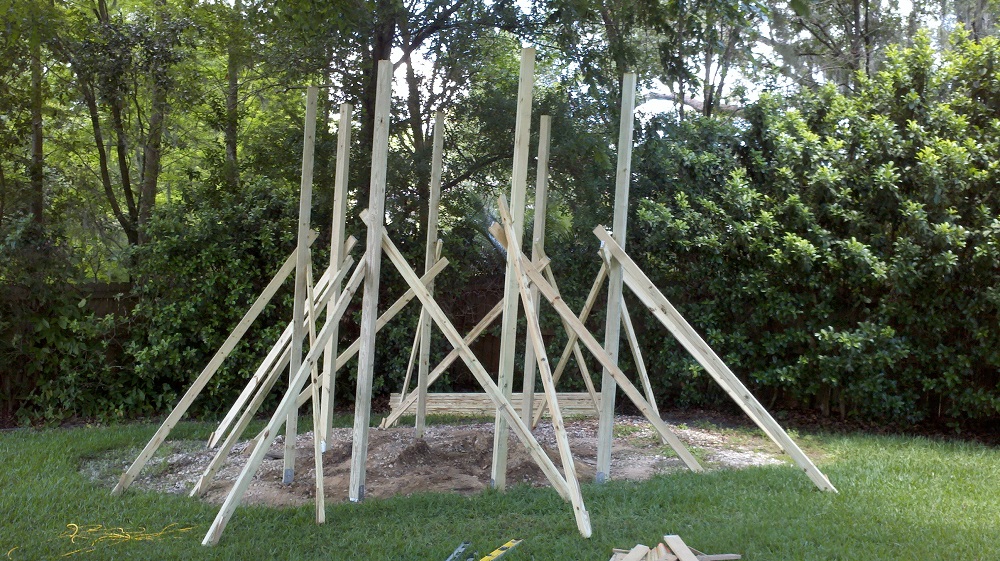
Next, have an assistant help you stand a corner post onto the first bracket. Attach temporary bracing to hold the post upright and use a corner level to make sure it’s perfectly vertical. Secure the post to the bracket with 16d nails through every nail hole. Finally, anchor your bracing to stakes in the ground.
Work your way around until you’ve mounted all 8 posts. For safety, leave the bracing in place until you install the head rails.
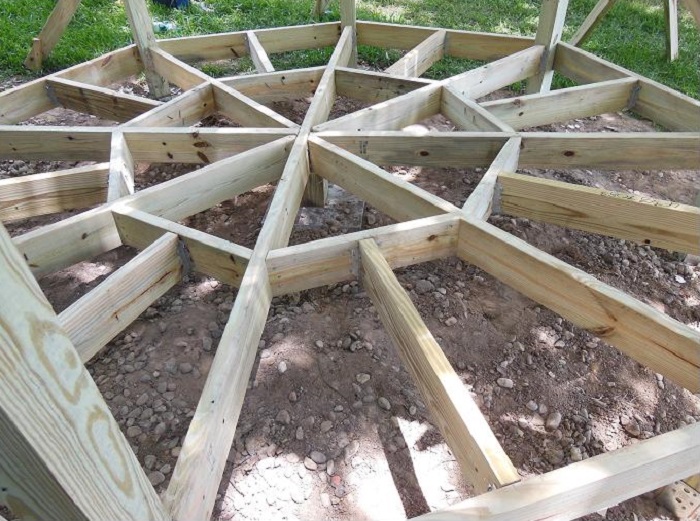
The Wood Wide Web

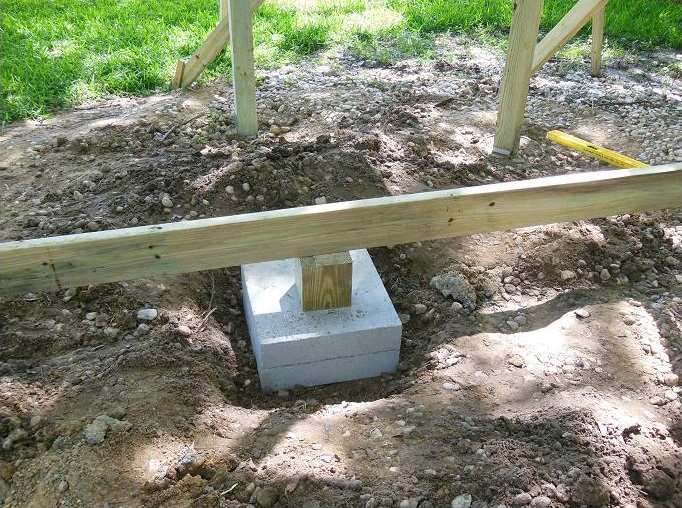
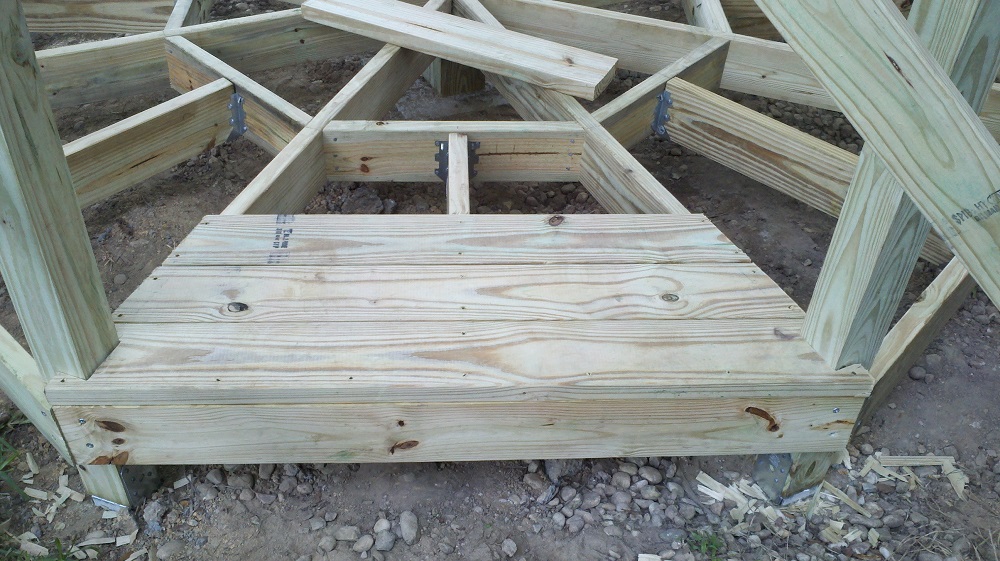
The joists are 2×6’s secured with joist hangers and 10d nails. They should start about 8-10 inches above the highest footer. The main joist stretches from one corner post to the one directly opposite from it. The middle is supported by a pair of preformed 16”x16”x4” concrete pads purchased at the local home center. Between the concrete pads and the joist is a section of pressure treated 6×6, as shown. Be sure the support blocks and all joists are level.
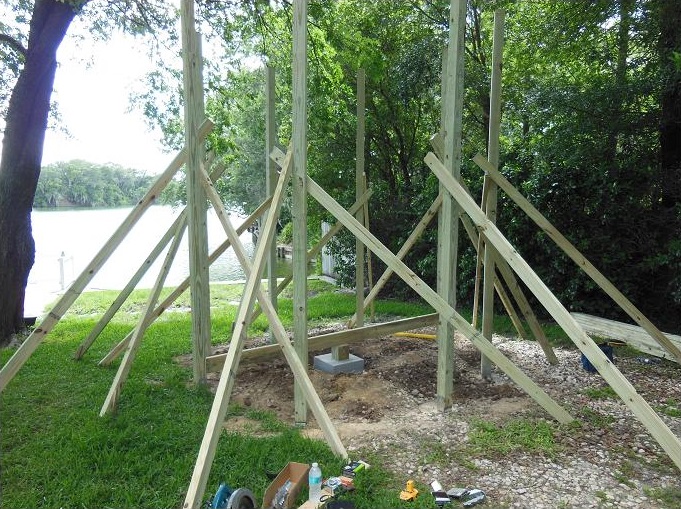
The next two joists run perpendicular to the main, forming a big “+” sign. Use hangers to suspend them from the corner posts and toe nail them to the center of the main joist, allowing them to contact the center post. No hangers are used at the center post.
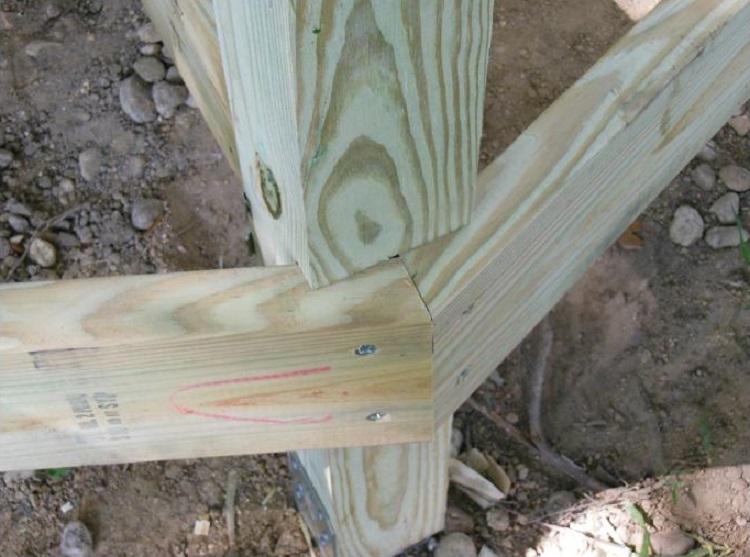
Next, install the last four spanning joists. These are also hung from the corner posts but, since they meet the center at the 90° inside corners formed by the other joists, you’ll have to trim the one end with a pair of 45° tapering cuts for a nice, snug fit. Don’t shape it to a point, just cut the corners off enough to fit.
Chillin’ At 22.5°!

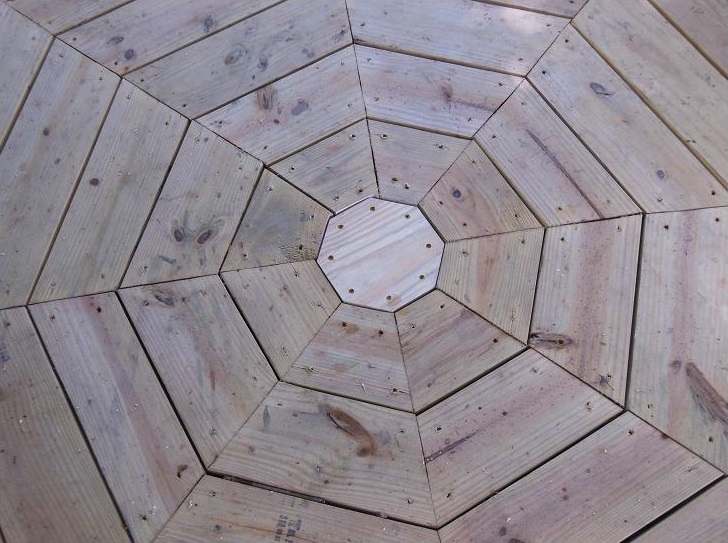
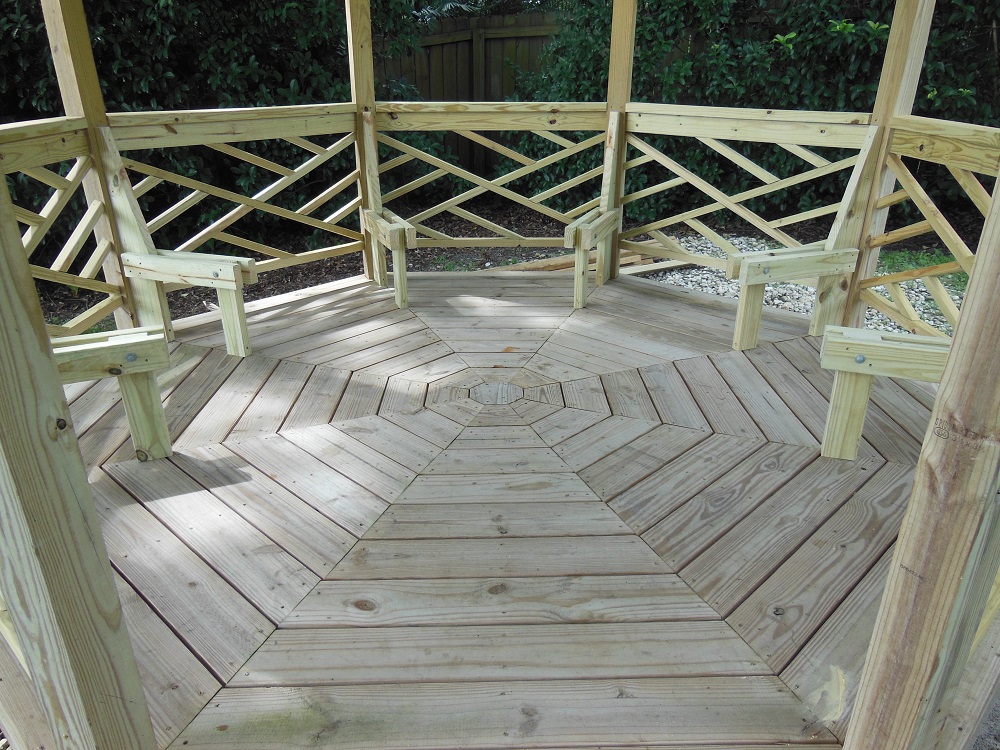
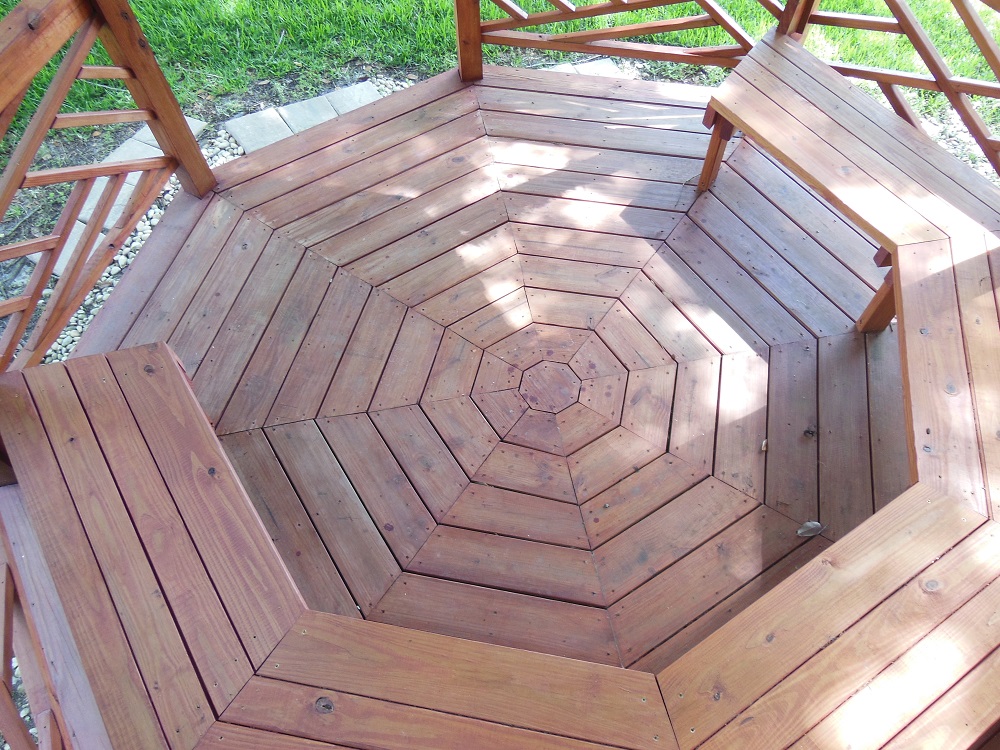
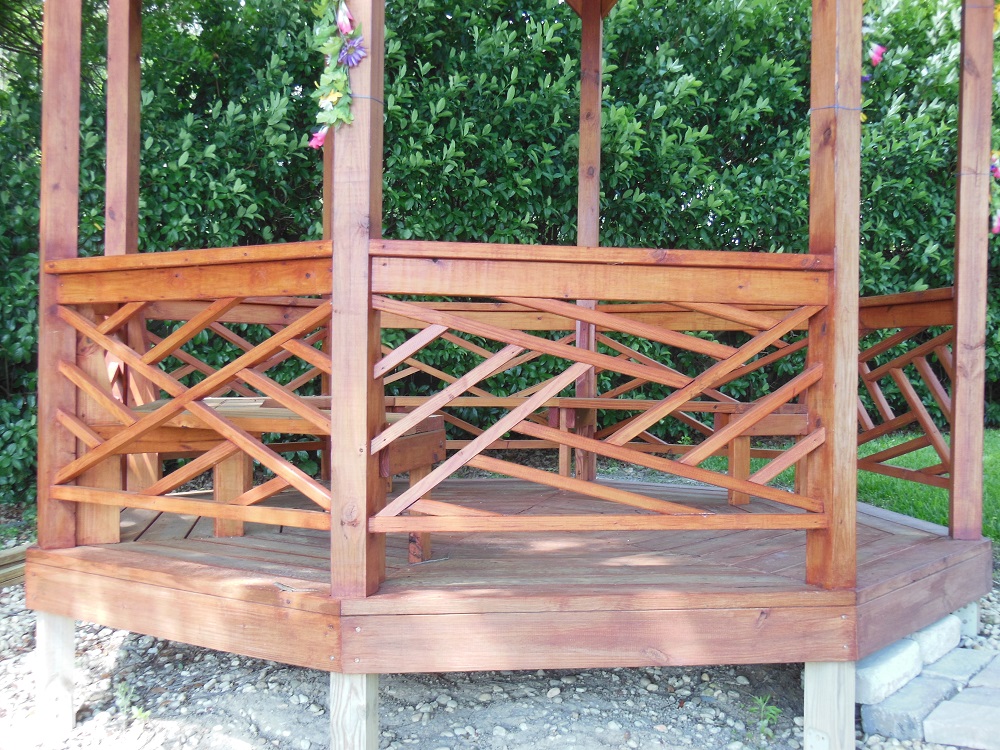
The 8 gaps between the joists should now be bridged with segments having opposing 22.5° angles (with respect to the end grain). You might as well get comfortable with this angle; it’s going to be around for awhile! These segments are approx. 25” long and are screwed in place, creating an octagonal ring.
Rim Around the Collar
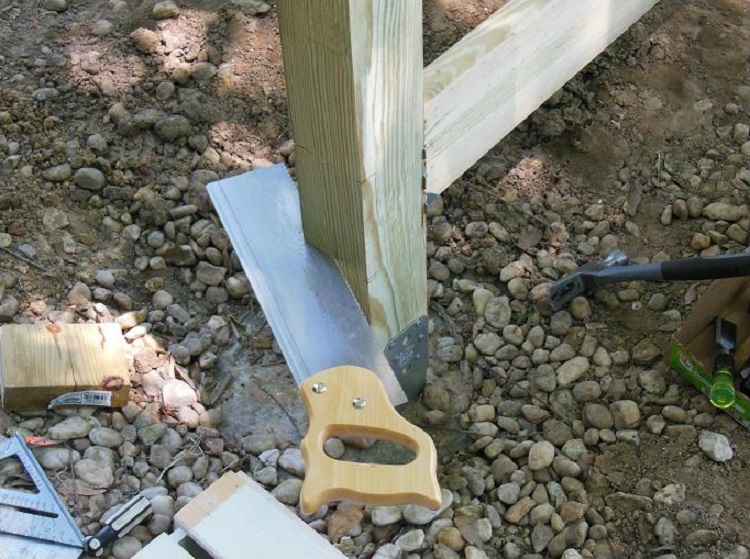
The 8 pieces that create the rim of the deck are also cut with opposing 22.5° angles. They’ll sit in a pair of notches we’re about to cut into the outside of the corner posts and are located at the same height as the joists. A hand saw is used to cut the grain at the top and bottom of the notches. Then a little mallet and chisel work removes the wood, creating flat facets. These facets are at, you guessed: 22.5° to the face of the post.
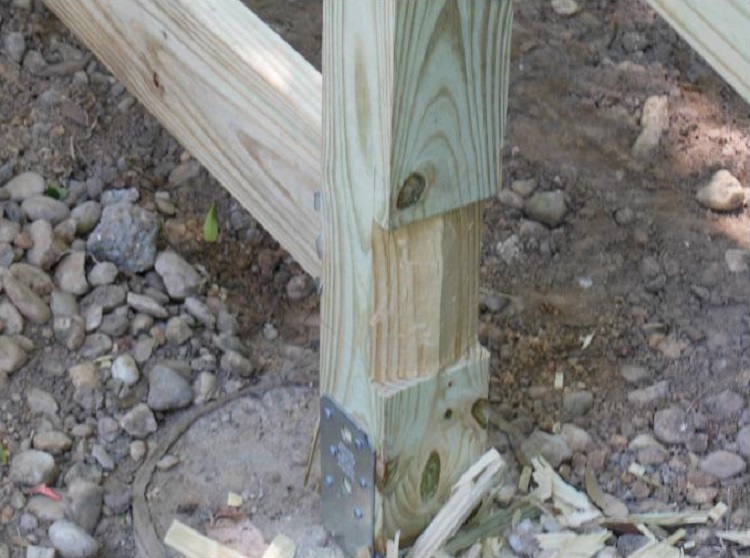
Cut the rim pieces to fit then screw them into the notches using 3-1/2” self drilling exterior grade deck screws. I used Spax screws. They’re a little expensive but very much worth it.
Finally, install intermediate joists between the outer rim and inner octagon. Use joist hangers on both ends.
All Hands On Deck
Begin installing the deck boards from the outer edge and work inward, towards the center. Notice that the outermost boards must be notched to fit around the corner posts. I’ll admit, it’s a little tricky. But with a couple of adjustable T-bevels and a little patience you can achieve great results. I somehow managed to cut near perfect notches the first time every time; I swear! I’m just as amazed as you!
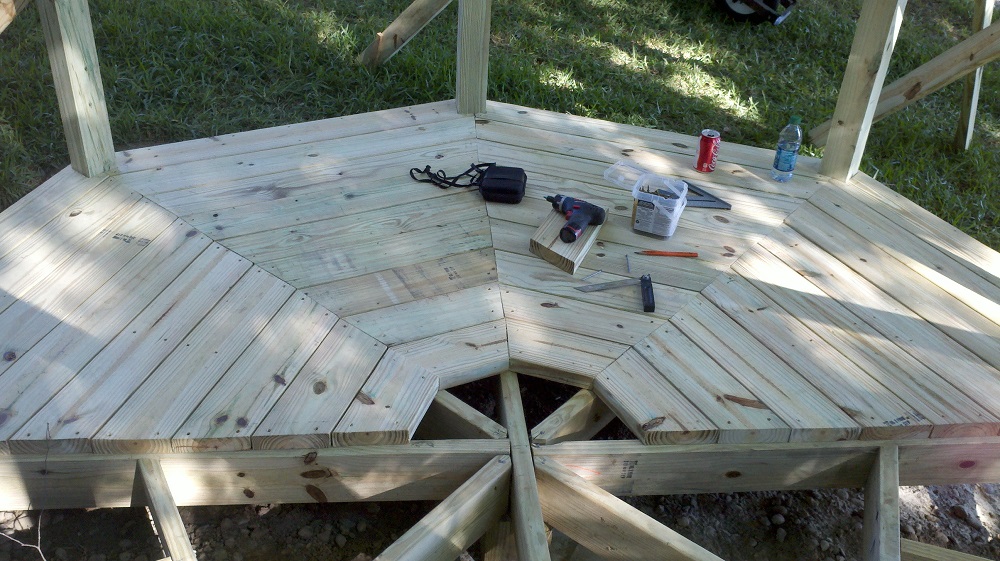
Span across the intermediate joists (the ones running from rim to the inside octagonal ring). The seams between adjacent deck boards are centered along the longest joists. Odds are, you won’t have any two deck boards requiring the exact same length or angles. So, as with the rest of this project, cut the pieces to fit. Avoid the temptation to cut a bunch of parts in advance; it’s a waste of time and materials. Trust me: I know.
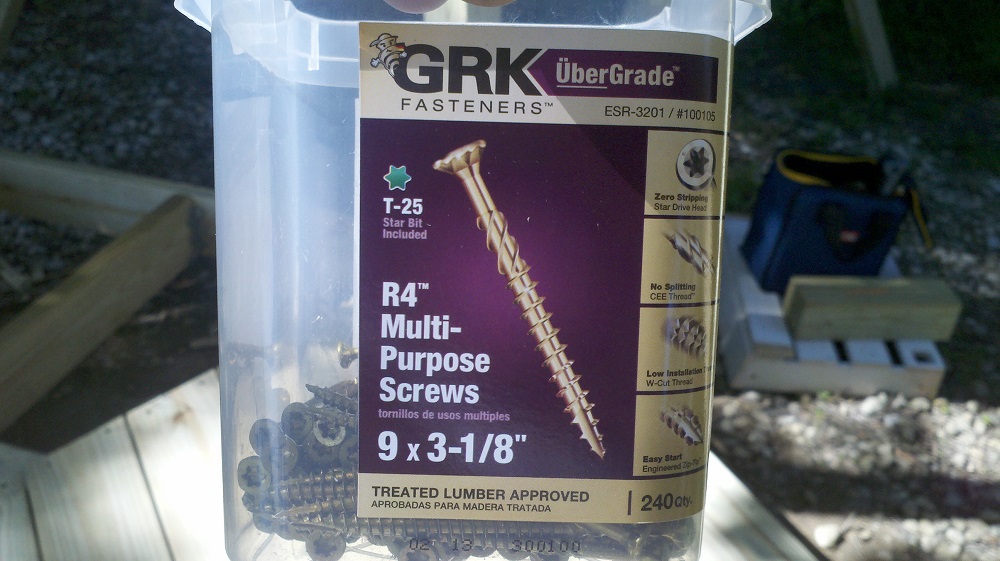
To allow drainage of rainwater, leave a gap between the long edges of the boards. This is best practice with any deck project. 16d nails are the right thickness to gauge the spacing. The ends of the boards, however, butt directly against each other with no gaps. I used GRX screws for all of the deck boards. Make sure to fasten the boards wherever there are joists (not only at the ends of the boards) and space the screws 6-7 inches apart. You’ll go through a lot of screws but the result will be an extremely rigid deck with very high resistance to warping over time.

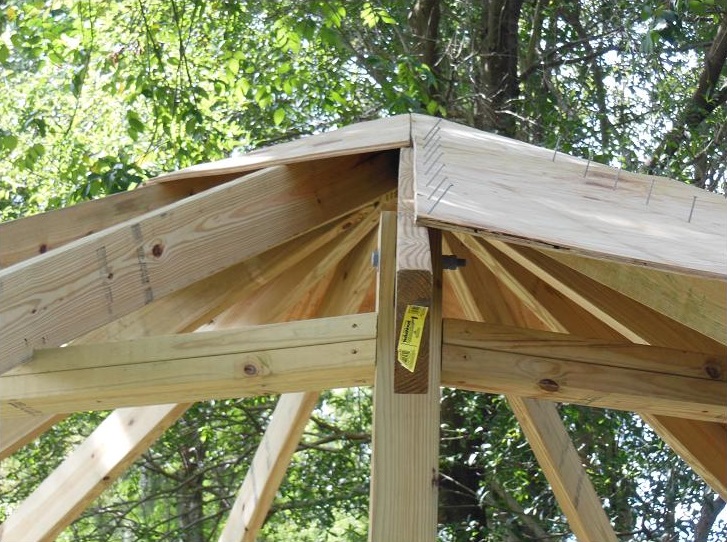
Head Rails
And now, the head rails: these span adjacent corner posts and really help stiffen everything up for the gazebo. They will also provide support and attachment points for the intermediate rafters to come later. The head rails are made by stacking and nailing – or screwing – together a pair of 2×4’s with the wide faces together. The ends are cut at the now-familiar 22.5°, with respect to the end grain (67.5° as measured from the outside edge).
Mark the corner posts 96” up from the surface of the deck. Align the bottom of the rails with the mark and toe screw them to the corner posts. I used 4 screws per end to ensure a hefty connection.
Just A Little Off The Top

Now that the head rails are securely in place, you can go ahead and remove all of the post bracing. They did their job of reducing the chance of disastrous mishaps; but now they’re just in the way. Next, cut off the 8 corner posts 6” above the tops of the head rails. Since my gazebo is built on a moderate hill, the length I trimmed off is actually different for each post. That’s why you want to start with corner posts that are too long. If I would have used 10′ posts, several of them would be too short. And I might not even realize it until this very moment, leading to a very bad day. Foul language would become my native tongue faster than you can say “f**k this b*llsh!t”. I may be a stutterer but I can curse like the most fluent of sailors, matey!
A Top Notch Notch on Top.
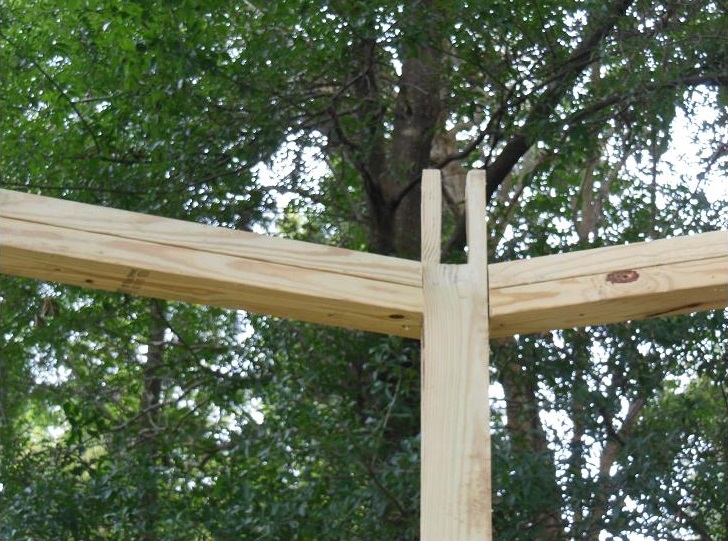
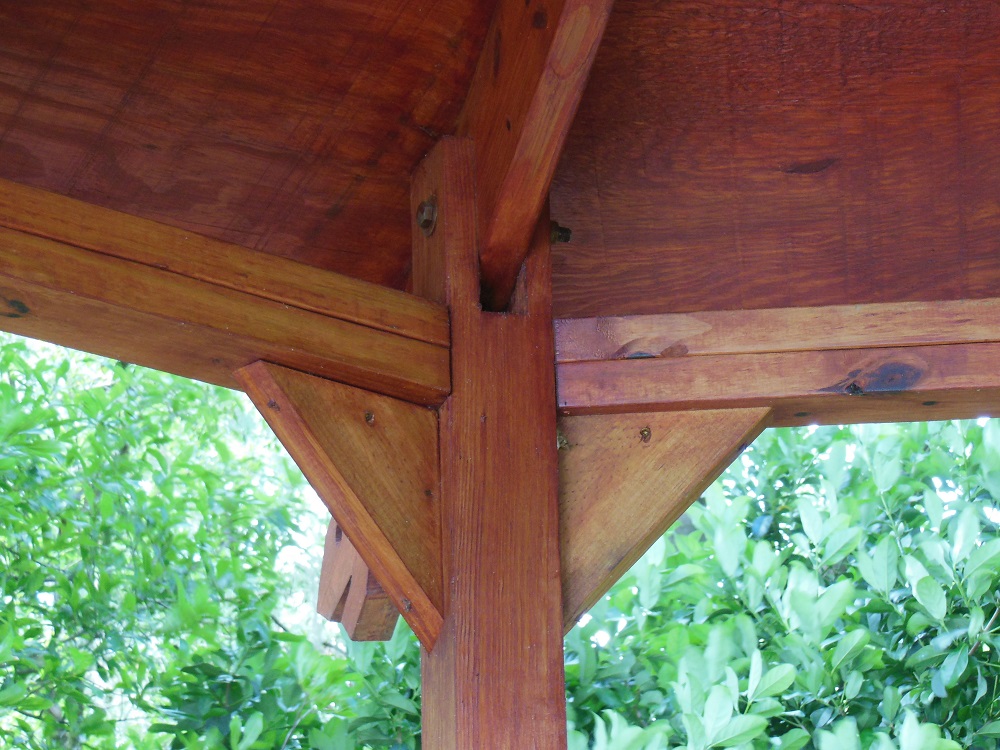
Cut a 6” long, 1-1/2” wide notch at the top of each post. This divides the 3-1/2” overall width of the “4×4” into thirds. The main roof rafters will be bolted into these notches.
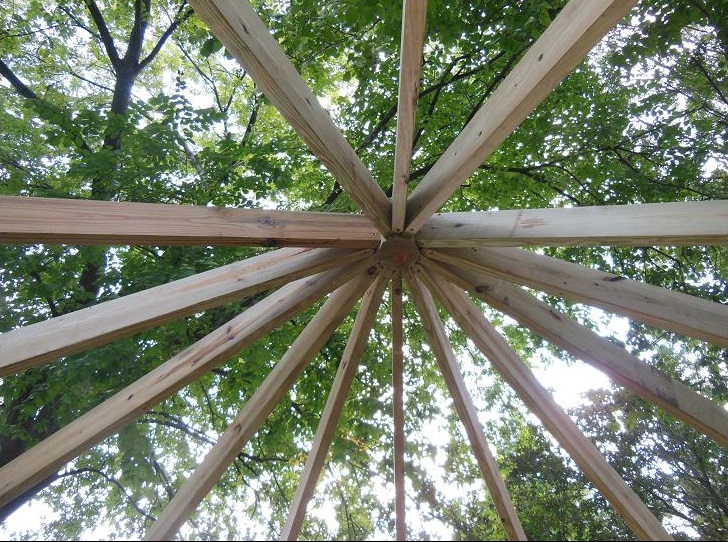
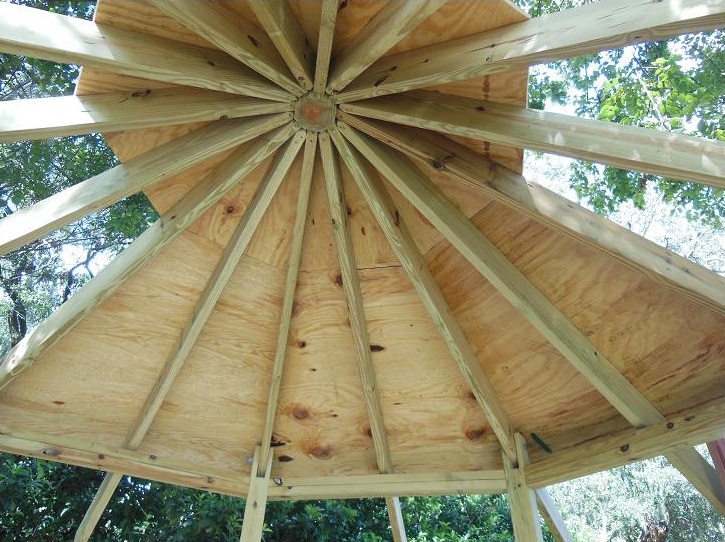
Swing Like a King (From The Rafters)

The rafter structure consists of 8 main rafters and 8 intermediate rafters, all of which radiate outward from a central kingpost. Go ahead and cut all 8 main rafters from 2x6s. Cut them 80” long with a 65° angle (with respect to one edge) on one end.
Next, we need a kingpost, the component that creates the central hub of the rafters. All 16 rafters get screwed to the king post. As the weight of the rafters and roof is added, the kingpost junction compresses even tighter, like the keystone at the peak of an arch.
Cut the octagonal kingpost from a section of 6×6. To determine its length, measure the length of the angled end of one of the rafters and add 2 inches. I believe that measurement was around 8-10”. After cutting to length, lay out an octagon on one end of the 6×6. Make the octagonal shape by cutting off the 4 corners. I find a table saw with the blade tilted to 45° to be the safest, most accurate tool for the job.
Gazebo Rafters: Some Assembly Required
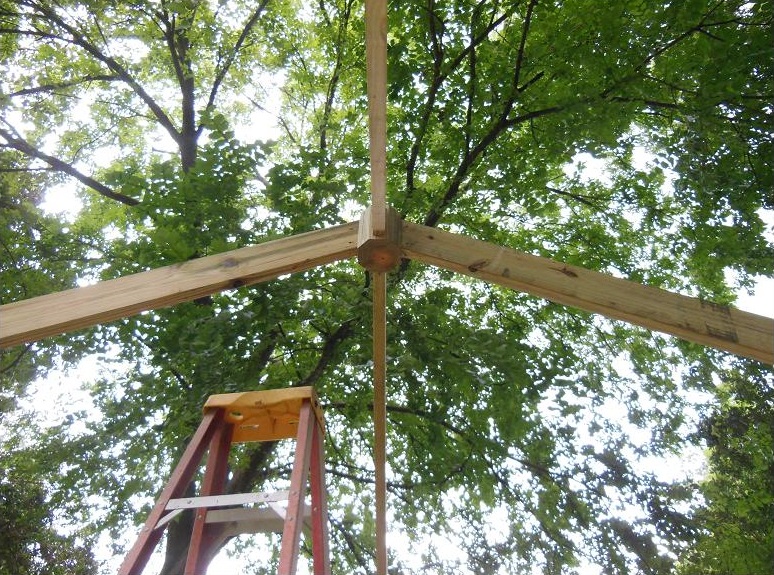
Rafter assembly begins on the ground. Firmly screw the first two rafters to opposite sides of the kingpost to form a really wide “V”. The rafters should be centered on the faces of the kingpost, leaving an inch above and below and equal space on each side.
It’s recommended that you get help with this next step. If you’re really careful (like I was) you can do it yourself. Constructing the rafters and roof can be cumbersome and dangerous; so be careful. Hoist one end of the rafter assembly up and into the notch on one of the corner posts. Standing on an A-frame ladder, carefully raise the other end up and into the notch in the opposing corner post. Center the assembly the best you can. A plumb bob (or a nut tied to the end of a string) can be hung from the underside of the kingpost to aide alignment.
Once the assembly is centered, temporarily secure one end with clamps so that it cannot shift. Drill a hole all the way through the corner post and rafter to accept a 1/2” bolt. Use 5” long galvanized hex head bolts: Put a washer onto the bolt, install the bolt through the hole, slip on another washer then a nut. Tighten the nut very firmly. Finally, install a second nut and tighten it up against the first one. This second nut – the “jam nut” – will help prevent the hardware from ever loosening on its own.
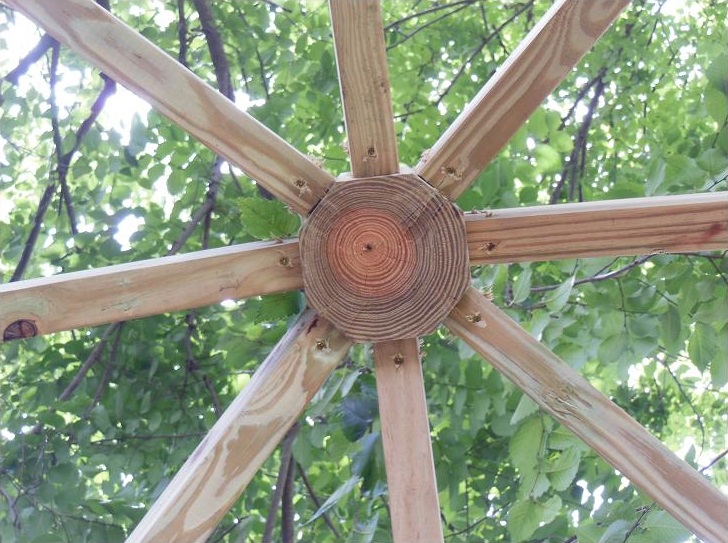
Repeat the drilling and hardware process on the other rafter then proceed to install the other 6 main rafters. Toe screw each rafter to the kingpost using 4 screws (top, bottom and both sides). I used the same screws as I did for the decking.
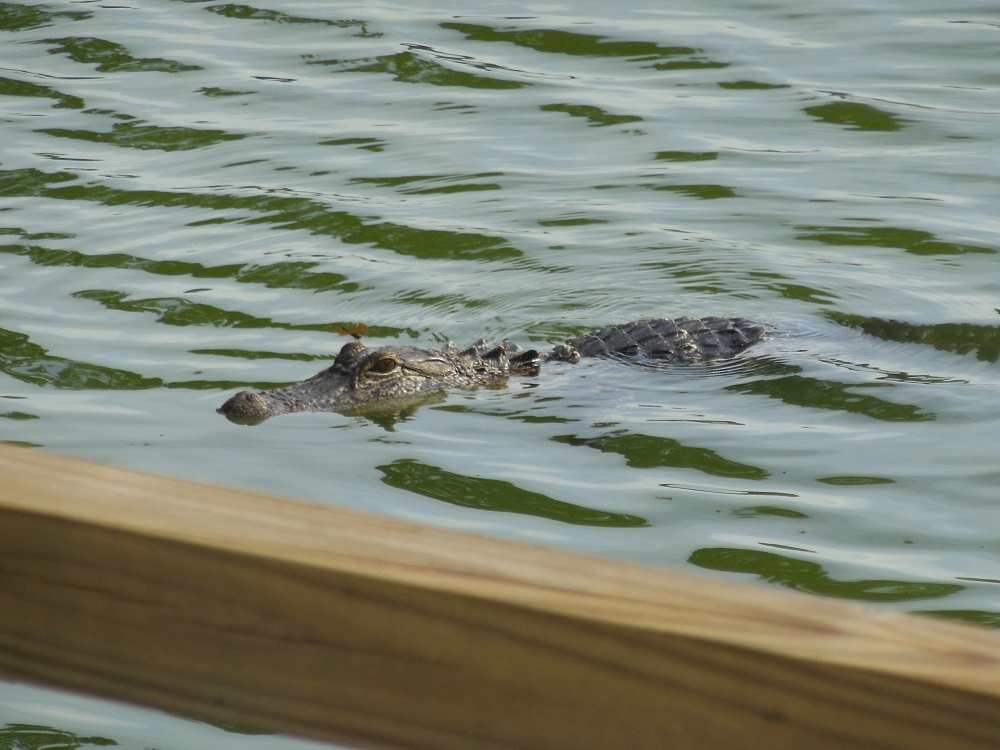
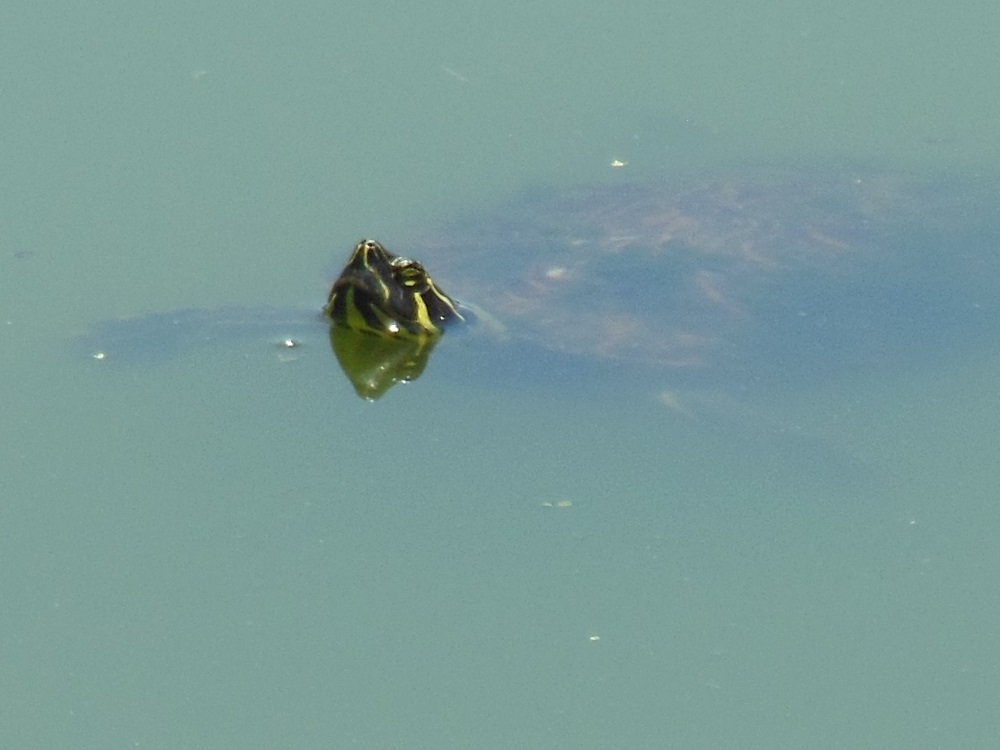
You’ve been working really hard on this project! Why don’t you take a little break and check out some of the critters in the yard. These wildlife pictures (and hundreds more) were taken in the yard during my gazebo build. Enjoy the sights of nature as I did. But don’t linger too long; the gators are watching your every move.


Alright, break’s over! Time to get back to it. Gazebos don’t build themselves, you know. And you’re definitely not being paid by the hour.
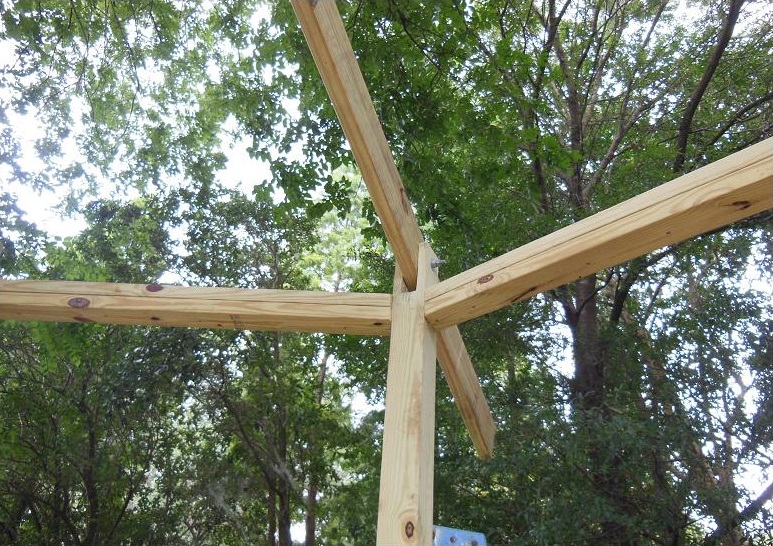
Intermediate Rafters
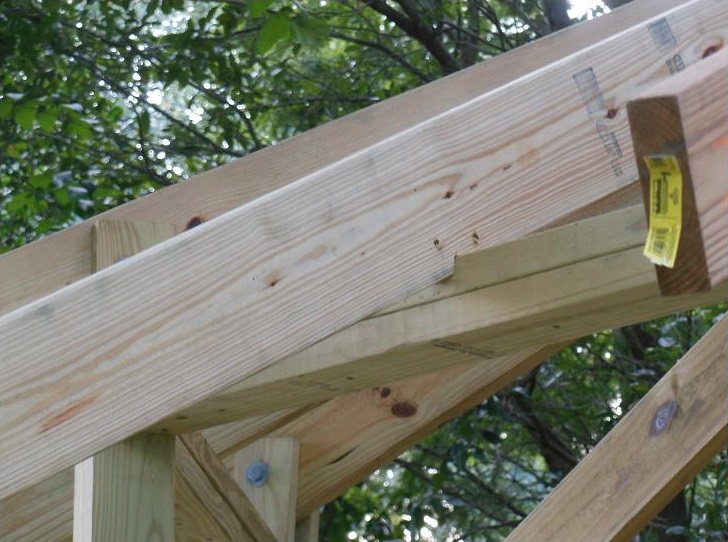
The intermediate rafters start off about 70” long. One end gets the same 65 degree angle as the main rafters. The angled end also needs to have the corners chopped off the same way we did with the spanning joists. Again, don’t shape the end to a point, just knock the corners off enough to fit between the main rafters and as close to the kingpost as possible.
The intermediate rafters should be fastened to the kingpost with two screws: one from the top and one from underneath. The other ends should be centered on the head rails. Notch the intermediate rafters where they meet the head rails to provide a more stable contact surface. Toe screw the notched areas to the head rails.
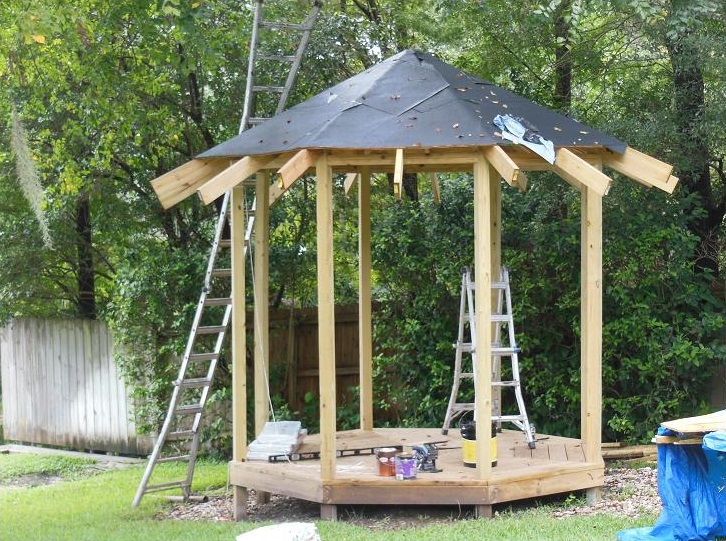
A Roof, A Roof, A Roof We Desire.
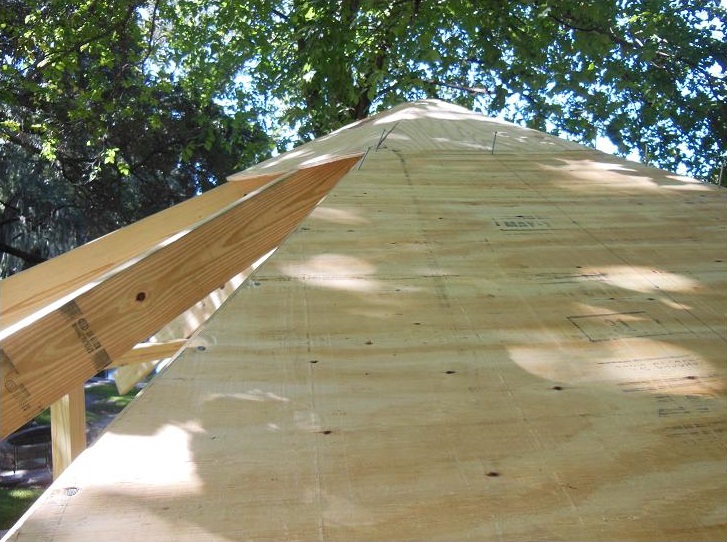
The roof consists of 16 separate ½” CDX plywood panels. Each side of the roof receives one small and one large panel.
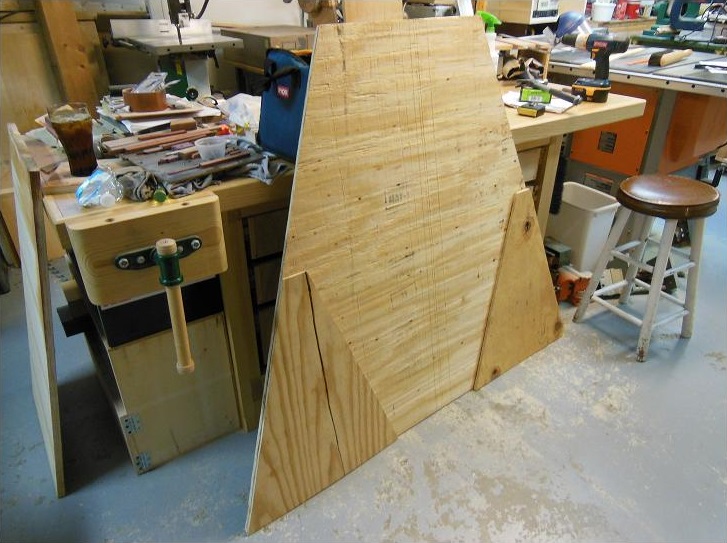
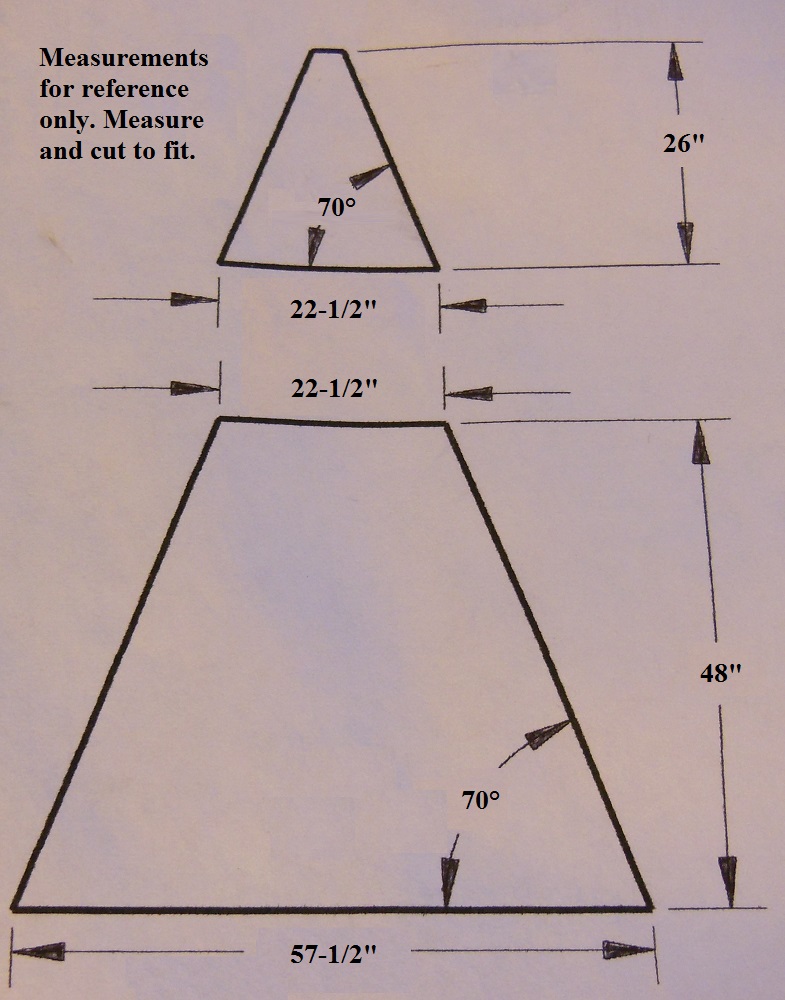
The given measurements are for reference only. You’ll have to measure and cut to fit. Fasten the roof panels to the rafters with galvanized 8d nails. First install the small panels with the flat “point” up against the kingpost. Then move on to the larger panels.
Wrapping Up The Gazebo Roof
When I was sheathing the high, peaked roof I realized that I’m too chicken to walk around on it. So I’d never be able to shingle up to the top. I wasn’t worried about the strength of it; the rafter structure is remarkably strong. It’s just that the thought of sliding off – then landing – didn’t much appeal to me. So my wife and I had a professional come in and finish up the roof job.
Their work began by applying roofing felt, starting low and working up towards the peak. The guy who completed the roof work for me had no problems stepping off the ladder onto the roof and walking around like it was nothing. More power to him!
He then trimmed all of the intermediate rafters just short of the edge of the plywood and installed aluminum drip edges using a black tar-based roofing adhesive/sealer.
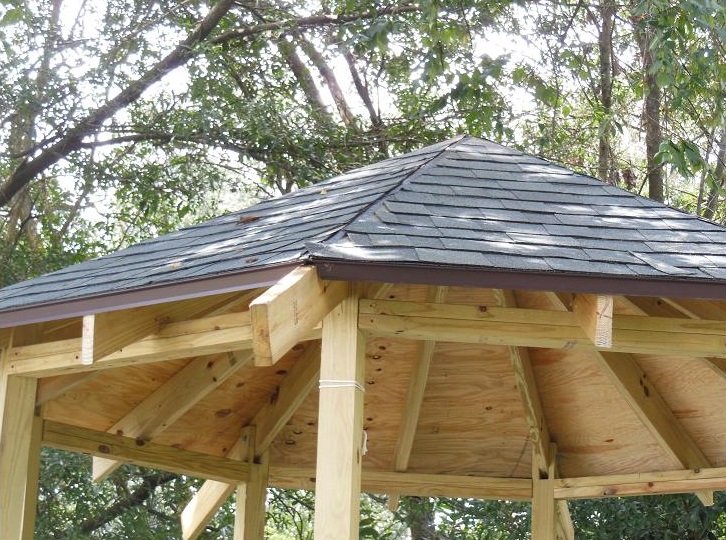
Architectural shingles were installed next. As with the felt, installation begins at the lowest part and progresses up towards the peak. They wrapped up the roofing by shingling the 8 rafter peaks and capping the whole thing off with a metal cone.

Gazebo Gargoyles
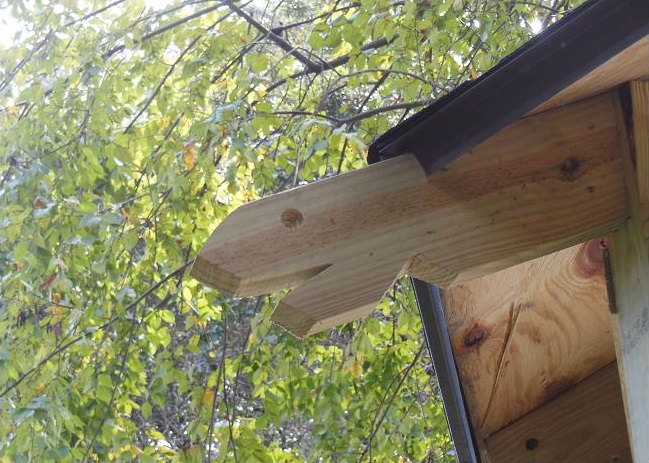
I specifically requested that the roofer guy not trim the main rafters. Ever since this project began I wanted to put “gargoyles” on the gazebo for a nice touch of uniqueness. Like me, you’ve probably never before seen a gazebo with gargoyles. Now we have! Aren’t we lucky?

My gargoyles (inspired by some I once saw in pictures of an old house) began as a template cut out of a 1×6 pine board. Trace your template onto the rafters and use a 1” spade drill bit to bore out the eyes and the inside curve of the neck. The rest consists of straight lines and can be cut with a reciprocating saw.
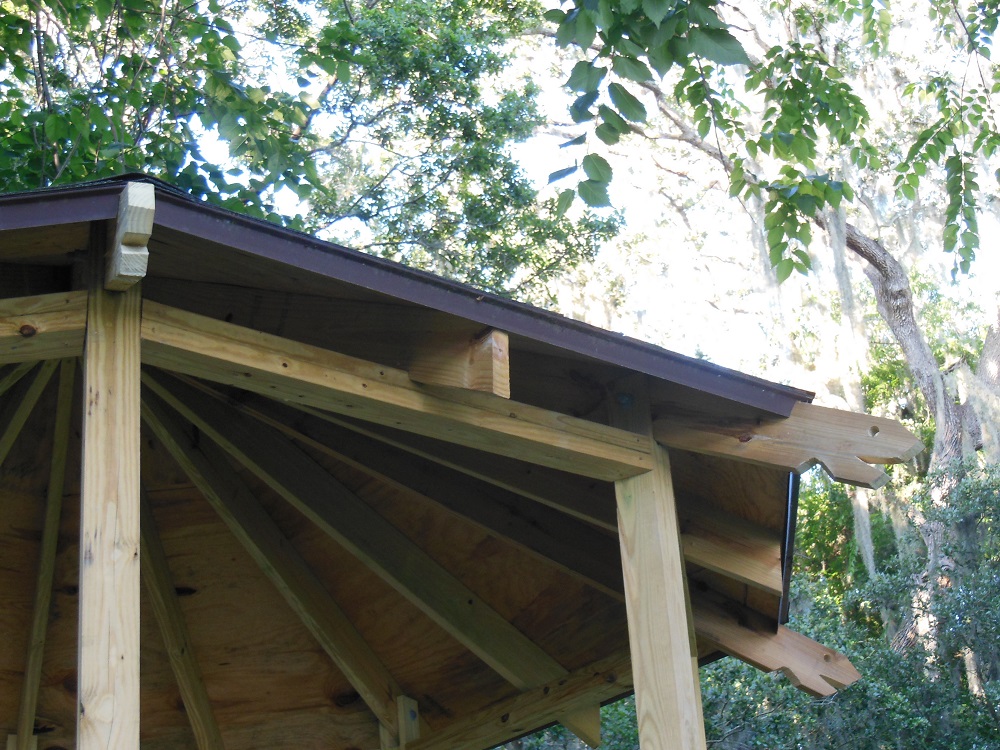
Brace Yourself

To lend even more rigidity – as well as cosmetic appeal – to the structure, gussets are added where the head rails meet the corner posts. The gussets are triangular pieces cut from 2×6’s. The edges that go up against the head rails are cut off squarely. But the edges that meet the corner posts are beveled at 22.5° (with respect to the face). The cuts are both 45° to the factory edge.

Getting Railed

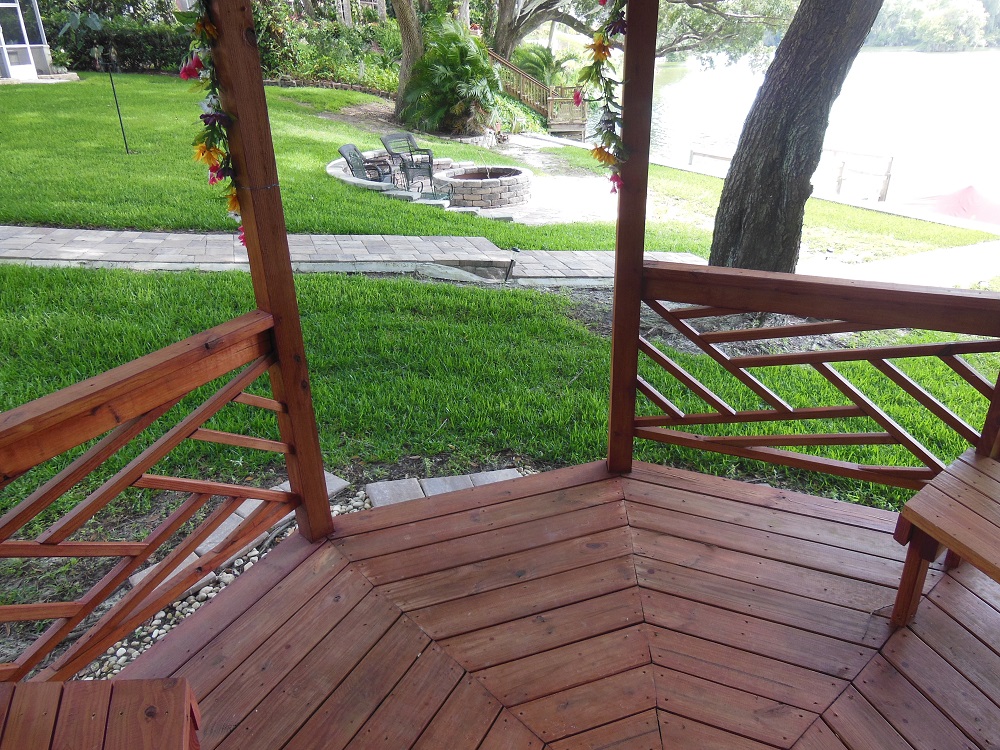
The handrails are constructed from 2×4’s. The top ledge is installed horizontally at a height of 36”. Directly underneath that sits a support piece that’s stood on edge. The pieces are screwed together and all ends are cut to fit at approx. 22.5°. The handrails span all sides except the entrance.
Gazebo Lattice
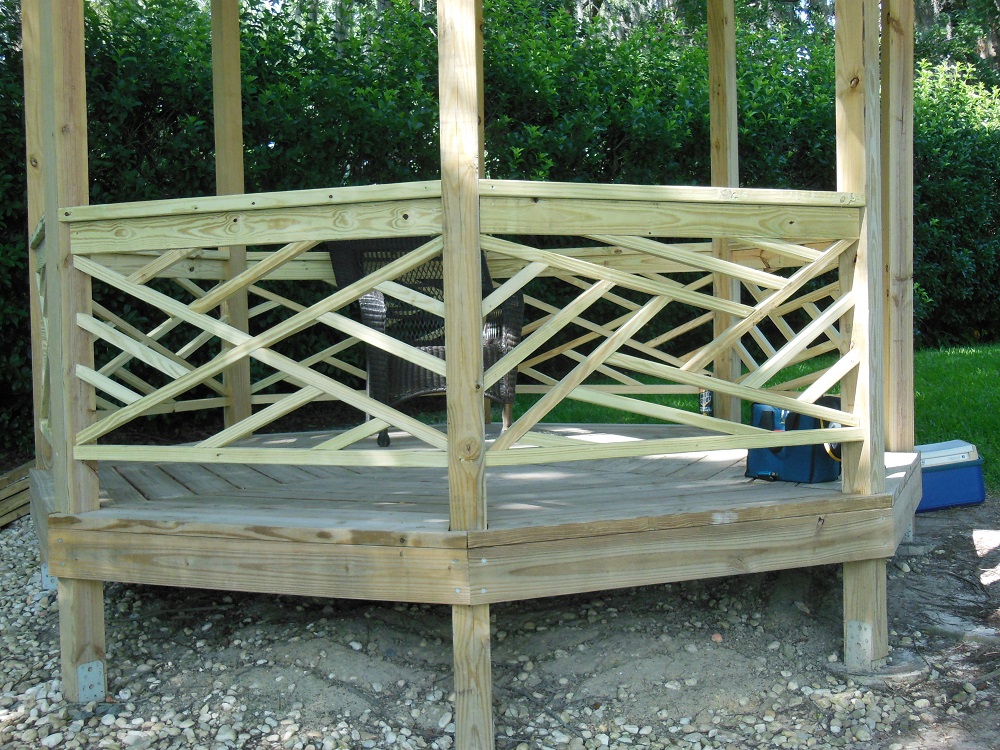
To really give the gazebo a polished look, I made fancy lattice from 2×2’s. The specific patterns are my own layout but are inspired by patterns I found in various image searches. I used 2 different patterns. One pattern – kind of a camera iris looking design – is used only on the two sides that flank the entrance. The second pattern is more of a pinwheel and is used on the other 5 sides.

The components of my latticework involve a lot of finicky single angles, compound angles and some tricky layout and are beyond the scope of this article. Many people choose to purchase pre-made lattice from the local home and garden center but, I wasn’t willing to settle for store bought. Your mileage may vary.
In Stain in The Membrane
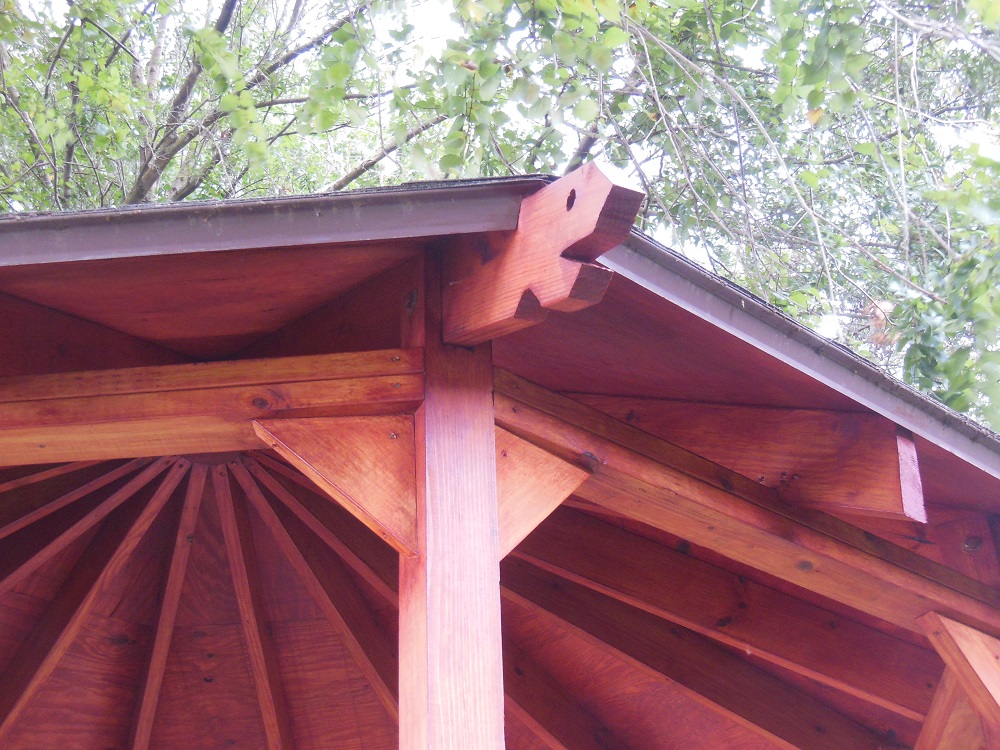
I finished my gazebo with 2 coats of Behr brand “redwood” deck stain.
Take a Load Off – How To Make Seating for your Gazebo

There are many options for seating. I made built-in seating along 5 sides. A detailed description of how I built the benches is beyond the scope of this article. However, I’ve included several photos to give an idea of how they came together. If you’ve made it this far, I’m confident you will find the seating quite manageable.
Congratulations! You built your own gazebo, which you will be able to enjoy for many, many years! It was a lot of work but I think you’ll agree that it was worth the effort.
Thanks Steve. I’m an amateur but I did build my octagon gazebo and my wife wanted our metal hexagon (deck, her words) on it for starters. I told her that a year later it’s time for phase 2 of the deck. I’ve been researching and your post is the best description I need to help me with mine. I am going through it on paper (for delivery purposes and make sure I’m not biting off more than I could chew) and I’ve come to the conclusion I should have done it in 1 setting (I blame you because I didn’t see your post last year) and it’s going to be harder than the base was. Your ideas have cleared up some of my questions. And if you think I’m good enough for notches you have more faith than I do. Wish me luck. My wife asked about the life insurance policy. Should I be concerned? ?
This is amazing. I have a habit of finding projects that I love the look of and then dropping hints/demanding loudly to my handyman partner to create for me. He acts like it’s a massive hassle and chore, but there’s no doubt that he loves it! Because of this I’ve now got myself a 60-piece spice rack, a buffet with wine rack, a massive deck and undercover area, a portable potbelly, a deluxe doghouse… and soon I’ll be able to add a gazebo!!!!!
This is an awesome project. My wife has been after me for years to build one of these (minus the gators). Please don’t show it to her! Of course this months give away of a RIDGID R86036K 18V Stealth Force Pulse Driver Kit would make it easier for a woodworker with rotator cuff repaired shoulder. 🙂
Very nice project Steve. Great write-up…can’t say I’ll be building my own soon…my view is less gator, more neighbors sheds, but it was a great read nonetheless. It turned out beautifully! My only thought was maybe 1×4 pine tongue and groove roof sheathing, but the stain does a good job of making the underside of the plywood disappear anyway. Nice project!
Thanks for the comment, Matt. The stain actually made the underside of the roof look fairly nice. I do like the thought of tongue and groove though. I bet that would have looked really cool.