

Doing your own stucco work. It sounds easy enough. Just mix some mud into a wheelbarrow and slather it all over the side of your house right? It’s not as easy as it looks, and it might be a job best avoided for those who aren’t so comfortable wielding a trowel (99.9% of us?) Take a look at my DIY stucco job and see for yourself how tough it can be if you’re a newbie to stuccoing. Then you decide, is this DIY inspiration or a cautionary tale?
I don’t know what it is. It’s like these hot jobs seem to find me every spring or summer. I try to avoid them, but it never fails. I’ve got to do some work on someone’s house in the hottest part of their yard in the middle of a Florida heat wave. Not that I’m complaining about the work, but why does the sun have to be so damn hot here?
My friend’s mother had trouble years ago with a shady contractor who turned an old porch into a room, mostly. He left long before he finished the exterior side of the room. The wall that was to be stucco never materialized and all she was left with was a bare wall with a bit of lathe. For some reason after several years of neglect, she decided that it needed to be repaired – in the middle of a heat wave.
Stucco Tools
One thing I do have is a few key stucco tools. I had my trusty wheelbarrow, my lovely stucco trowel and plenty of accessories for stucco like a margin trowel and horse hair brush.
It also doesn’t hurt to have a long hose with a spray nozzle that doesn’t leak. This way, you can spray the wall, your tools, spills, etc. without having to turn the water on and off at the spigot all of the time. You need a good flat head shovel too. I used it for mixing the mud, and they can be handy for digging away the dirt from the exterior walls.
For the painting part, I used a bunch of stuff. A few clean five gallon buckets, assorted rags and sponges, a five gallon bucket roller strainer and a roller with a super long handle. Don’t forget the caulk gun!
Stucco Materials
It was easy enough to buy the stuff I needed at Lowe’s. In fact it was right by the contractor checkout so it didn’t take me long to get what I needed. The first thing I picked up on my trolley was an 80 pound bag of scratch coat stucco mix. The next ingredient I heaved onto the big blue trolley was an 80 pound bag of brown coat stucco mix. This was for my base coat or a “brown coat” as it’s known in the field. I got another 80 pound bag of finish stucco mix. I bought this one with a white tint so you could more easily see the texture in the photos. In other words, you don’t need to buy tinted finish stucco, just the regular stuff will do just fine if you plan to paint. Alternatively, many pros do a color coat of stucco rather than painting. Color coats can be ordered in a wide range of colors, although matching an existing house color can be a bit tricky. On this small job, painting the wall to match the adjacent wall made the most sense.
Since I was in charge of painting, I also bought a few heavy nap roller covers, a brush and a five gallon bucket of white exterior paint. I got two tubes of caulk as well to fill in any voids or cracks before I got to painting.
The Scratch Coat
Mixing the mud to the right consistency can be the toughest part. If it’s too wet, the mud will slip right off of the end of your trowel. If it’s too stiff, it won’t spread out on the wall and creates a poor pattern. When mixing stucco mud for the first time, it’s a wise idea to mix it in small amounts until you get the consistency right.
For the first coat, you need to create what’s called a scratch coat. It seems easy enough but it has to be nice and level on the wall. As you spread it out as evenly as possible on the wall (this is the tricky part – well one of them anyways). You’ll need to come back as quick as possible to flatten it out with a screed. Fill in any voids and knock down any high spots with the screed (aka a slicker) for a perfectly smooth wall.
Note: This is incredibly challenging. It sounds easy on paper but when you try it for the first time, you’ll more than likely start chain smoking cigarettes (even if you’ve never smoked before) and sprouting some grey hairs, regardless of your age.
Once it’s level, you need to scratch horizontal lines in the wall. This ensures the finish coats bond well to one another. Wait overnight before moving to the next step.
The Brown Coat
 Wet down the wall with the hose and mix another batch of mud. This second layer of mud isn’t as forgiving as the scratch coat and needs to be really level and as smooth as possible, so get ready for some more stressful mudslinging.
A good tip for spreading the brown coat is to spread it on quickly but smoothly, then come back as fast as possible with the slicker before it has a chance to dry. Keep the scratch coat wet with the hose to keep the mud from drying out too fast. Having a helper can be really useful here.
Once you’ve got the brown coat down smooth and flat, you can let it rest overnight and try to get some sleep. Maybe you won’t have those stucco nightmares tonight because you’ll be too exhausted to dream.
The Finish Coat
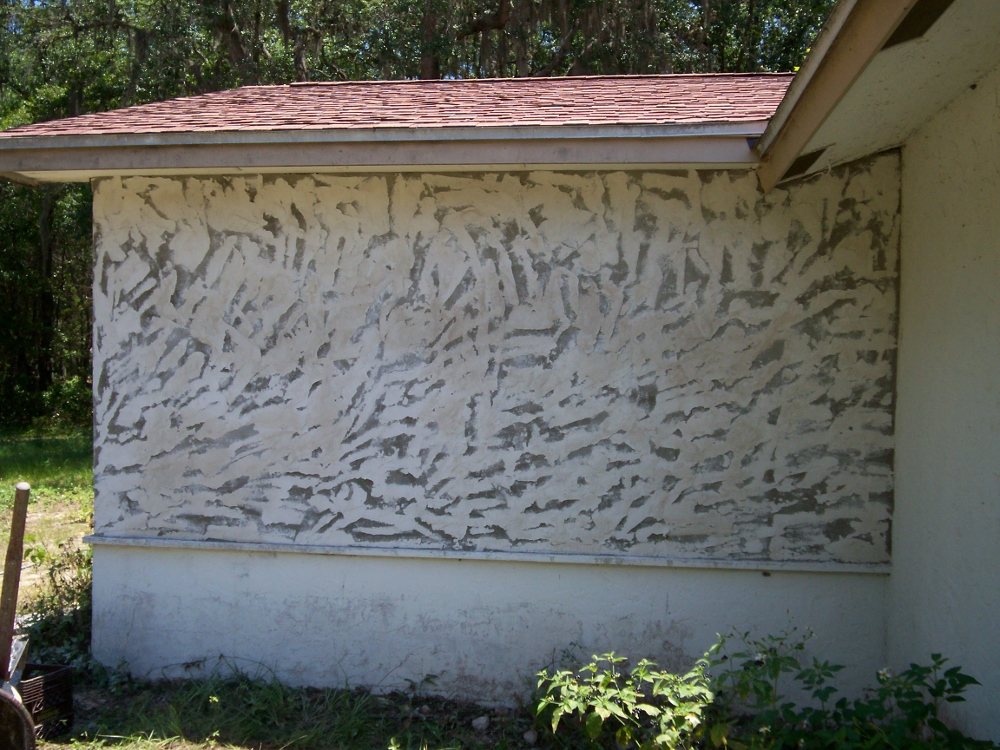
 The finish coat is all that’s left; hurrah! But matching the texture is like trying to copy a Da Vinci painting. If you’re lucky you can match the texture of the old wall well enough to disguise how bad you might be at first-time stucco finishing.
I made my mud extra wet and spread it thin to match the texture of the previous stucco crew. As you can see in the photos, it’s a kind of sideways looking texture – but it matched.
While not rocket science, stucco crews often have decades of collective experience slinging mud. There’s a lot more to a great stucco job than outlined in this brief overview of my small stucco project. For most folks, hiring an experienced stucco contractor is the natural (and wise) choice. However, if you have a small job like this one, some solid DIY skills, and some serious ambition, we hope this short overview provides a little inspiration and gets you started on some of the basic info you’ll need as you research the project more. Good luck and happy stuccoing!