

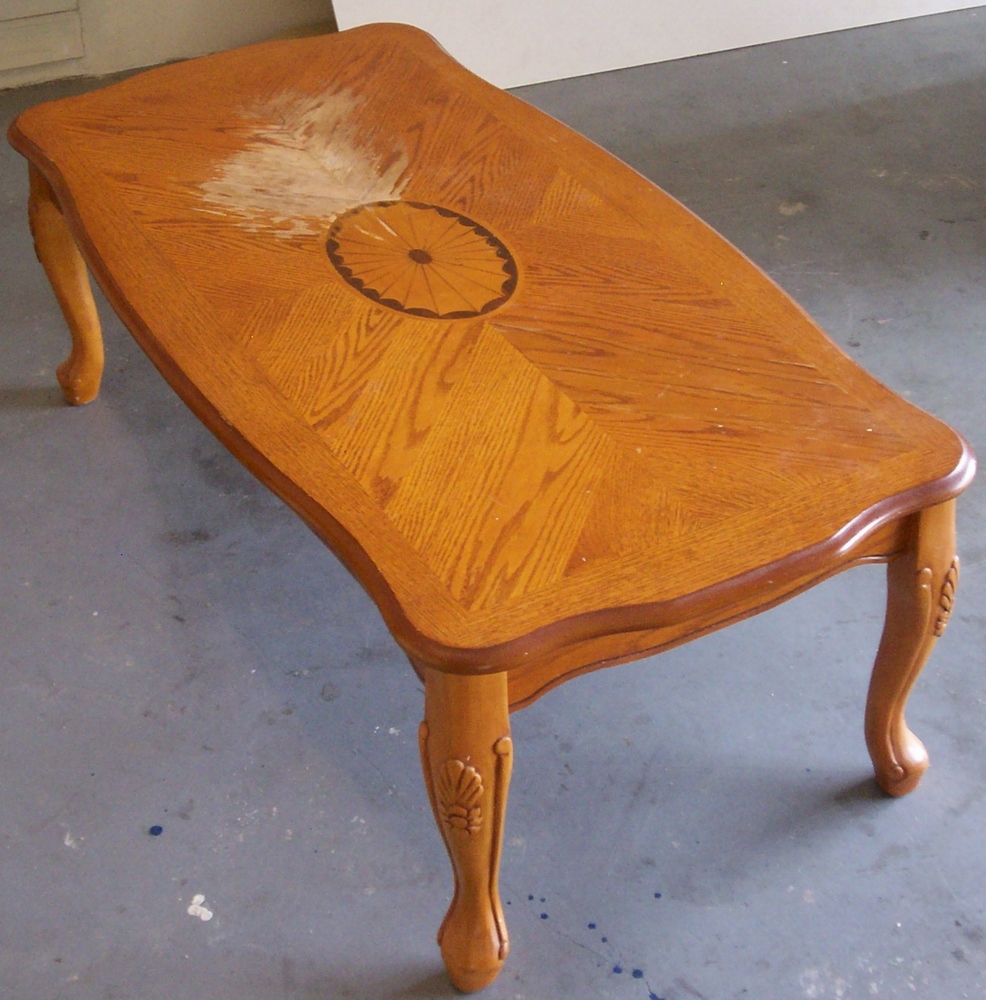
I’m a scavenger. No, not the kind of scavenger that eats rotting carcasses off of the side of the road and looks like an angry turkey. I’m a material scavenger. If I see old furniture, wood or even palates on the side of the road, I stop to have a look and usually end up taking them home with me. The same was true last week when I visited the local dump. Someone had thrown out a perfectly good coffee table with a really nice veneer and inlay. It had a hideous water stain on one side of the table that explained why it was at the dump. No problem for the scavenger! If you’d like to know more about how to finish a coffee table, read on for my project details and the official before and after shots.
Stripping the Old Poly Finish
Polyurethane, shellac, varnishes – it’s all a nasty bit of business when you’re trying to get rid of the stuff. You can sand it all day long, but if you get too far and end up sanding through the veneer, you’ve just ruined it for good.
When I’m faced with a thin veneer that needs the poly removed, I use a water based sealant remover. My favorite is called Mostenbockers, and I use it because it’s easy to use, is ecofriendly and doesn’t stink as bad as other paint strippers and sealant removers I’ve worked with in the past.
Because it comes in a gel form, it gets pretty messy. I use a pair of rubber gloves to handle the stuff so I can work the goo in with my hands. You want a nice even coat of the stuff on your veneer so it works best if you pour the stuff out directly onto the veneers surface and evenly smooth it out with your hands.
After about ten minutes, it starts to do its magic. Using a thin blade paint scraper or drywall knife, carefully peel away the now gooey polyurethane. It comes off in some really messy gloppy chunks so be sure you have a good garbage bag to dispose of the nasty stuff.
Once you’ve got all of the goo scraped away, you can rinse the mess of the veneer using a lightly damp sponge or old rag. Be careful not to get too much water on the veneer or else you’ll end up with wrinkled and ruined veneer.
It only took two coats of the Mostenbockers to get the veneer removed enough to begin the next step of the process – removing that outrageous water stain.
Removing the Old Water Stain
Getting rid of the water stain proved to be tough. When water stains wood – it’s for good. The stain travels all the way through the veneer so you can’t sand it out. To get rid of a grey stain on light colored wood, you need to bleach it. A small cup full of non-perfumed/no dye bleach works great when mixed with a very small amount of water.
I used a little foam brush as an applicator. I dipped the foam brush into the bleach and loaded it with a very small amount. Carefully, I applied it to the stained area only. If any bleach got on the other unstained areas of the veneer, I quickly wiped it away with a rag.
As the bleach slowly soaked in, I used a clean white cloth to dab up the stain from the surface. It’s a tedious process, but you’ll need to constantly apply new bleach to the stain, and then soak up what’s left to really get rid of the trouble spots. After a few hours of that, the stain had been removed enough so that I could sand, stain and poly the surface once again. No one said this was going to be easy.
Repairing the Wood Imperfections
The old stain was much more than just a nasty discoloration on the wood, it was also bubbled up from where the water had warped the veneer causing it to come loose. To mend this problem, I simply needed a bit of wood glue, some toothpicks and a heavy concrete block.
Where the bubble began on the veneer, I carefully cut it open using a razor knife with a brand new sharp blade. Once the slit was open, I could load some wood glue onto the toothpicks and jam them inside of the veneer bubble. After I violated the inside of the veneer bubble with the glue, I wiped away any excess with a wet sponge and put a piece of cardboard over the top of it. I then put a concrete block I had laying around to help hold it flat while it dried.
Sanding, Staining and Poly
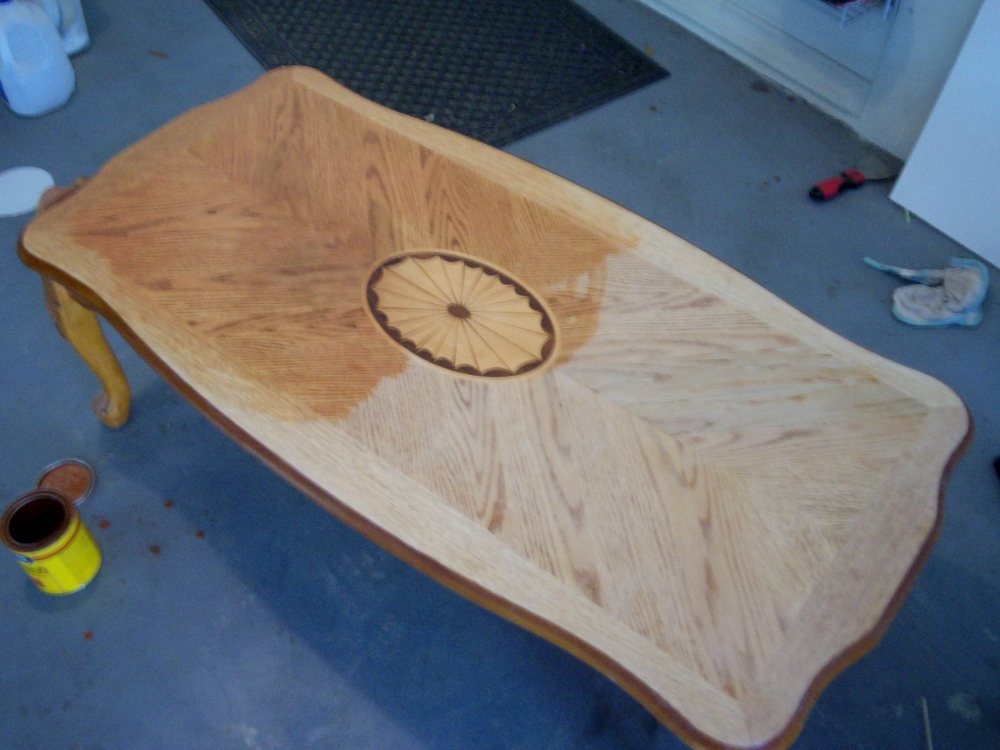
The next day, I removed the cinder block and cardboard to see the bubble was now gone for good. Now I could sand the surface down using a bit of 220 grit sandpaper and get it ready for staining.
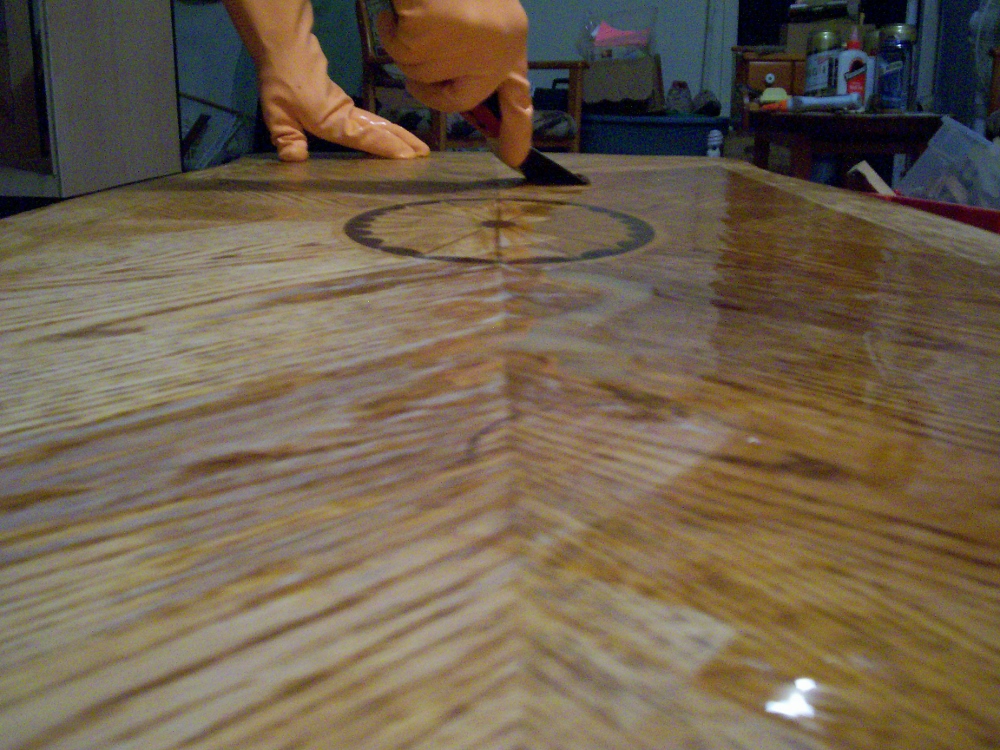
Once sanded, I wiped the excess dust away and applied wood stain using my handy foam brush. I wiped away the excess with an old rag. A few hours later, I hit it with another round of light sanding using 220 grit paper to remove any raised edges and let it dry overnight.

24 hours later, I was applying the poly. I put on two coats and then let it dry overnight. The next day, I used some 00 steel wool to knock down any rough edges. I then finished the table with a final coat of poly. After a good furniture waxing, it looked brand new!
I founf the EXACT table on the roadside! I am doing it now. I ushually paint, however want to keep the pattern. Is there a way to enhance the top partially and paint some of it also? In sectioms, s to speak. I just love the table. Not sure of its value, if you know, I would appriciate you sharing it . It looks fabulous, great job 🙂
Please get the ads out of the copy! I have nothing against ads – except here one was covering up the key section of text I wanted desperately to read on treating water stains. I’ll come back later, because you definitely have some awesome projects and information!
Hi Karen. Sorry you find the ads annoying – in a perfect world we’d prefer not to have any ads on our site. However, ads are the primary way we are able to provide the content we do at no cost to our readers. Ads don’t typically block content and they have a small “x” in the upper right if you need to close a specific ad. Thanks for being a reader and I hope that info helps.
On closer inspection I am seeing the same issue you were Karen. I have reached out to our ad partner and we hope to have this issue resolved asap. Sorry for the inconvenience, and thanks again for the feedback.
Hi Karen! It looks like we have the issue related to ads overlapping copy fully resolved now. Thanks again for bringing it to our attention. If you run into the same problem (hopefully very unlikely at this point), please let us know. : )
that came out really excellent but the bleach part that took a couple of hours seems to make this a tough project for most of us!
Hey Rich. . . we here you loud and clear! Refinishing just about anything isn’t for the time-pinched!