

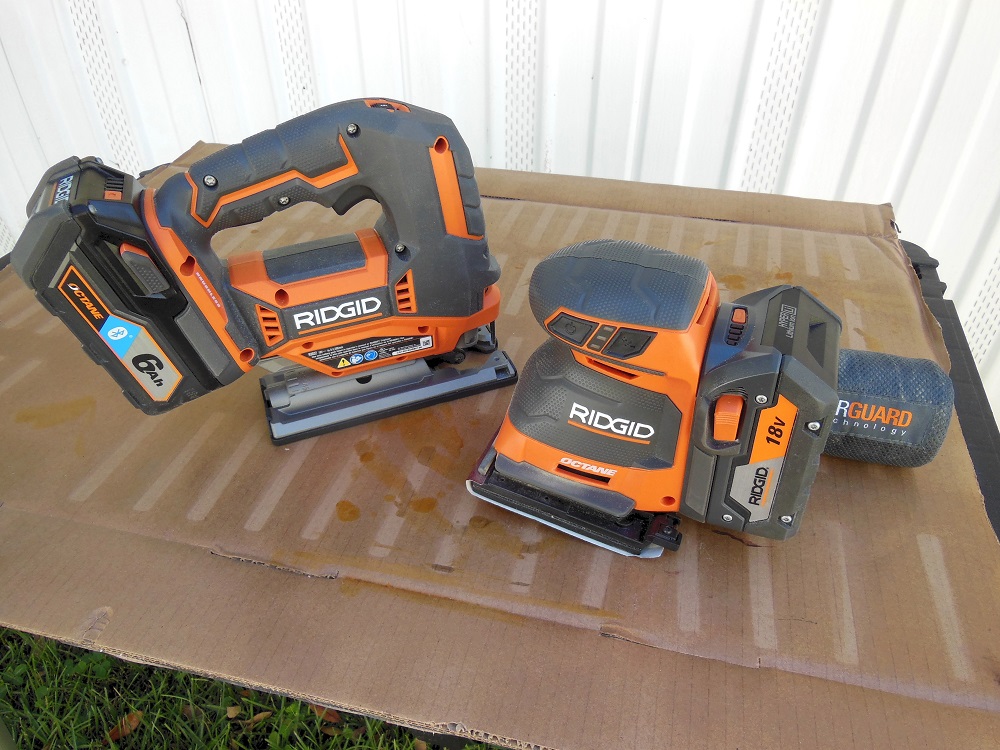
![]() This post is sponsored by The Home Depot. Here at Home Fixated, we like to put our tools to work on useful projects like lawn and home maintenance, repairs and construction. Sometimes we just do stuff that needs to be done. But today’s project is purely for the fun of it. We received an R8832 Ridgid 18V Octane jig saw and R86064 ¼ sheet sander to try out. Both tools served us well on the DIY picnic table project. This time they help us metamorphose wooden “caterpillars” into a pair of beautiful butterflies. We’ll take you under our wing and show you how to make your own butterfly wall art!
This post is sponsored by The Home Depot. Here at Home Fixated, we like to put our tools to work on useful projects like lawn and home maintenance, repairs and construction. Sometimes we just do stuff that needs to be done. But today’s project is purely for the fun of it. We received an R8832 Ridgid 18V Octane jig saw and R86064 ¼ sheet sander to try out. Both tools served us well on the DIY picnic table project. This time they help us metamorphose wooden “caterpillars” into a pair of beautiful butterflies. We’ll take you under our wing and show you how to make your own butterfly wall art!
He’s Got The Biggest Moths Of Them All
Some projects are made for charity. And some hold your fancy dress. But when they’re made for pleasure they’re the projects I like best. I know butterflies aren’t moths (though they are related), but-ter I was flying trying to pique your insect interest so you don’t just flutter by. And “big butterflies” doesn’t really parody Aussie rock with quite the same zing.

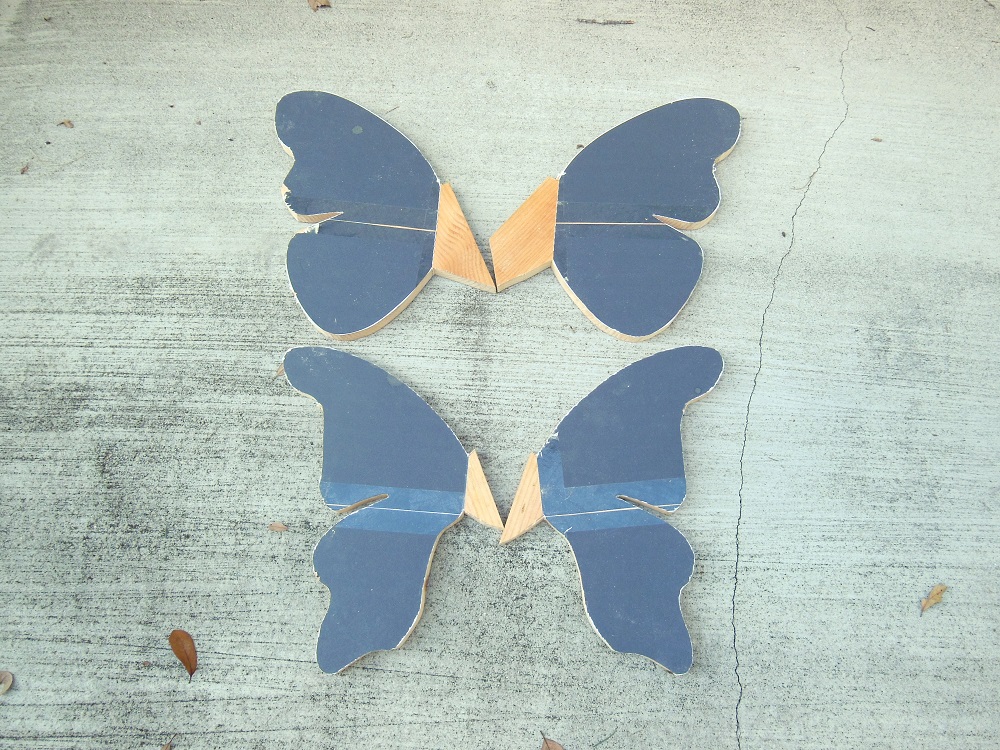
This project began with a certain lady’s love of butterflies and purple-blue hues. Then the butterfly patterned pillows she bought for our couch. In an effort to give her butterflies of anticipation (and maybe score me some butterfly kisses), I decided to make complementary pieces to dress up the bare wall behind said sofa.

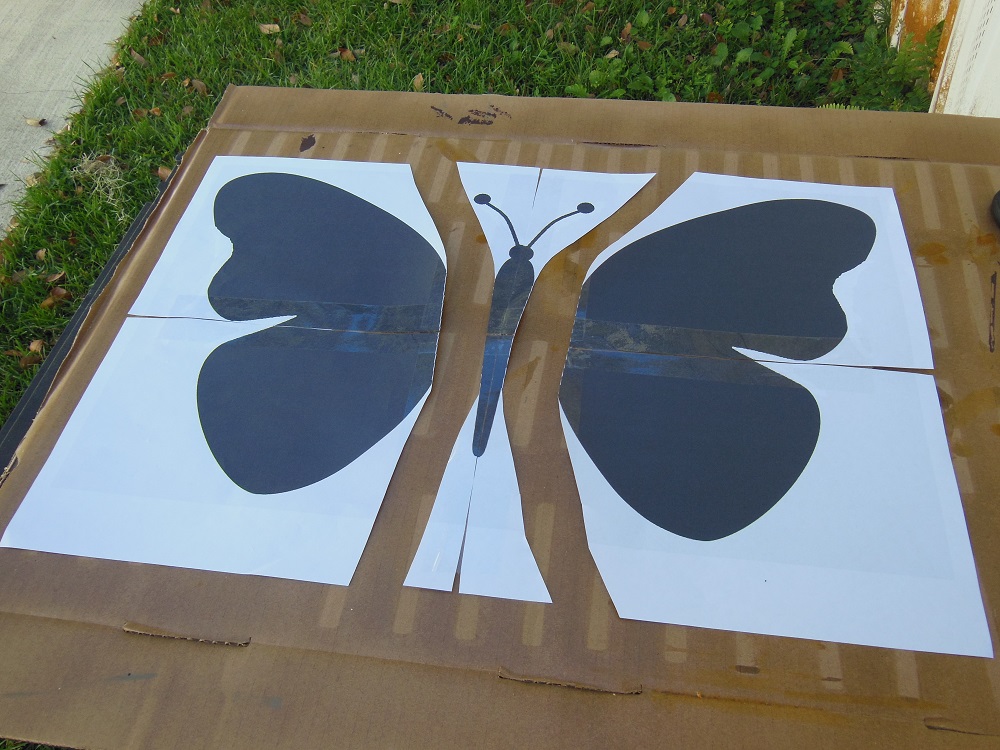
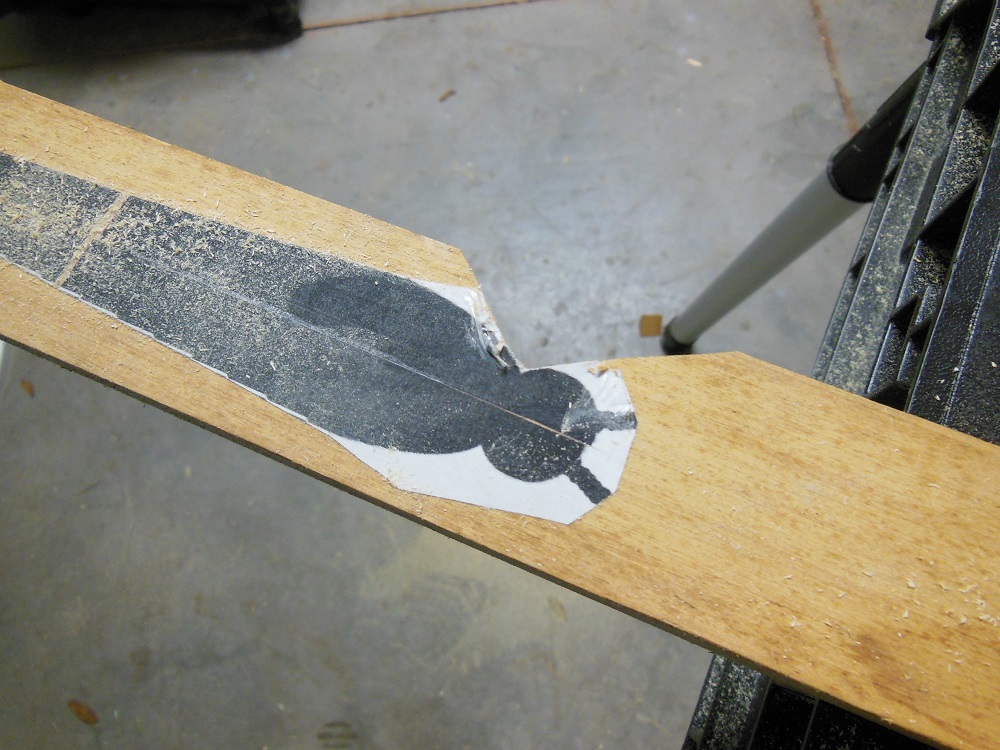
Start by creating your patterns. For mine, I found two clip art silhouettes online and customized them with a basic imaging program. I reshaped the wings, bodies and antennae on one side and added a white “cut line” between the bodies and wings. Then I copied that half and pasted it – flipped horizontally – to the other side.
How To Make A “Ridgid” Butterfly
Real butterflies are elegant, soft and pliable. Ours are stiff, hard wood. To give this project a sense of grace and motion, we’re going to set the wings at an angle to the body, as if they’re flapping. So the body and wings are cut separately and joined later.
The wood you use is up to you. Decent quality plywood would work if you don’t mind the layered look at the edges. I went with a 1×10 pine board (actual measurements: 3/4” x 9-1/4”). Since I’ll be painting these, I’m not particularly concerned with using pretty wood. If you plan to use a natural finish (clear coat) you may want to select wood with interesting character.
Welcome To Our Wooden Wingding!
I’d suggest 3/4” thick wings for a piece this large, but you can get away with 1/2” (or even thinner if you add glue blocks to the back of the “body edges”). I know some of the wood grain will show through my paint job, so I tilted the wings in opposite directions to give it a symmetrical appearance. It’s subtle and not absolutely necessary, but attention to detail can take your butterfly wall art project to new elevations.
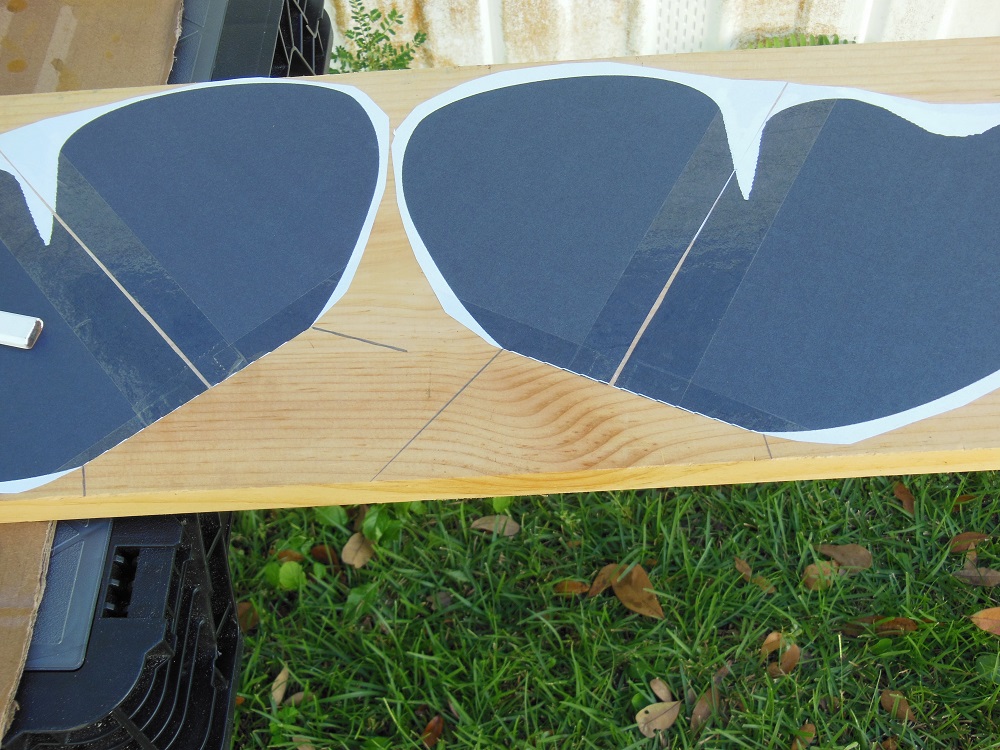
It was also an intentional decision to not butt the straight edge of the wings against the factory edge of the board. The extra material will help to support the jig saw when we make the bevel cut later on.
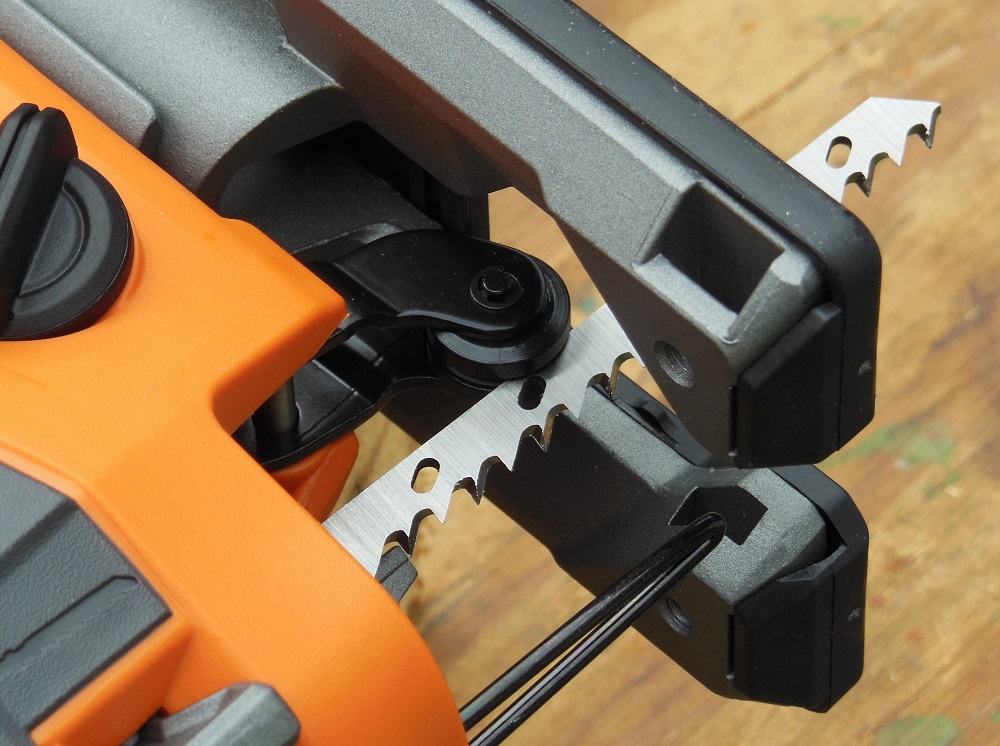
Winging It With The R8832 Ridgid 18V Octane Jig Saw
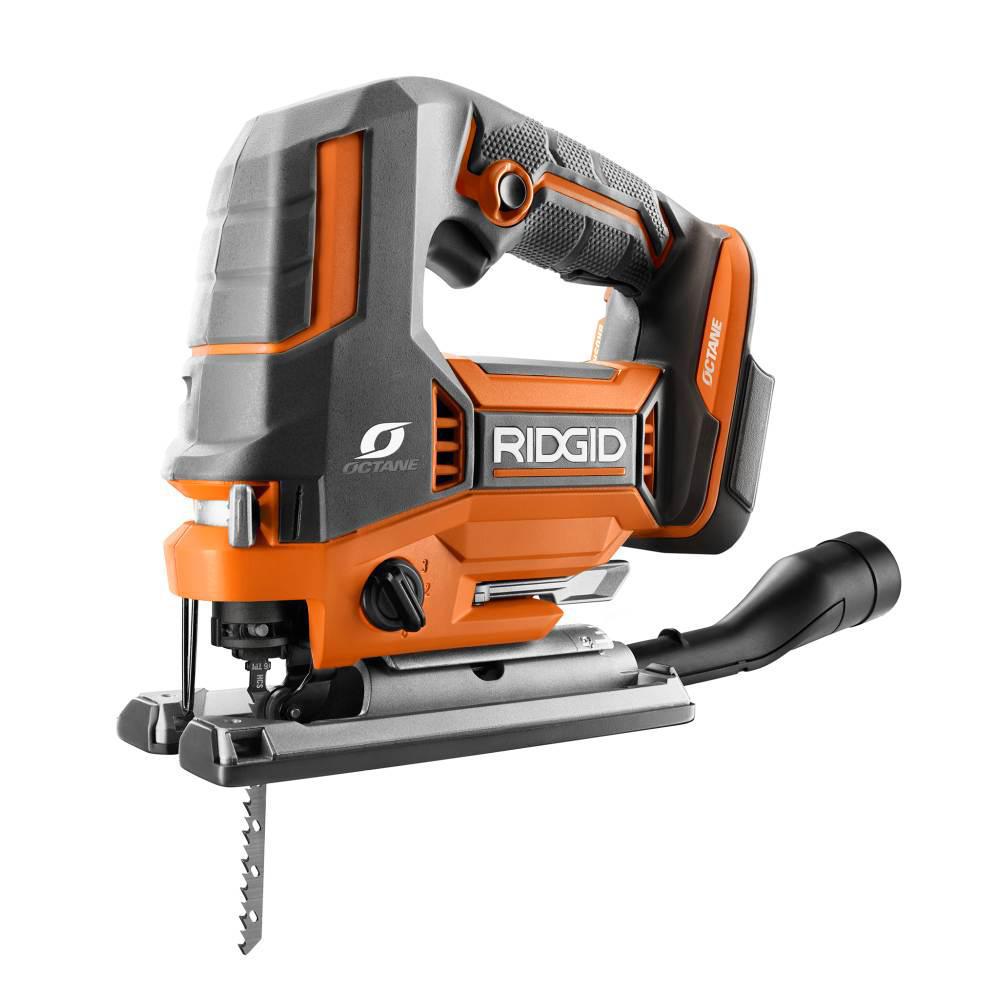
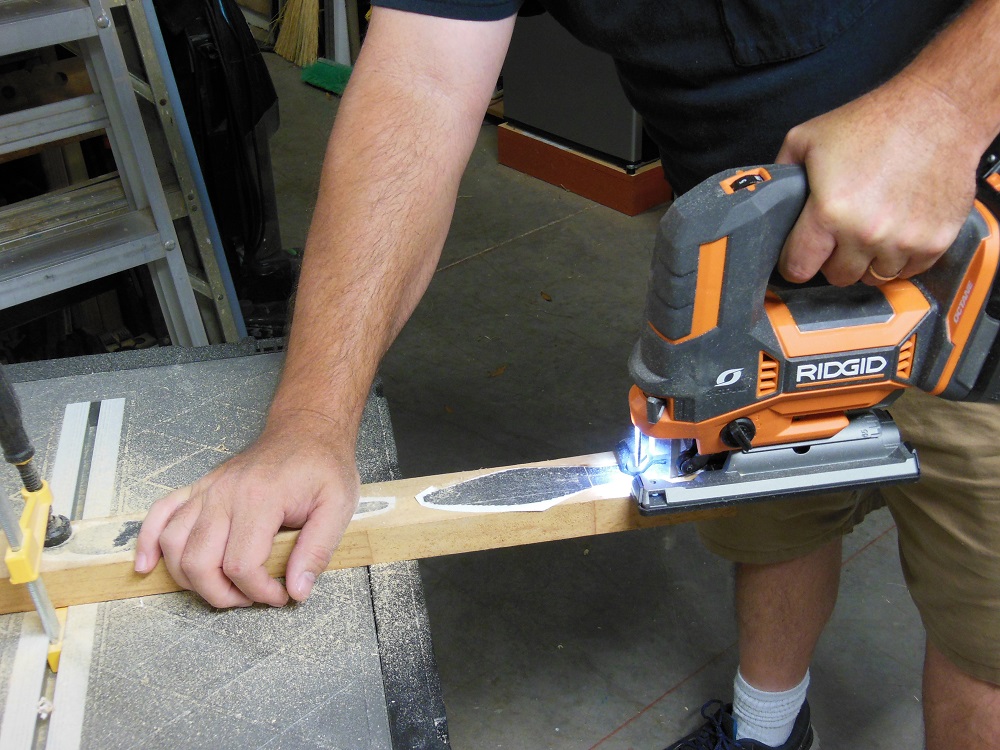
Before we spread our wings, let’s take a look at the first star of this show: the Ridgid R8832 jig saw. This cordless tool had no problem cutting through 1-1/2” thick pressure treated wood when we showed how to make a wooden picnic bench table. So it could obviously “fly” through this wood like “butter”.
Some of its features include:
* Brushless 18V motor for longer run time per charge. No brushes to replace. Ever!
* Variable speed trigger with variable max speed dial.
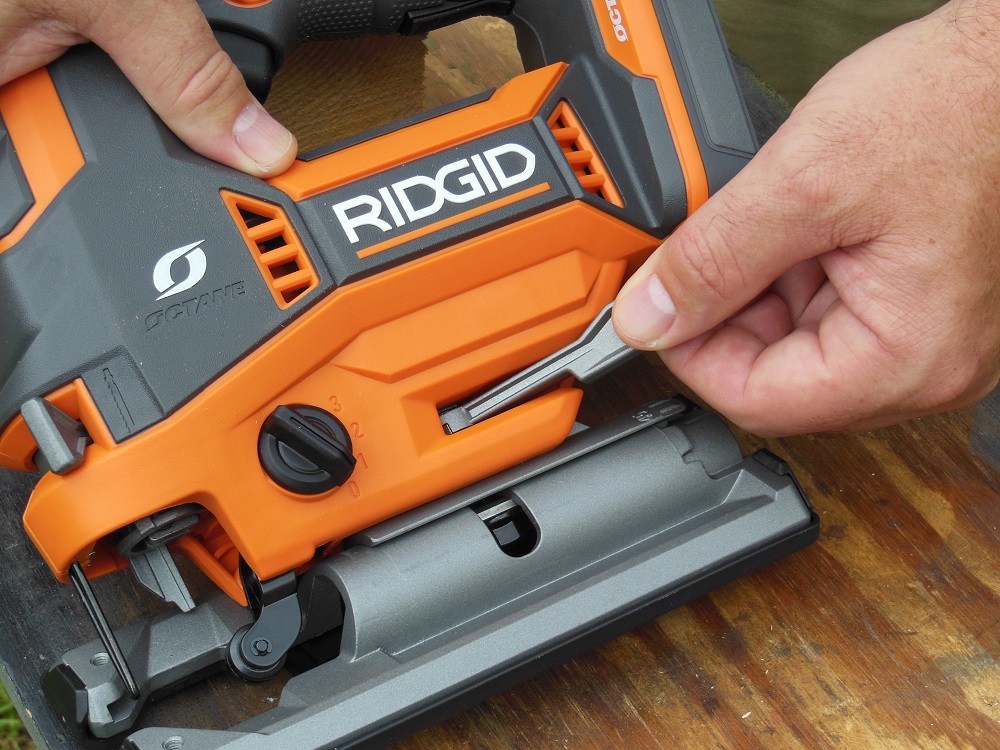
* Tool-free blade clamp. You have no idea how nice this is if you’ve never used one!
* Compatible with both “T” and “U” shank blades.
* Trigger lock.
* “Line start” setting starts the blade slower and increases to full speed after you’ve engaged the cut.
* Blower port keeps your cut line clear of saw dust.
* Dust collection attachment. When you hook up a portable vacuum, this does a wonderful job at preventing fine dust from filling the air! But don’t expect it eliminate the larger, grainy saw dust.
* LED light illuminates your cut line.
* Compatible with all Ridgid 18V batteries. Get best performance with 18V Octane batteries.
Now Let’s Clip These Wings! – Ridgid 18V Octane jig saw

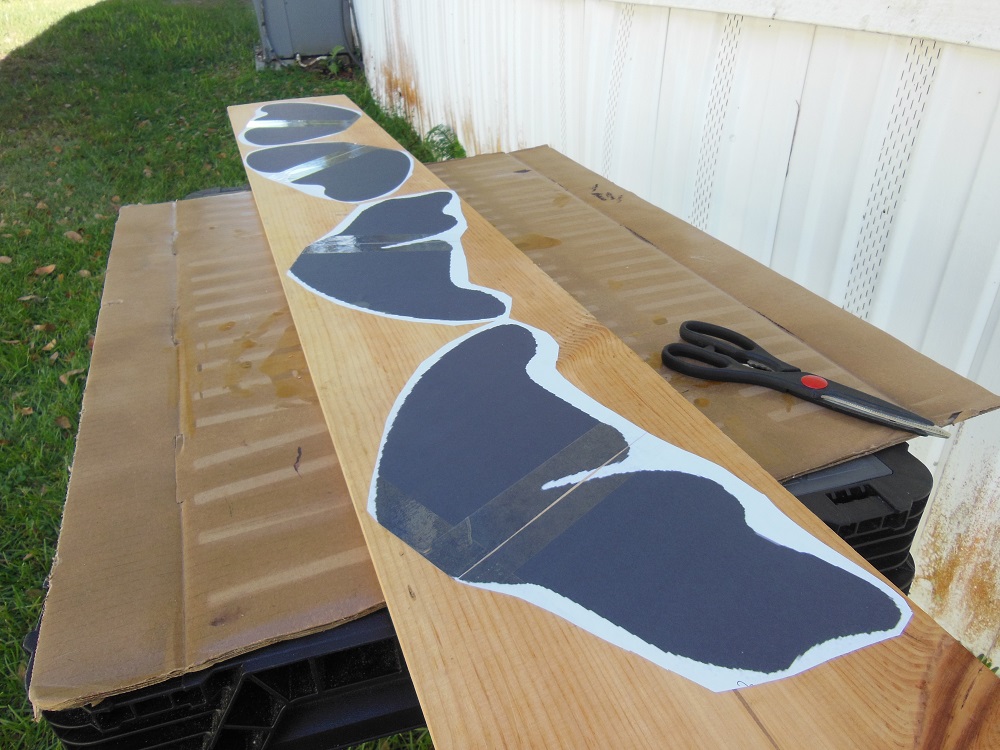
It’s pretty easy to follow a straight line with the R8832 jig saw. But being a jig saw, it really excels at cutting curves. For tighter curves, get yourself a scrolling blade, like the narrow one in this assortment. I made all of my cuts using the blade that came with the saw.
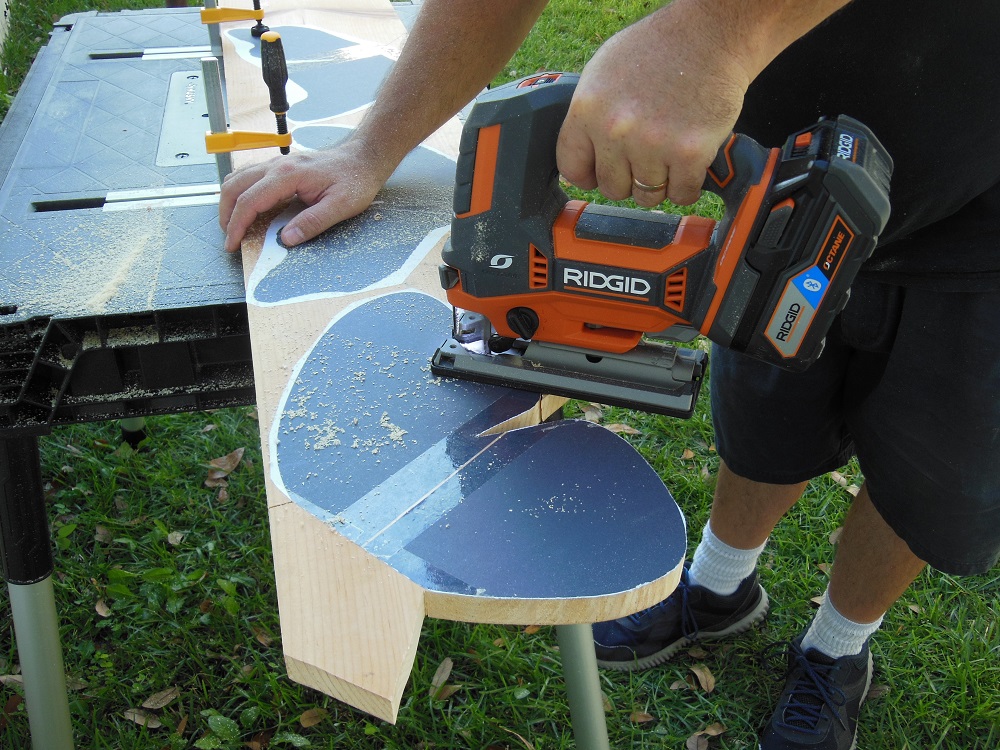
The included blade is a bit wide for tight curves. But that doesn’t mean it can’t be used. When cutting curves that your blade can’t quite follow, make a little extra clearance by backing off a bit and nibbling away some material from the waste side of your cut line; no problem! If you’re having trouble making clean curves, it’s OK to leave a small amount of material on the waste side. You can clean it up later.
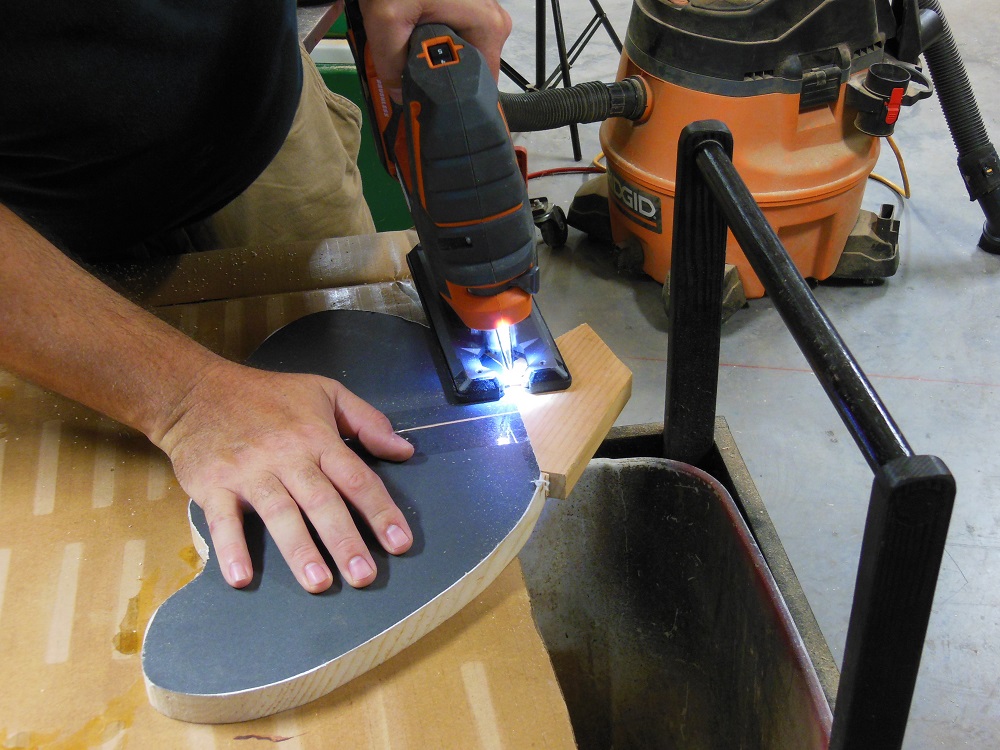
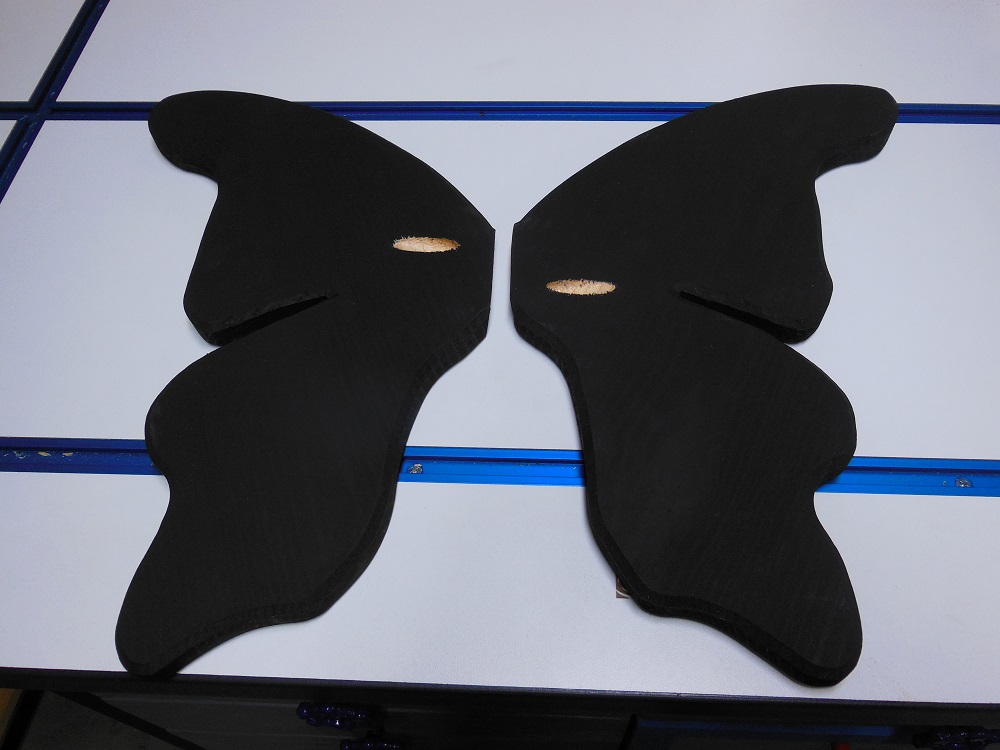
Bug’s Body – Neither Hare Nor Hide
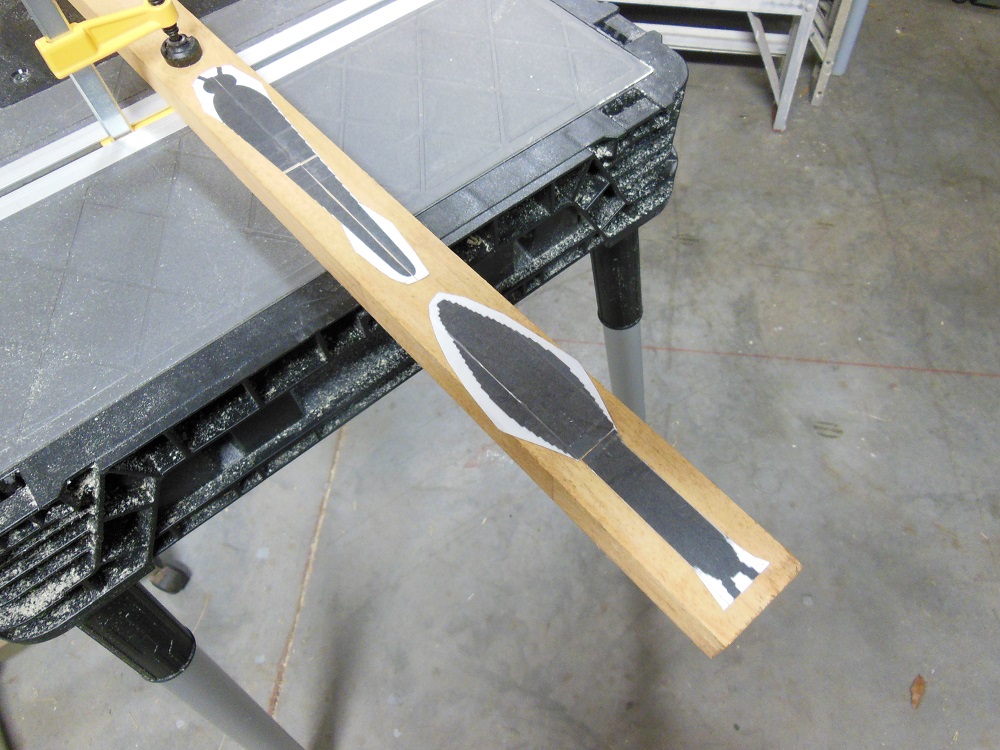
To give your butterfly more character and dimension, use thicker material for the body. I used 1-1/16” frakenpine (my word for wood – probably soft maple in this case – made up of short scrap segments finger jointed end to end).
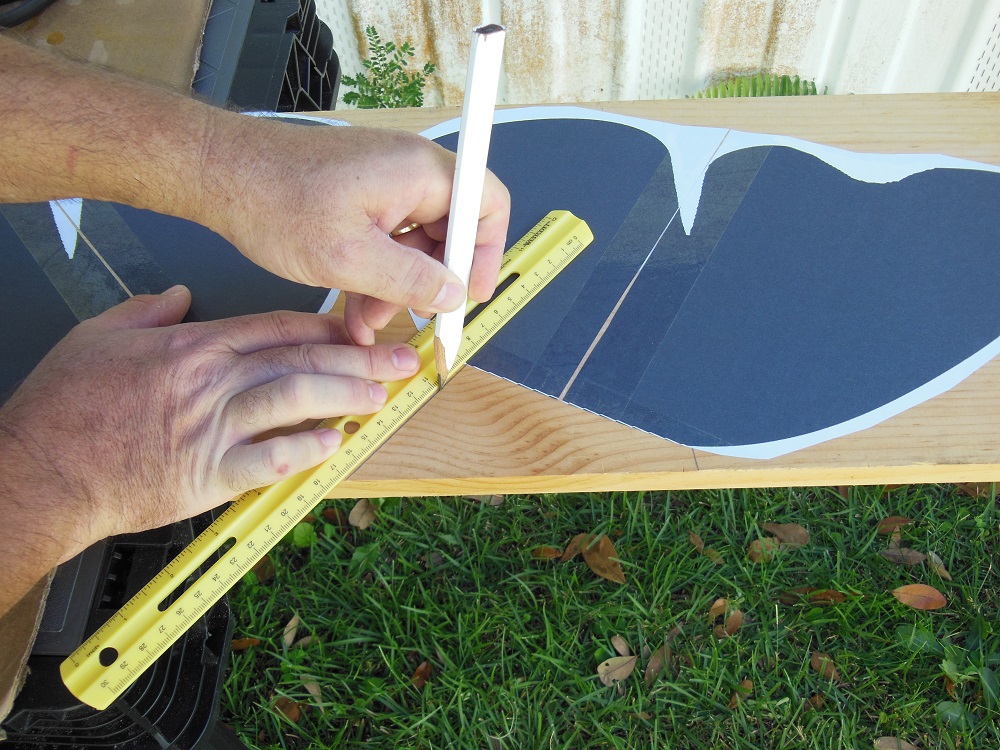
Angle The Saw Base For The Final Cuts – Ridgid 18V Octane Jig Saw
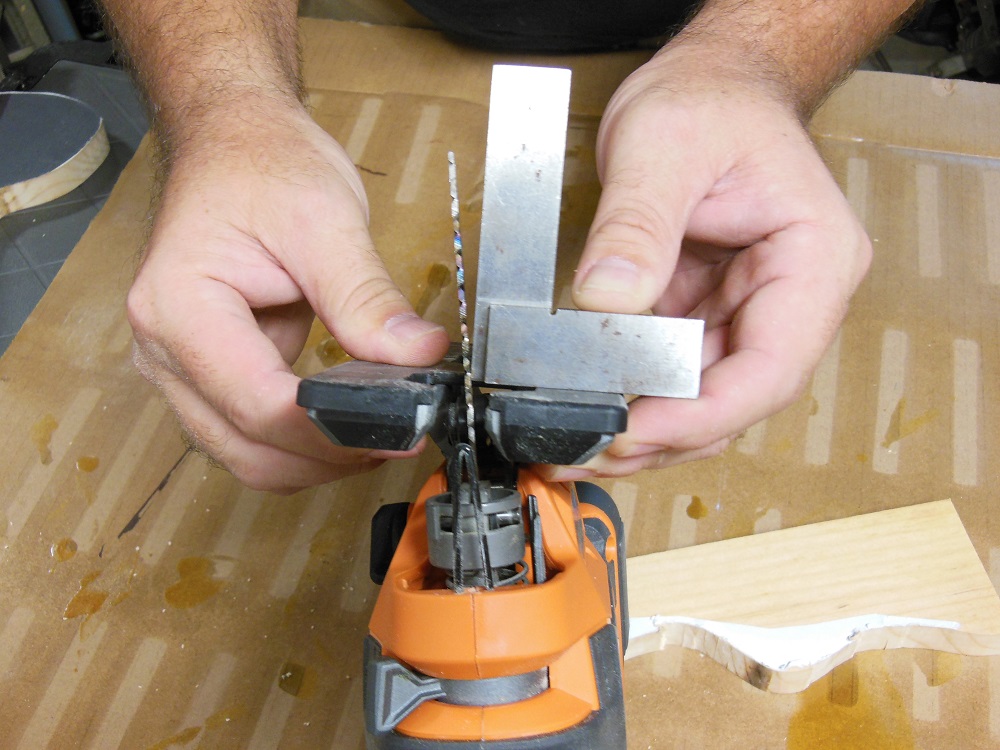
Angle the base of the jig saw to make the “body line” cuts on the wings. I just eyeballed it and made a test cut to see how the angle looks in relation to the butterfly body. Somewhere in the range of 8-10° worked out nicely for me.

When you’re happy with the angle, cut away the remaining material from both wings. Make sure to orient the bevel so that the wings tilt forward!
Oops! Without The Dust Attachment In Place, Butter Wasn’t The Only Thing Flying!
I cut the wing shapes outside, where flying dust wasn’t really an issue; I just stayed upwind. But then it started to rain so I moved indoors (and put on a dust mask). While cutting the bodies, I noticed that a ton of dust was being thrown into the air and wished that wasn’t the case. And it didn’t have to be, as you’ll see.
Honestly, I’d completely forgotten that the saw came with a dust attachment. I’ve had several jig saws over the years but none had that feature. It wasn’t until I was done cutting that I realized my folly. Ugh!
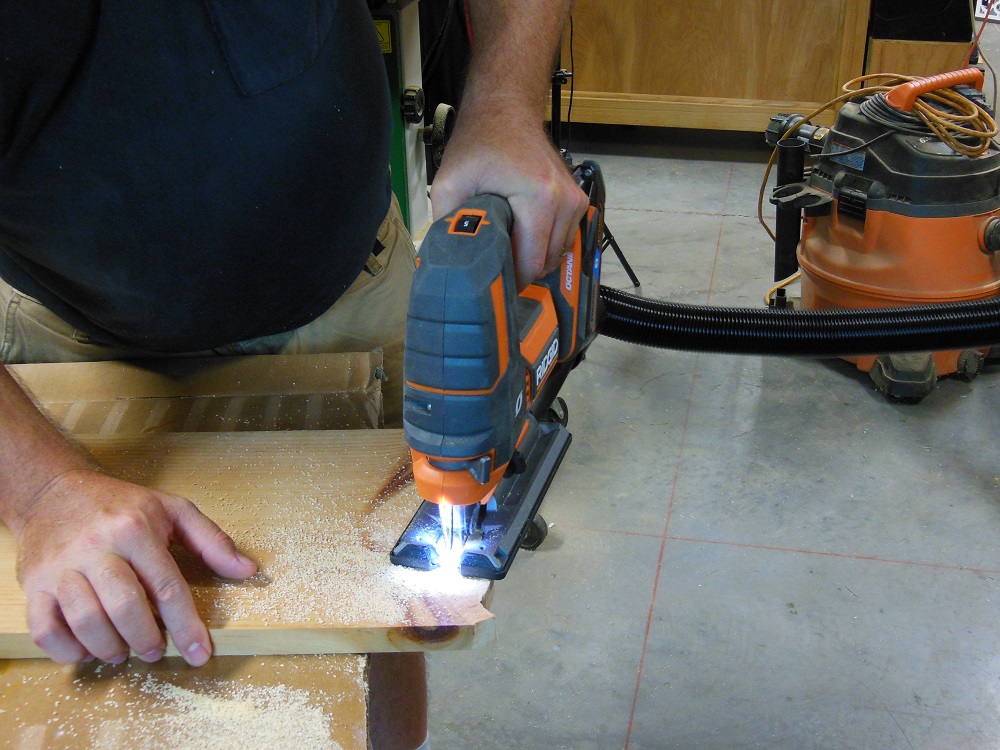
So to give it a fair evaluation, I slipped in the dust collection port, hooked up a vacuum (actually, a small portable vac, not the one visible in the background) and made a half dozen or more proper test cuts. The difference was night and day! It virtually eliminated the fine particles that coat everything in the shop.
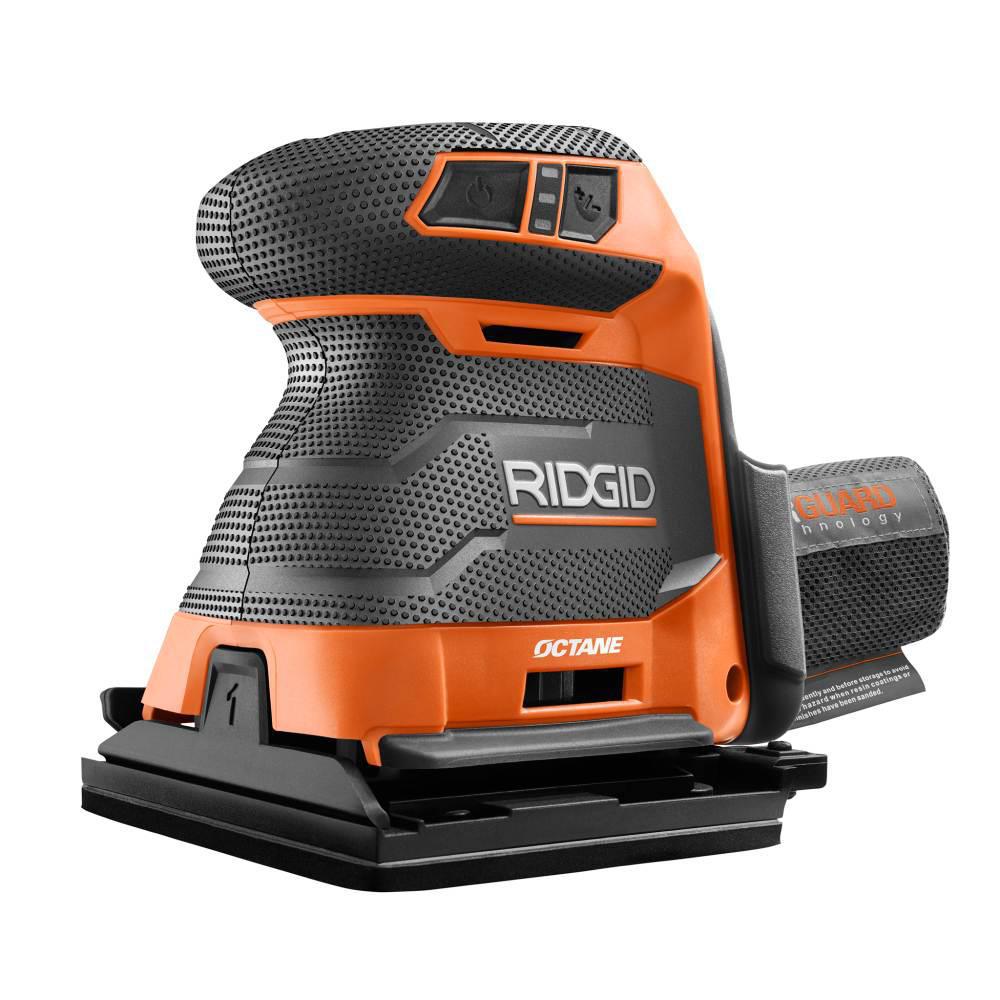
Ridgid 18V Octane 1/4 Sheet Sander – One Smooth Operator
The R8832 jig saw ruled as monarch during the first act of this butterfly wall art show. But now it’s time for the 1/4 sheet sander to emerge from its chrysalis.
First, let’s go over some of its features.
* High efficiency brushless motor.
* Orbital sanding action (makes a 1/16” orbit).
* 14,000 orbits per minute.
* 3 speeds.
* Power and speed switches are shielded from dust by a rubber membrane.
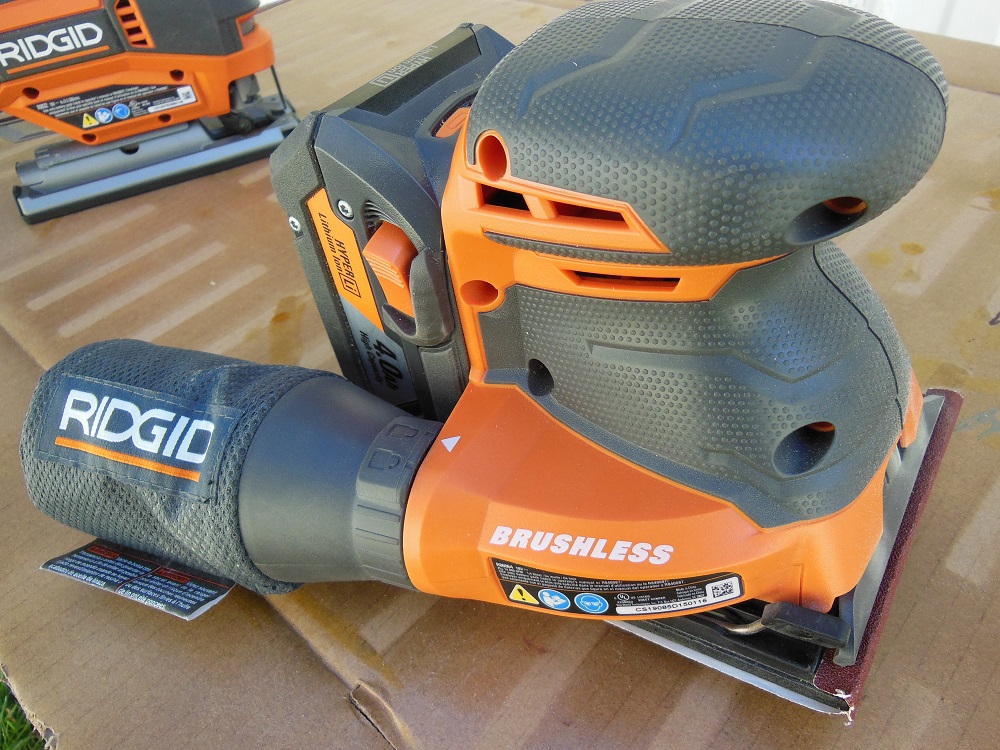
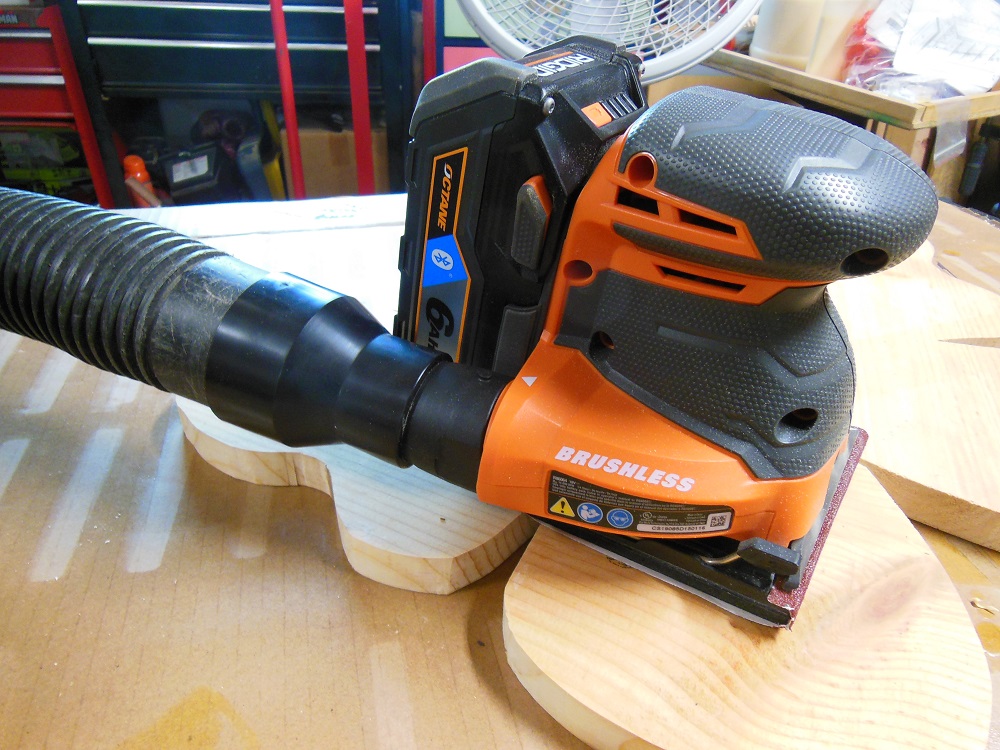
* Built-in dust port works with included collection bag or 1-1/4”, 1-7/8” or 2-1/2” vacuum hoses.
* Works with all Ridgid 18V batteries. Use an 18V Octane battery for best performance.
* Quick, easy paper replacement.
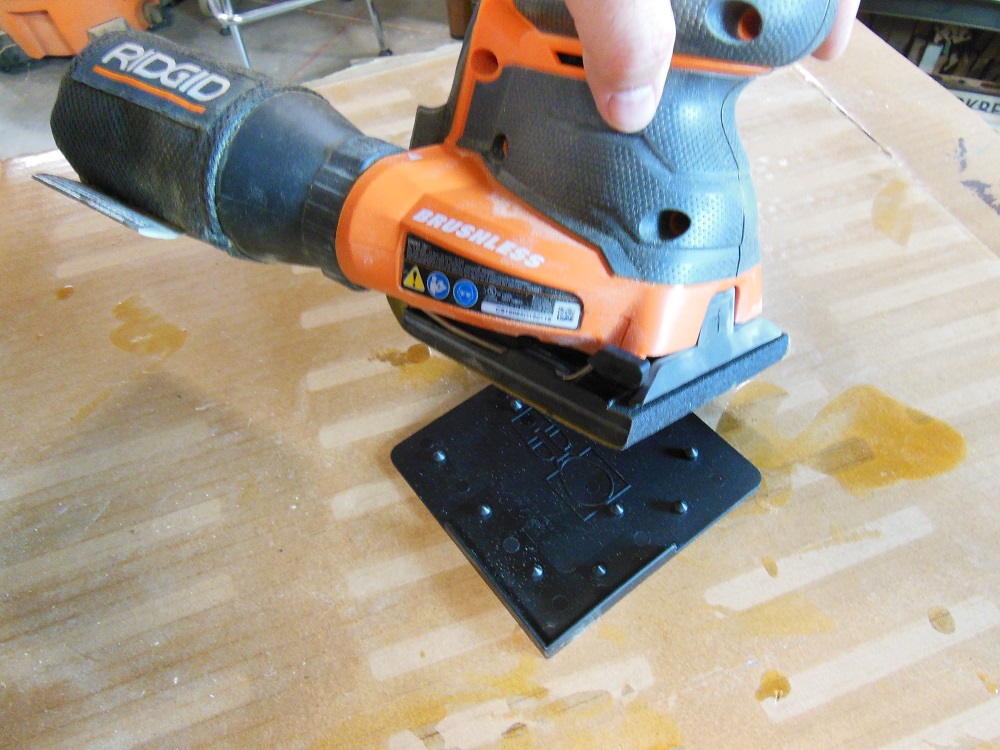
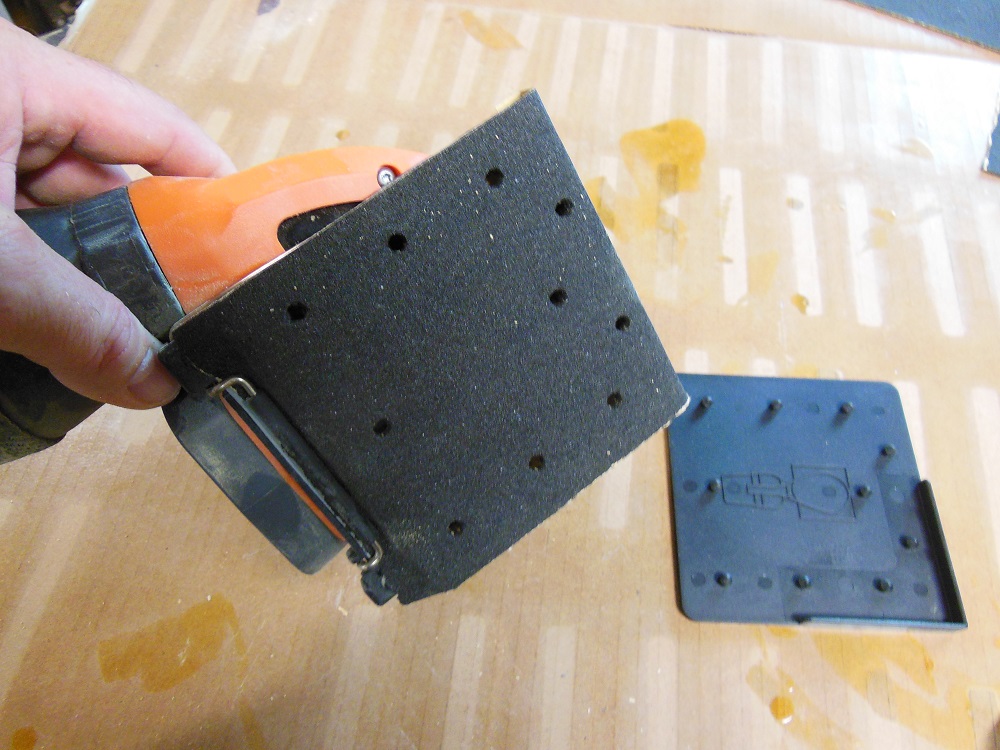
Ridgid 1/4 Sheet Sander – A Real Paper Pusher

For me, the Ridgid sander’s most welcome feature is the included hole punch. I’m used to using a random orbital sander. And part of using it is having to buy special pre-punched sanding discs. In contrast, the Ridgid R86064 ¼ sheet sander does come with a couple pre-punched sanding sheets, but it also includes a punch plate so that you can use ANY sheet of sandpaper.
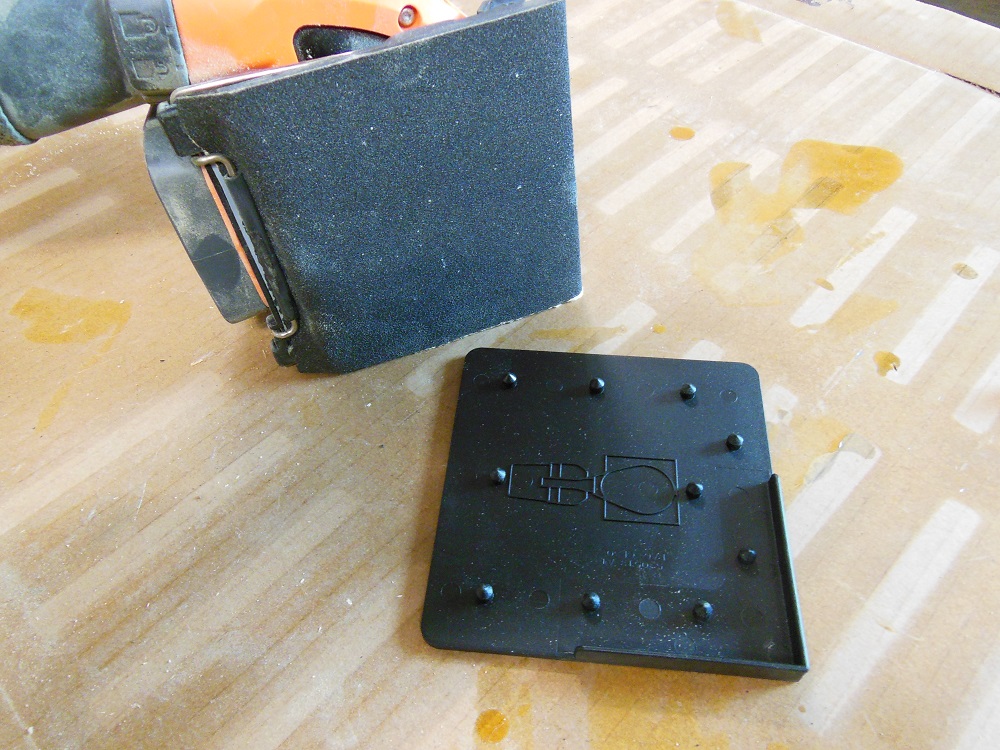
Without the holes, the dust collection won’t work, the paper will clog and dull a lot faster and the sanding dust will be burnished into your workpiece.
Migrating Back To Our Project – How to Make Wooden Butterfly Wall Art
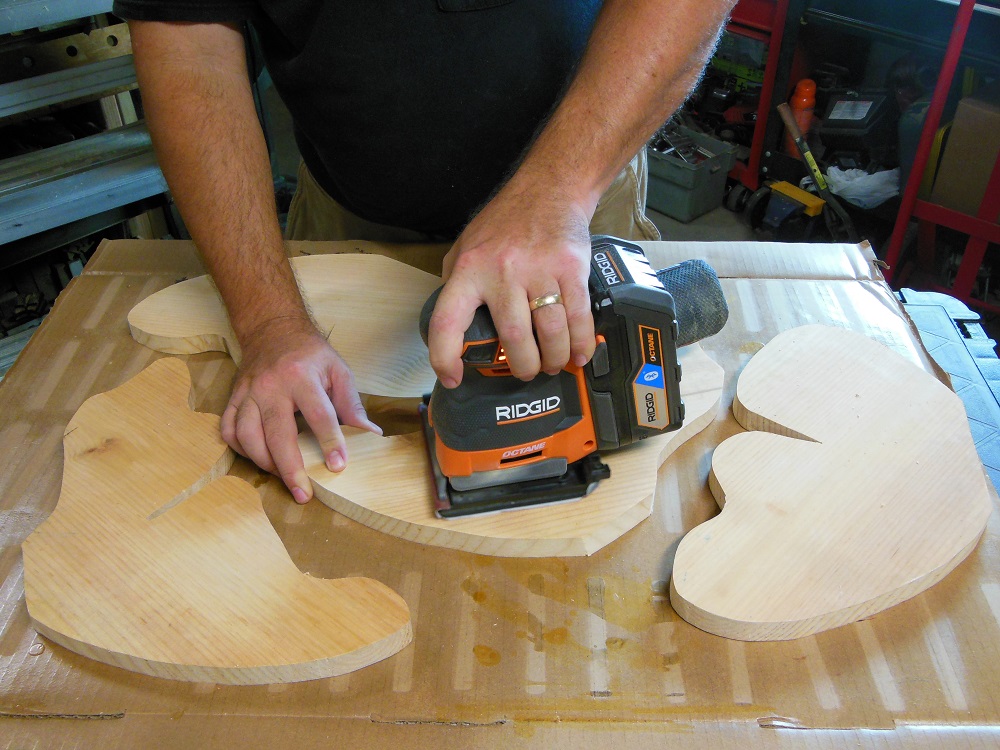
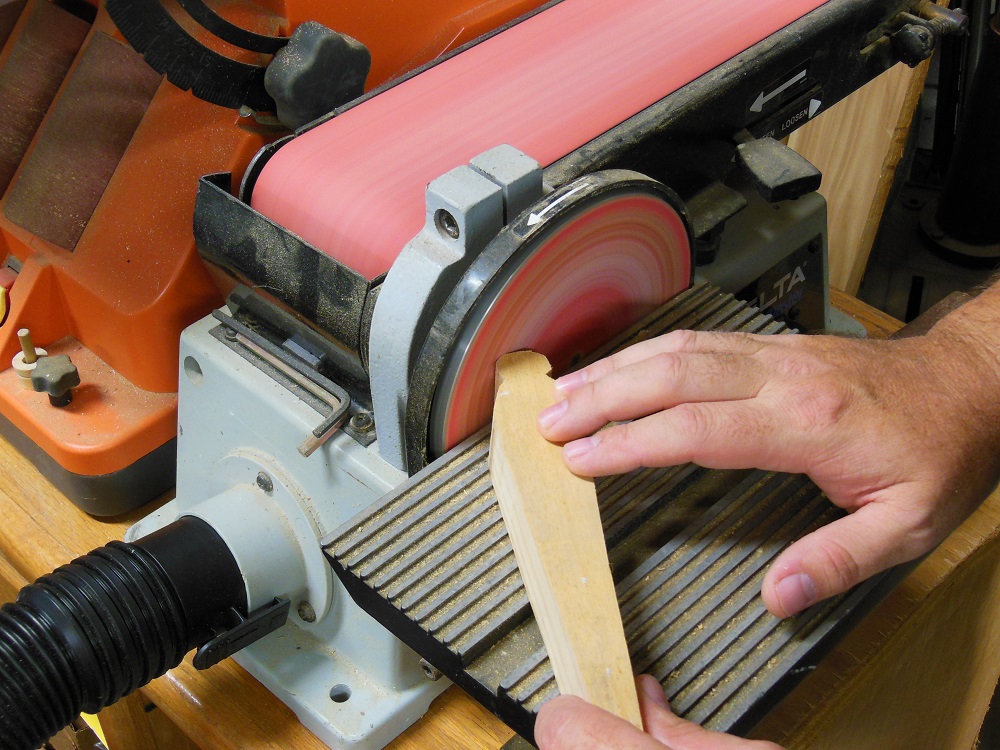
OK, so now we need to do a little smoothing and shaping. Begin by sanding the fronts and backs of the wings. Sanders tend to be somewhat limited in what they can do. A ¼ sheet sander, for example, is fantastic at smoothing and keeping flat surfaces flat. But it isn’t as well suited for use on curves and narrow edges.
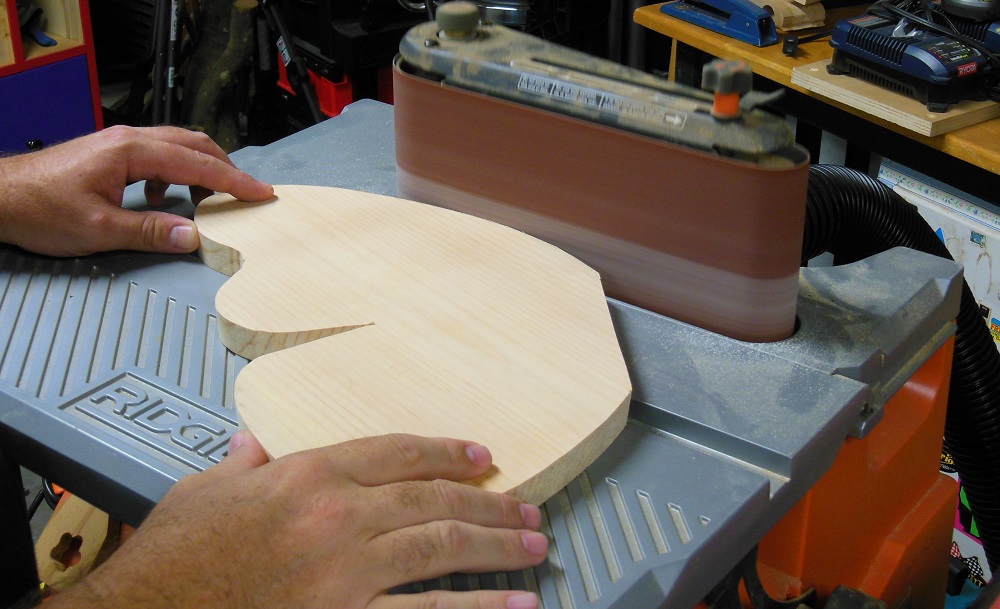
For the rest of the our shaping and sanding, we turn to other tools. I fired up some of the other power sanders in the shop and used a file on a couple tighter inside curves the machines couldn’t reach.

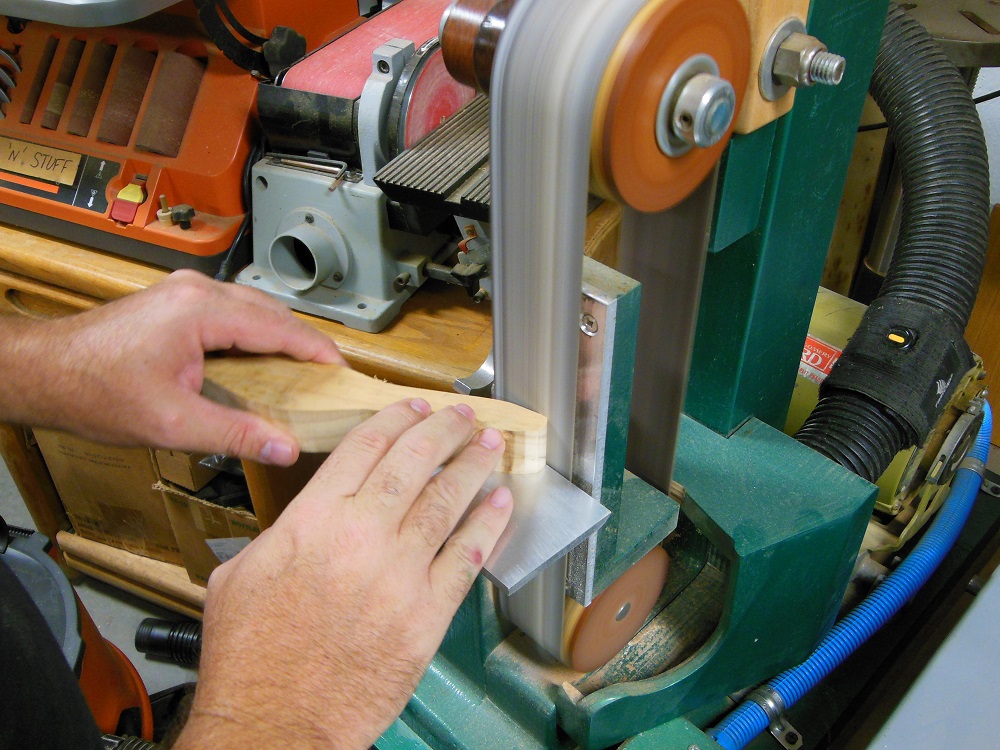
The Butterfly Effect – These Wooden Wingers Are Really Shaping Up!
Just a little more sanding and shaping to go. If you don’t have the luxury of assorted power sanders, files and hand sanding can get the job done just as well. It will just take you longer.

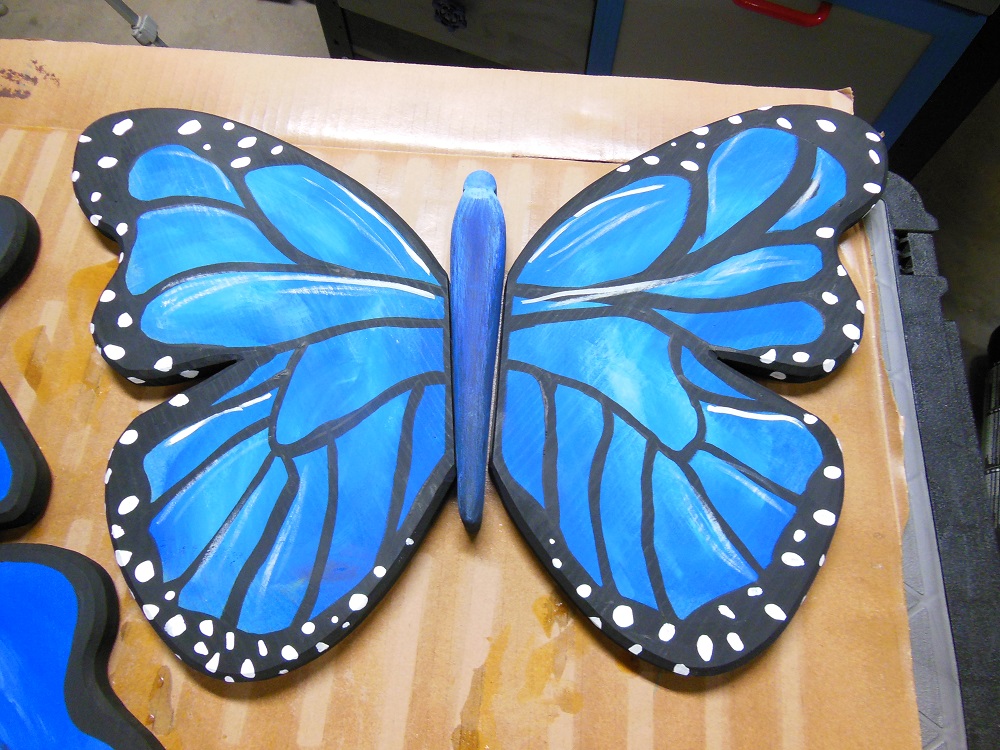
After sanding and shaping, I routed a chamfer on the fronts and backs of the wings (save for the “body edge”). On one butterfly, I also chamfered the front of the “body edge” to flow better with the shape of the body. Either way, leave the back of that edge untouched.
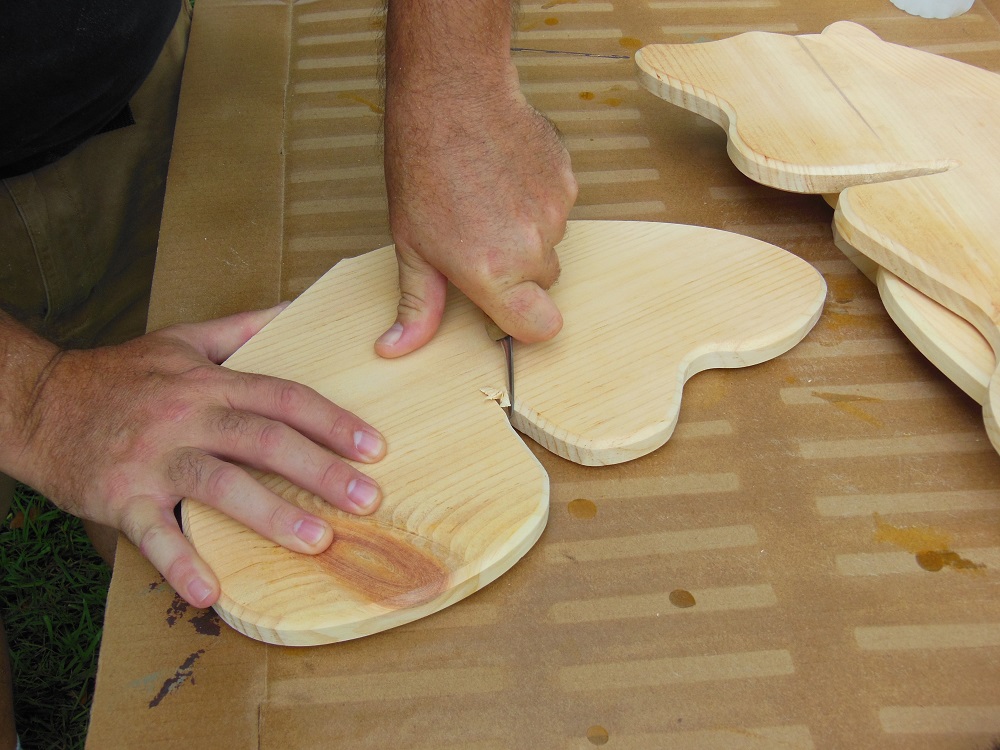
Not only does the chamfer give the wings a more organic look, it also makes them appear thinner than they actually are.

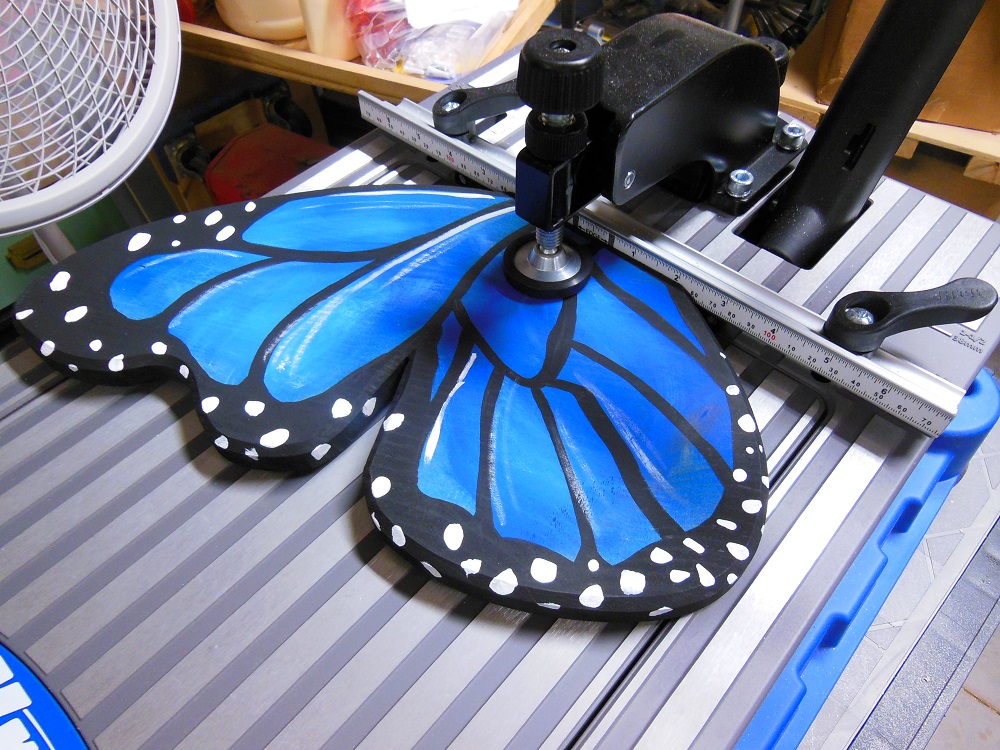
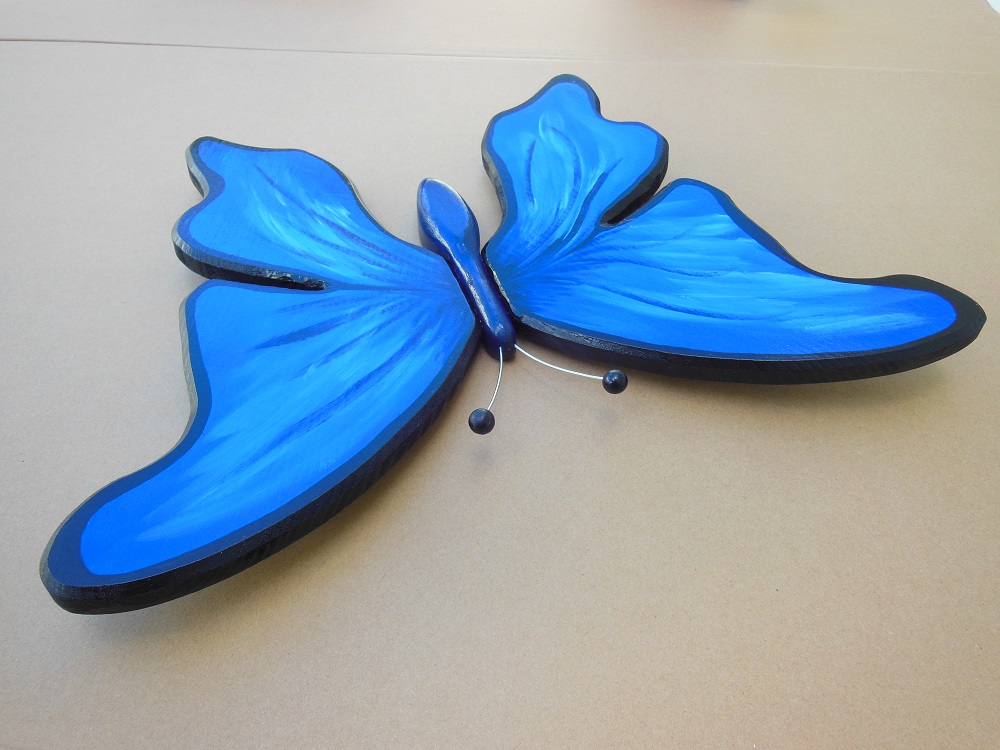
Let’s Beautify These Butterflies – Decorating Your Wooden Butterfly Wall Art

You can decorate your butterfly any way you’d like, if you’d like. But don’t apply a clear coat until after the wings are glued to the bodies. I chose to paint mine with acrylics. I photographed some of the butterflies on our couch pillows and printed them out to use as references. Artistic license was still in play but – like diurnal butterflies – at least I wasn’t flying in total darkness.
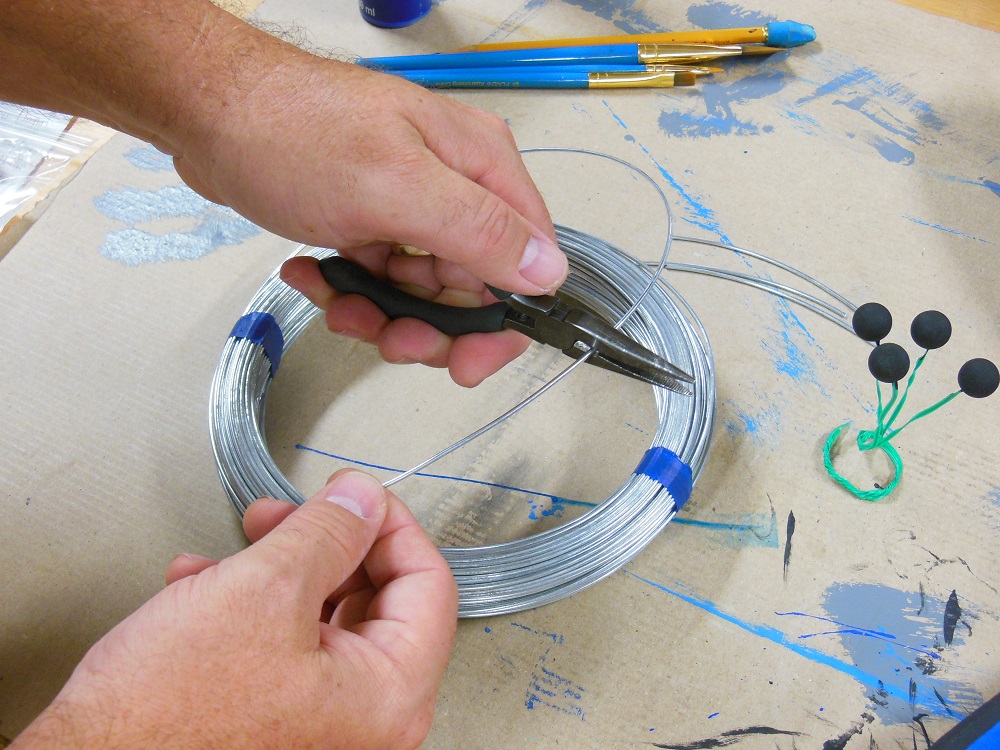
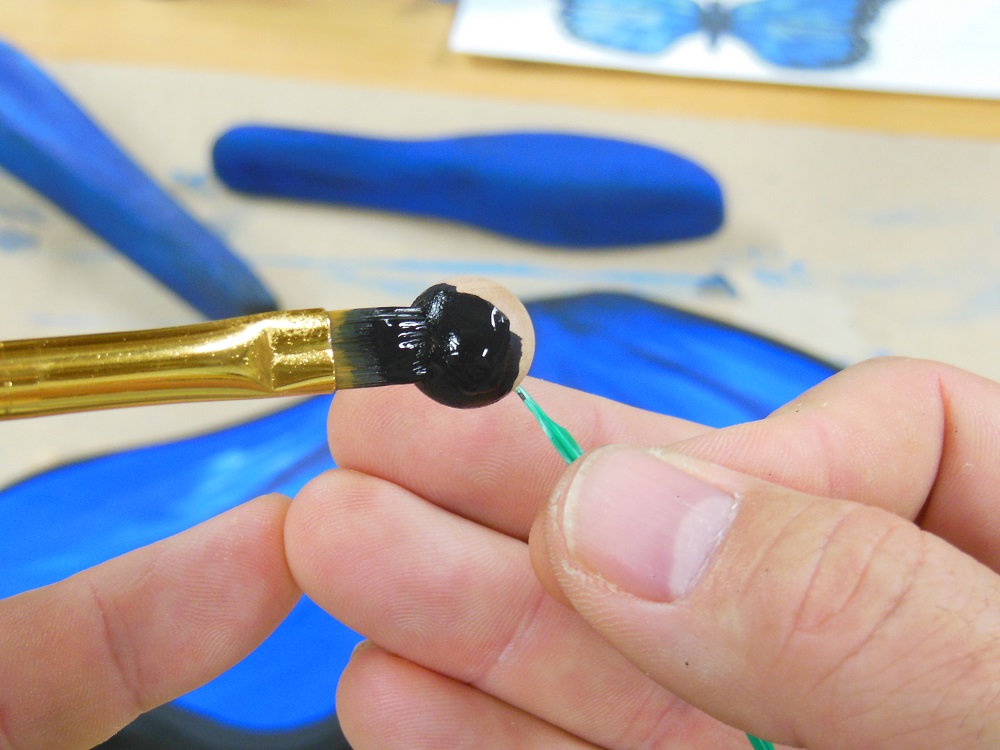
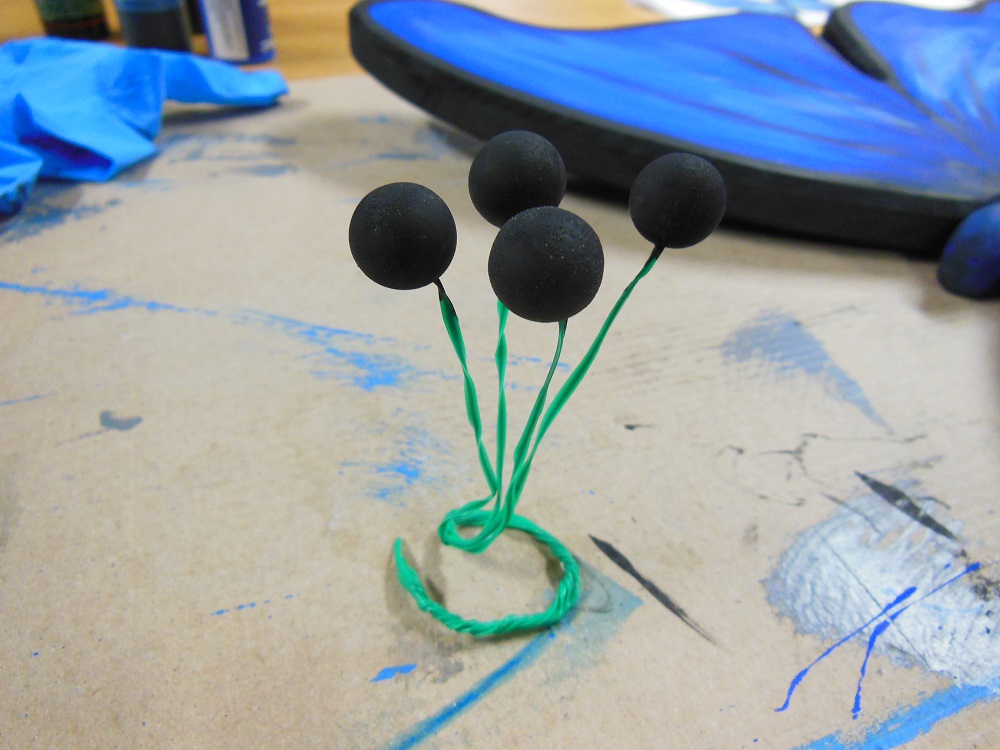
Get Great Reception With These Antennae – No Foil Or Arm Waving Required

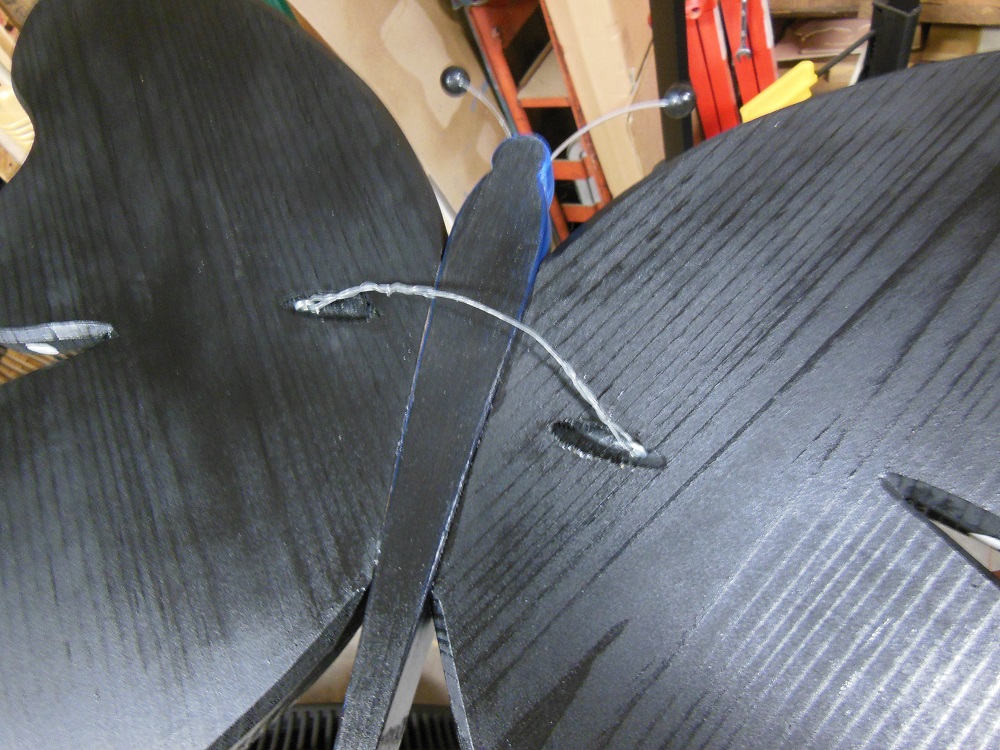
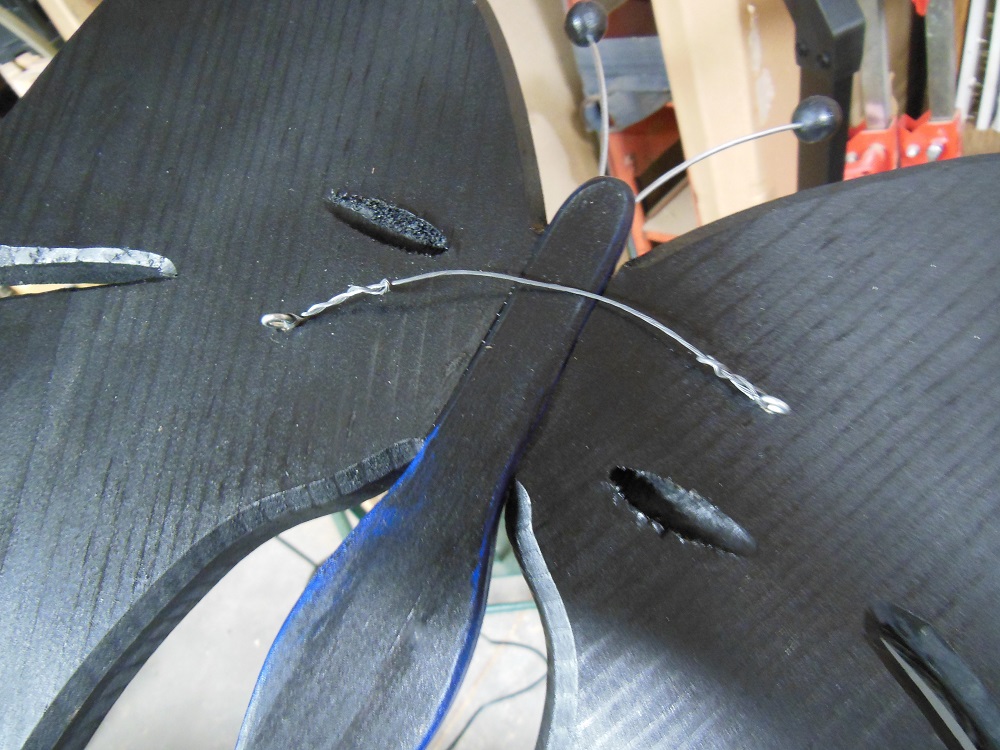
Before gluing the parts together, I got some 1/2” wood balls from the local craft store and cut pieces of wire to mount them to. Then I drilled holes in the balls and butterfly heads to accept the antenna wires.
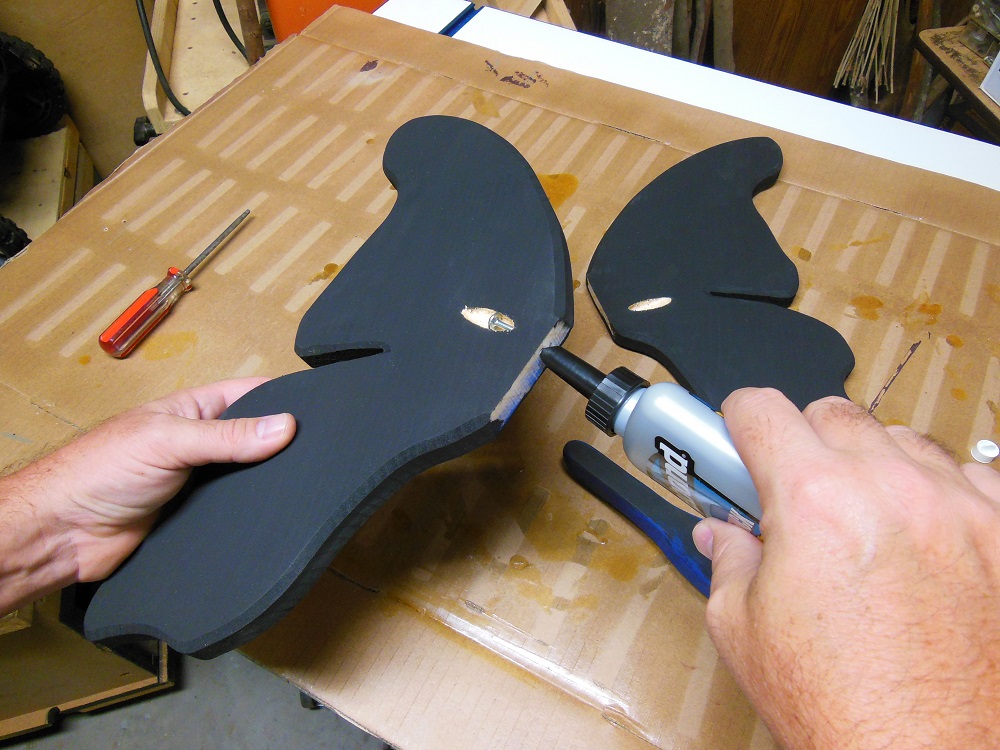
Left Wing, Right Wing – Can’t We Just Meet In The Middle?
We’ve finally reached the point where we can assemble the butterflies. The wings can be glued on with any wood glue. I used Titebond Quick & Thick because it tacks up quickly and doesn’t run or drip. Home Depot only had these in 12 packs, so you may need to hunt elsewhere unless you need a LOT of glue.
I used pocket screws to speed up the assembly process even more. You can skip the pocket screws if you’d like. But you’ll have to be creative with your clamping until the glue sets up. If your butterfly isn’t large enough, you may have to skip the screws anyway.
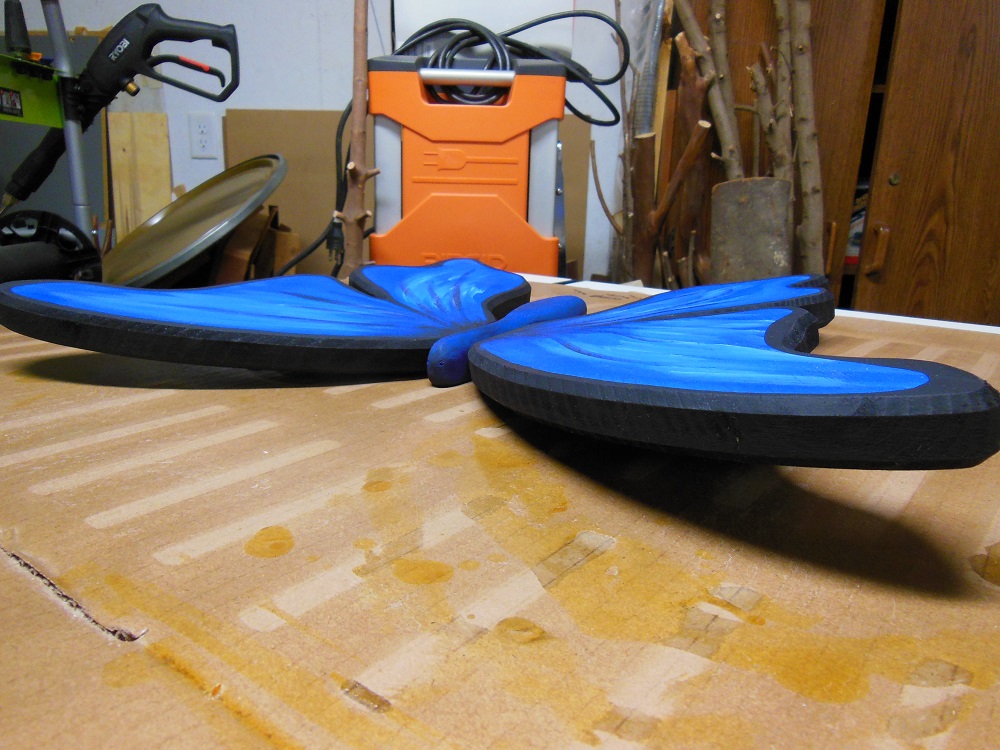
How Do Butterflies Get A Clear Signal While Flying? They Have Aerial Antennas

Use cyanoacrylate glue (“super glue”) to fasten the wooden balls to the wires and the wires to the butterfly.

To Be A (Butter)Fly On The Wall – Ridgid 18V Octane Jig Saw & ¼ Sheet Sander
Finally, attach hardware to the back so you can hang your butterfly on the wall. I set both of mine up to hang at a slight angle, in towards each other.
Take Flight, Oh Winged One!
I’ve noticed a lot more butterflies flitting around the yard while building this project over the past week. Could it be that they’re interested in checking out Ridgid’s 18V lineup? Or maybe they’ve mistaken these art pieces for the moth(er)ship, or even their sovereign ruler. Or perhaps it’s because fall has alighted upon us and it’s all just a happy coincidence.

Get the Ridgid 18V Octane jig saw for just under $130
Get the Ridgid 18V Octane ¼ sheet sander for just under $70
A 5-pk. of Bosch T119BO jig saw scroll blades can be had for $6
Get a jig saw blade assortment (includes the Bosch T119BO scrolling blade and others) for under $15
Get the Ridgid oscillating belt/spindle sander for just under $250
Titebond Quick & Thick wood glue for $48 (For a 12 pack)!
I acknowledge that The Home Depot is partnering with Home Fixated in sponsored content. As a part of the sponsorship, Home Fixated is receiving compensation for the purpose of promoting The Home Depot. All expressed opinions and experiences are our own words. This post complies with the Word Of Mouth Marketing Association (WOMMA) Ethics Code and applicable Federal Trade Commission guidelines.