
 Which wood joint would you prefer? Would it be the lowly butt joint, the subject of jokes that will never seem to end? Or maybe it would better suit your fancy cozying up to a full or half lap joint? Or will your shrink tell you to just cope and stick it! These, along with many more methods, are examples of the kinds of wood joinery available to use. The goal is simple: use some glue and stick two pieces of wood together in such a way that after the glue dries, they won’t fall apart. Some like doing it by hand and others like using a machine but either way you roll, there are plenty of options to choose from. So, what are you joining together? Here are some examples.
Solid Wood Panels – Butt Joints
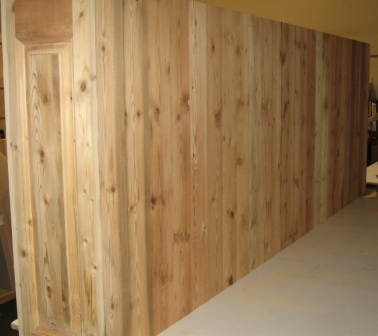
Here’s where you want to glue the long edges of two or more boards of wood together to make door panels, end panels, wall panels, etc. Butt joints are great for these guys as they’re fast and easy to do. Rip the boards you want to glue together on your table saw using a rip blade that spits out your pieces ready to glue up. Set up your clamps, glue up your pieces, and clamp until dry. If you need better registration between your boards, then use a biscuit or dowel. If clamps are few and far between, and the backside of your panel is not visible, use the new Kreg K4MS Jig Master (or Porter Cable QuickJig 560) to prepare your boards for pocket screws. Use a good aliphatic glue, and your joints will be stronger than the wood itself.
Stiles and Rails for Doors – Cope and Stick Joints
Basically a cope and stick joint allows the stiles and rails to go together using a cutter to cut the inside edge detail of the door stile and the dado for the panel, then cutting the reverse detail in the end of the rail so the rail will slide down from the top of the stile, nice and snug. After running test setups to dial in the joint, this method of joinery is great for production runs where a number of doors will be made at the same time and all you have to do is run all your stiles and rails, get your panels ready, and glue and clamp. Three wing cutters are available for shapers, and different router bits are on the market if shapers are not part of your shop. MLCS, Freud, and Porter Cable make high quality bits for the majority of the standard inside edge details you’ll be looking for.
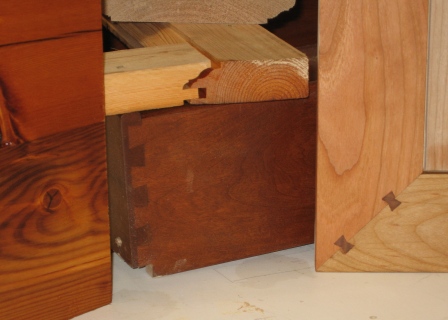
Drawer Boxes – Pocket Screws or Dovetail Joints
It’s up to you whether you decide to slam together boxes with pocket screws or go old school with hand sawn dovetail joints. What does the situation call for? Is it for your mother-in-law who thinks dovetail and rabbets are something you eat on hunting trips? I’m thinking pocket screws here. Is it for your girlfriend’s father’s office? Who just so happens to have timeshares in Vegas, Cabo, and Hawaii? If you’re no Sam Maloof or you don’t have as much time as Norm, order out. DBS (Drawer Box Specialties) makes a really nice prefinished dovetailed drawer box that just might get her old man to say, “Here are the keys to the condo – aloha.” You can also check out our post on Western Dovetails.
More Joints
There are more – lots more – like rabbet joints, T&G joints, dado joints, mortise and tenon joints – the list goes on. What joint will work best for your project? I’ll talk more about these and others in a future article.
Having been a finish carpenter before a framing carpenter, I found that a scarf jointed sub-facia (between trusses with a splice block behind it) and facia makes for a much straighter eave than the old way of just butt jointing them half on a truss tail.
Some other joints to consider (for drawers) is the standard screw joint which can actually look decent when plugged. You can even get ‘fancy?’ and use square or diamond plugs.
There is also the Miller Dowel Joint which is just an exposed dowel joint – much easier to create than a standard hidden dowel joint.
Then there is the ‘Lock Miter Joint’ which is a made using a special router bit to create a stepped miter joint that can be used to hide end grain but requires no mechanical fastening.
Similarly, there is the ‘Reversible Glue Joint’ which is essentially a routed cope and stick joint that is just two matched tongues also using a special router bit.
Let’s not forget the original ‘Lock Joint’ which can be made on the table saw by creating three mating dado cuts resulting in an L shaped piece fitting into a J shaped piece and an exposed 1/3 thickness end grain.
Of course the average person only knows about dovetail joints and of that only that they are shaped like a dove’s tail and are purportedly the strongest… supposedly the best.
DC
I use biscuits for helping to strengthen glue ups – they are fast, accurate and easy.
I like splined miters for boxes. One of these days I’ll try my hand at dovetails.
Splined miters can be very cool looking too (especially with contrasting wood). Let us know how your dovetail efforts go Drew!
@Drew and Mike,
Don’t forget that there’s two ways to spline a miter:
1.) Exposed splines on the outside of the corner – the kerf is perpendicular to the miter edge and easily cut after assembly – can look very nice with a contrasting wood species.
2.) Hidden splines on the inside of the miter – the kerf is parallel to the miter edge and must be cut prior to assembly – is a very strong joint especially if you can use a slice of plywood or face grain wood with the grain running perpendicular to the miter faces.
I just realized how difficult this is to describe with my limited vocabulary so, I hope it makes sense ( a picture would be worth 1k words for sure).
DC
I am a big fan of scarf joints, they work great to make two short pieces into one long one. They come in handy for making canoe gunwales.
Also very popular on trim. . . I can’t say I’ve ever made a canoe gunwale (or canoe for that matter). Very cool Tom!