

Don’t you just hate it when the sun is in your eyes? Your house hates it too. So why not build it a pair of sunglasses? Simple DIY awnings are but just a few cuts and screws away. Use this guide to basic wood and metal window awnings and create your own one-of-a-kind window dressing that takes the yawning out of awning.
My dad loves to come up with “little” projects to do around the house. I think it’s how he relaxes, but it’s also a sign he’s been out in the sun a little too much and has gone a little crazy. Either that or we’d better check his medication again. No matter what it is, he nailed it when he created these simple yet effective awnings. I liked them right away because it took less than a day to assemble and the materials aren’t that expensive.
Materials
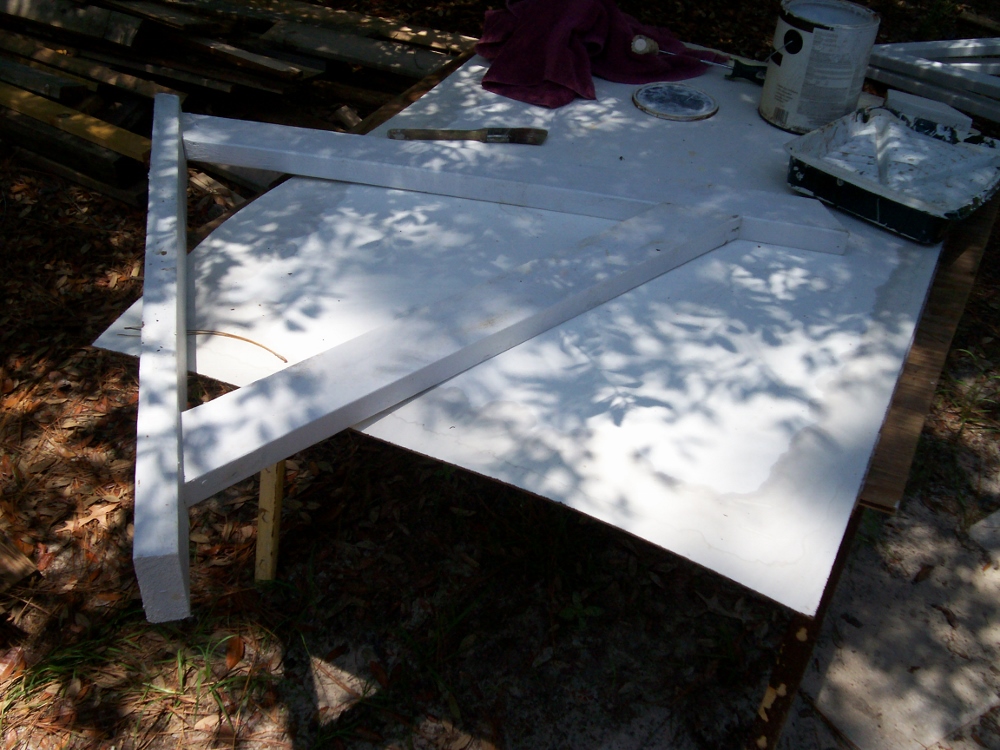 The good news for us was that we already had a stash of materials and it cost us practically nothing to build two wood frame/metal roof awnings. The bad news for you is that you probably don’t have a few sheets of metal roofing lying around your backyard and you’ll need to go out and get some. But the good news about that is that now you can get them already finished and cut to size.
We also had a bunch of yellow pine structural 2×4’s laying around that needed to be used. Since they had weathered outdoors already, they had done all of the twisting and warping they were going to do and were perfect for this job.
 With a bit of white exterior paint and a few galvanized exterior decking screws, we painted the 2×4’s after we cut them and assembled the basic A-frame that would serve to hold up the roofing material for the awning.
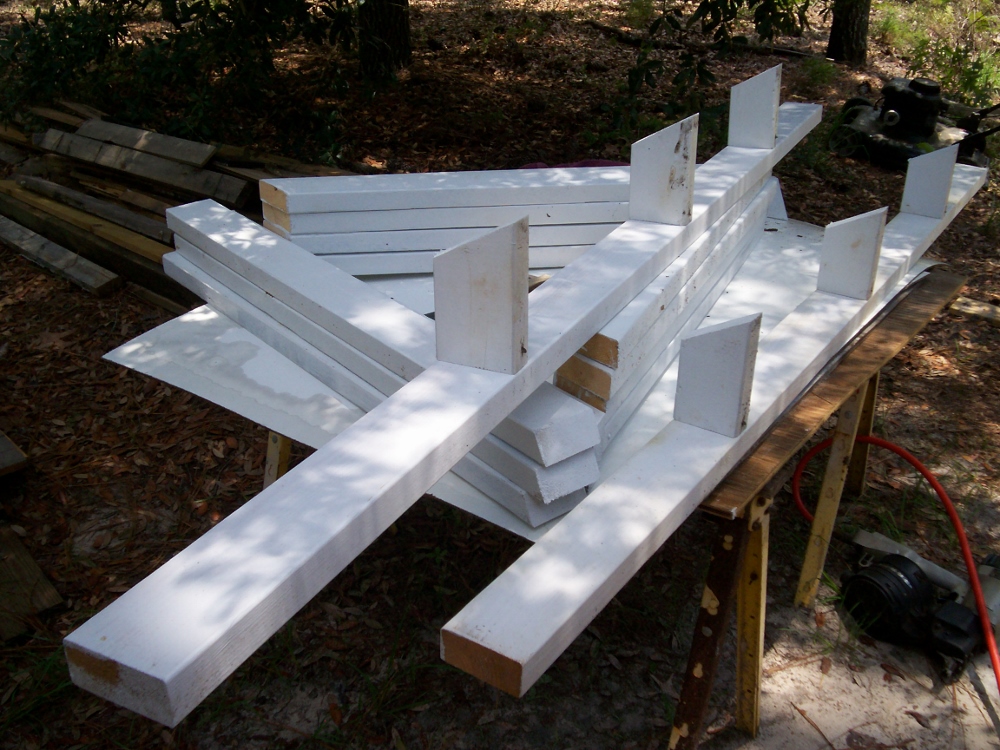
A-Frame Dimensions
The A-frame, as I like to call it, is more like a triangle on its side. We wanted the pitch of the awning to be a 6/12 pitch and match the pitch of the roof on the rest of the house. It’s a nice detail that helps the awnings tie in with the rest of the house design.
 For the part of the A-frame that rests against the home, we cut the bottom flush and cut a 26 degree bevel at the top. It’s actually a 26.57 degree bevel to match a 6/12 pitch but it’s a little tough to get the extra .57 degree’s on a circular saw. We cut these boards to a length of 40” from square point to long point.
For the top piece (barge rafter) of the A-frame, we cut this board to a length of 40” as well. But instead of cutting a bevel and square end, we cut both ends with a 6/12 pitch. Just like a rafter, we cut our ends so that one angle has the long point and the other side has the short point.
The remaining part of the A-frame got cut to a length of 34”. This board was cut a little differently too. We still cut two 6/12 angles on each board, but we flipped one around so that the 34” measurement travels from short point to short point of the angle.
Rafter Dimensions
The top rafters were the easy part of the job. The two sides that hold the rafters in place are already on the A-frame assembly. All that’s really needed is two horizontal rafters, a piece of deadwood to hold it all to the wall and a few dummy ends cut to look like the rafter tails.
We cut three rafter pieces at 85 ½” with square ends on each side. Of course, for your window, the dimensions will very likely be different. We cut the three dummy rafter tails flush on one side and with a 6/12 pitch on the other ends. These were cut 6” long to match the ends of the A-frame rafters.
Awning Assembly
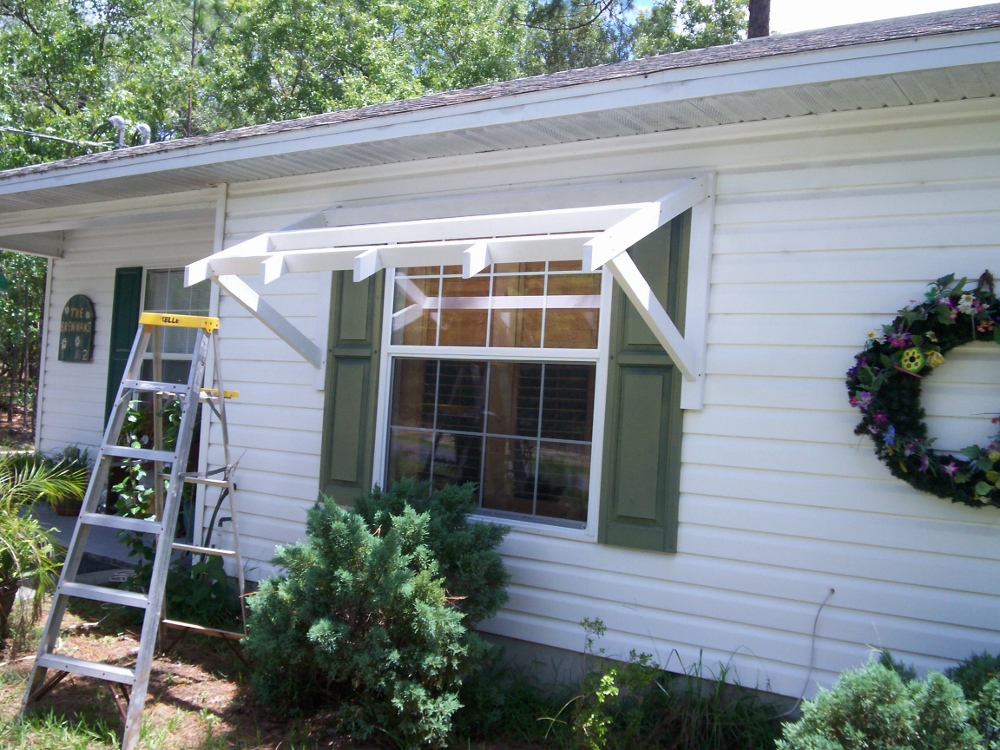 This part of the project was fairly simple too. We fastened the A-frame pieces together on the ground, and then we installed them against the wall of the house. Since the house has a wood frame exterior, it was pretty easy to screw the A-frames in place. It wouldn’t be that much tougher to drill for some tapcons or redheads if you have a block home. Just make sure whatever you are fastening to is solid and structural.
Once the two sides were up, it was all cruising downhill from there. We attached the three horizontal joists between the two A-frame pieces. For the piece with the fake tails, we attached them to a joist first before we attached it to the rest of the awning.
Metal Roof
Once the frame was up, it only lacked a metal roof. We used a three foot wide panel (since we had some lying around anyways) and rip cut one piece so that all three metal panels fit evenly over the top of the awning. With a few well-placed metal roofing screws complete with butyl grommets, the roof was on and the awnings were complete. Sunlight glare eliminated!
Way too many ads. Couldn’t read a paragraph or even a sentence without being interrupted by ads.
Hi Deborah. Thanks for taking the time to submit your feedback. Ads are a bit of a necessary evil for us to provide free content, and we try to balance that need with user experience. We appreciate your input and will factor it in to our ongoing analysis of ad density.
great job and gives me ideas how to proceed to do the same on my house , 30′ wide though, was thinking about doing it using solar panels, $3K , that would be shade in winter, just priced this at lowes with corrugated pvc panels and 2×4 for $300, ya, this makes so much more sense. you did a great job and again having visual picture of it gets my neurons firirng.
Hi Marc, I like your yawn over yawning! I want to make 4 of them for my windows and over my front and back doors. If I give you the measurements will you help me determine the amount of lumber I will need. Window installation measurements: 4 windows: 8 ft wide and length 4 ft. I don’t know pitch of roof, but I believe it’s standard. Doors installation measurements: 2 doors: 6ft 2″ wide and length 3ft. Width is accounting for outside light. Hoping to hear from you soon. Thank you Grace
Hi Grace, glad you enjoyed the article. Calculating lumber orders is outside of the scope of what we do here, and your order will depend on details for your particular installation. If you’re not sure what you need to order (or how much of it), you may want to consider hiring a contractor to assist you with your project. We wish you all the best with your awnings!
Hi Grace! Glad you were inspired by the article. I didn’t write that article personally, and the author that did isn’t part of our team. If you are not comfortable determining how much lumber you need based on your measurements, you may want to enlist the help of a handyman or contractor to assist you. Wishing you all the best with the project!
Three of these are going up right now! The attached rafter tails exactly match our 1917 home. Really great for protection from heavy FL rains. The horizontal platform provides premium support for the metal panels and lessens the unnecessary weight. Thank you for a wonderfully “simple” but effective design.
Hi Lyn, thanks! Glad our DIY awning tips helped!
I would like an awning over my kitchen window to get pivacy from a two story home. Any advice about deciding on the projection and slant would be appreciated .
This tutorial is great. Thank you for posting. That other material could be used as a topper. I live in Texas and I’m concerned the tin roof would just make it that much hotter.
Thanks for the tips! I’m going to build one of these for my south facing bedroom window. I will make a couple design adjustments per the materials I have at hand to use and the way I would like mine to look, of course. I’ll shoot you a picture when complete. Great post btw.
Hi, I love your project and the finished result. I’ve been researching the best way to construct a couple of awnings, with wood and metal for about 2 days now and yours is the most logical to me … especially the rafters that travel horizontally as opposed to vertically. To secure the metal, with vertical rafters, you’d need 1 every 14″ or so, which is 7 rafters for an 8′ awning. Talk about unnecessary weight! I toyed with the horizonal thing, but didn’t like the look, until I saw your little rafter butts … that did it for me! Awesome idea. Thank you so much for posting all the “how’s” for us
Did you remove siding so that the frame sits flush against the underlayment, or did you just mount the awning frame over the siding?
This looks great, I’ll build this over my french doors. Thank you!
I like this… I am worried about the tin on the roof of it… We have a window unit in our bedroom window and every time it rains, I do not get any sleep, because the dripping keeps hitting the unit. Does the tin roof make lots of noise?
If you wanted to experiment you could try automotive foam rubber insulation sheets under the awning right on the metal. It’s automotive purpose is sound deadening so it might work. Possibly thought, if you have modern windows and the dead air space between the awning and window would take care of the noise. Good luck!
This is exactly the idea/plans I needed to show my handyman to resolve my huge front window issue… thanks for the well written instructions!
Glad we could help Dianne!
nice job but what about trailer homes
should work just as well for a mobile home, Just make sure to put some silicone caulking on the top of your 2×4 going above your window so you dont cause a leak.
Nice article! Really has a pretty bang bang for just a little investment!
Nice job!
Thanks for the comment Liz, glad you liked the project!