
 Last time we hit up getting started fence building tips, we talked a bit about the planning, layout, and installation of the posts. Now, we’ll cover the actual framing of the fence, and finishing it off properly. Your new neighbor will need a good finish–since you will be looking at it quite a bit, and an ugly fence is just…ugly.
Fence Materials: For our fence–we went a bit more expensive…I am not a fan of metal fences–but they certainly can be useful. Ease of maintenance is a big draw to them, but the installation may be a little more than most DIYers care to undertake. Granted–I haven’t done much with metal other than the fencing we do when we head to the inlaw’s ranch. That is more of the barbed-wire, utilitarian fence–and unless you are keeping cattle, or fortifying your barbed wire with sandbags for the imminent Canadian invasion–I’d go with something less…prison-y.
You can use vinyl, treated wood, untreated wood, metal–really the decision is yours. Cost and the finished look will dictate what you end up using. A note on vinyl: Don’t do like my buddy and place your grill too close to it. It gets very nice and warm there–and will melt it. Fence fires are not cool. Neither is the toxic smoke from melting plastics.
We chose to use treated 4”x4” posts for the structure, cedar 2×4”s for the stringers or cross members, and a nice 1×6”ish cedar board for the vertical fence pieces. I like cedar. It smells nice, looks natural, and finished pretty good. Cedar is pretty soft as well–so use care if you choose to go with it as a miss with your saw or drill will gouge it up pretty good. It is pretty sucky to cut, because of the fine dust it creates and cedar dust can irritate some people. The usual safety bit for this too. Dust, eyes, ears, blah, blah, blah don’t cut your hand off. There I said it. Don’t sue us.
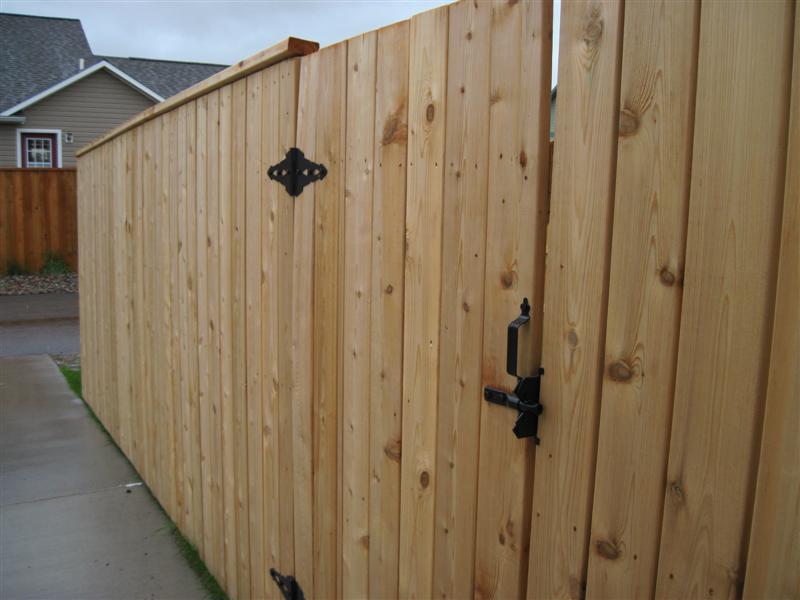
The Framing: Since your posts are already in–the framing bit isn’t too tough. Choose a height that will keep your fence boards from touching the ground. For a 6′ fence, I used three stringers. Top, middle, bottom. I didn’t worry about leveling them off too much as I kept the bottom stringer about 6 inches on center from the ground. Just let the ground dictate your height. Your bottom stringer will be your guide for the others. At about the mid-point of the posts, I put the middle, and then used the tops of the posts for my top stringer. I calculated the 2x4s so I could put a “cap” on the fence. This serves to keep the open grain of the vertical fence boards from taking rain/snow directly, and just gives the top of the fence a nice finished look.
The Fence: For the 1×6” installation–I wanted a nice, uniform gap. The gap gives the wood room to expand/contract, and just gives a clean appearance. I do not recommend fencing with your boards tight to each other. It will just want to twist, and you will get uneven gaps that way. Wood is going to move. Just get used to it. The spacing will take your eye away from any non-uniform gaps, and give it a clean appearance. I just ripped a couple of pieces of scrap wood to a 3/8”s size, and used those as spacers. Your gap can vary. For shorter fences, a larger gap can look pretty cool–and give you that Americana white picket fence if you choose to do so. I just screwed two screws per stringer, for a total of six screws on the fence board itself. I could have done three–and in hindsight…I probably should have. Some of my boards are cupping, twisting, and, just generally being wood. More screws would have helped that.
While I’m on the subject–if you do go with wood, it isn’t a bad idea to get it to your crib, and let it sit outside for a week or two. Let it get acclimated. Who knows how long it has been in your region at the lumber yard. Could be days, weeks, or even hours–it’s not a bad idea to let it adjust to where it is going to be permanently installed. Avoid the urge to use nails. Nails won’t hold, you’ll miss and mar up your boards–and eventually the fibers of your wood will outdo the holding power of your nails. There are some pretty ugly fences in our neighborhood where non Fixated readers used nails. Screw it!
When installing your fence boards, make sure the first is nice and plumb–and you can just use your spacers and put up the boards without measuring each one. You should do some maths to make sure that the width of your boards, plus gap will allow for full boards without having to rip one. Or, if you don’t like maths, you can try to mock it up without actually screwing the fence boards in place. You can adjust your gaps accordingly to make sure you don’t end up with some funky ripped board.
Finishing: I regret not staining the boards before installation. Mostly I was too hasty, and just wanted the fence up. Don’t be like me. Finish your boards with a stain or sealer BEFORE you install them. Pre-cutting and staining will save you a lot of trouble in the end. If you are like me–at the very least hit the ends of your fence boards and stringers with the sealer/stain you will use. The end grain of wood is like a sponge–and without a good seal you will have the beginnings of rot in not too many seasons.
Gates: These can be a little tricky–but most box stores have good hardware for fence gates. Just build it like it is a section of your fence. I put posts on either side of the opening, and make double sure the hinge side was nice and stout. Doesn’t have to be super fancy or within such close tolerances you can’t open it. Just mind the gap. (Little bit of Tube humor for all the Londoners–we are international). Leave enough room so that your gate opens and closes even with seasonal differences. 1/2” or so ought to do the trick.
Now that you have built your new neighbor–take a moment and enjoy a refreshing beverage (or 12) in the new room in your backyard!
Your cautionary tale in the “Finishing” section should be required reading for anyone putting up a fence. I have a beautiful redwood fence that has been carefully maintained over the years. But, because my fence builder did not seal the ends of the boards, and I didn’t think about it at the time, I’ve had to deal with water stains creeping up from the bottom of the boards where rain water was trapped. It’s all fixable, but so avoidable. (And this is with waterproof posts and beams running along the bottom side of the fence.)
Thanks “sk8888”! No offense, but you have the weirdest name of anyone commenting! ; )
That old “an ounce of prevention is worth a pound of cure” definitely applies to a lot of home improvement too. Thanks for sharing your own fence and finish comments.
Just one picture? Posts with less words and more pictures are better for these kinds of projects.
Duly noted Jeff.
I’ve been trying to remember to take pictures of projects in stages…but I missed on this one. Thanks for the suggestion!