
 Okay, so some of you may have read the first installment of this article “Mud ‘n Tape For the Last Time With Faux Beam Work,” and here’s the wrap up. As you can see from the pictures, the project still isn’t totally finished. Paint, hardwood floors, new doors, finished closets, etc. are still to come, but the beam work is up. (And c’mon ladies, what girl doesn’t dream of a Bosch Double Compound Miter Saw as the focal point of the master bedroom?)
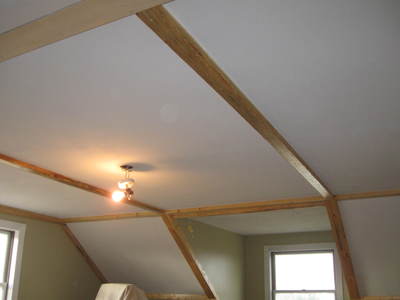
The Original Plan for our Faux Beam Installation
We stuck fairly close to the original plan, which called for:
- Skirting the ceiling joints with the 2x4s
- Running the 2x6s perpendicular to the trusses to give the illusion of mother beams
- Running the remaining 2x4s parallel to the trusses at 4-foot on center, in a tighter repetition, to look like roof support
- Installing the remaining 2x6s vertically in the corners to mimic load-bearing posts

Sometimes Room Features Dictate Where You Place Those Faux Beams
The only thing we decided to alter was the placement of the 2x4s across the ceiling. The original intent was to run four beams at 4-foot on center, but we cut it down to just two beams for two reasons: 1) As mentioned in the previous article, there are space and height limitations in this room. The two additional crossbeams would have started to look too crowded and 2) there’s a dormer that pretty much dictates the spots where two of the beams have to run. Once those were in place, the remaining ceiling span would have forced us to install the last two beams in an asymmetrical layout and/or in an area without a supporting rafter. (I love it when decisions are made for me!)
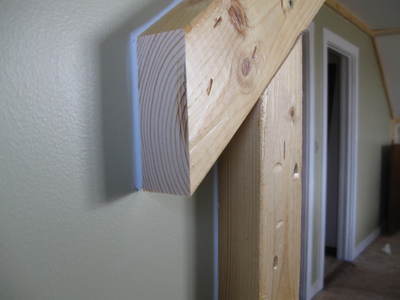
Another crucial step once the beams were in place was to caulk the beam-to-ceiling and beam-to-wall joints. As is the case in almost every structure I’ve ever been in and every project I’ve ever worked on, nothing is perfect. The ceilings and walls have a few waves and the 2x4s will always have a little twist or warp here and there. The caulk goes a long way toward giving everything a clean, finished look, and helps to maintain the illusion that the beams are part of the structure, rather than just slapped up on the surface.
While the faux beam application certainly isn’t for everyone or every style of home, it works well here for more than one reason. Time will tell, but it seems as though the constant stress cracks, mostly due to high winds (God, is anyone ready to punch my face in yet for droning on and on about the wind around here?) are permanently camouflaged and the additional bracing and support can’t hurt.