

Last year, my daughter and her husband moved into their first home, somewhere in the great state of Ohio. Fortunately, it needed a little work, so that helped occupy my spare time last summer (and on some periodic weekend visits since). After all the minor issues were addressed, her dream was some respite from the sun on their south-facing patio; to be able to sit out in the shade and read a book, hang out, grill a burger and enjoy a cold beer. It was the last potential uses that got MY interest up, and with their pergola kitty bolstered to $500 by a tax refund, we leapt into action.

Choosing a Site and Design
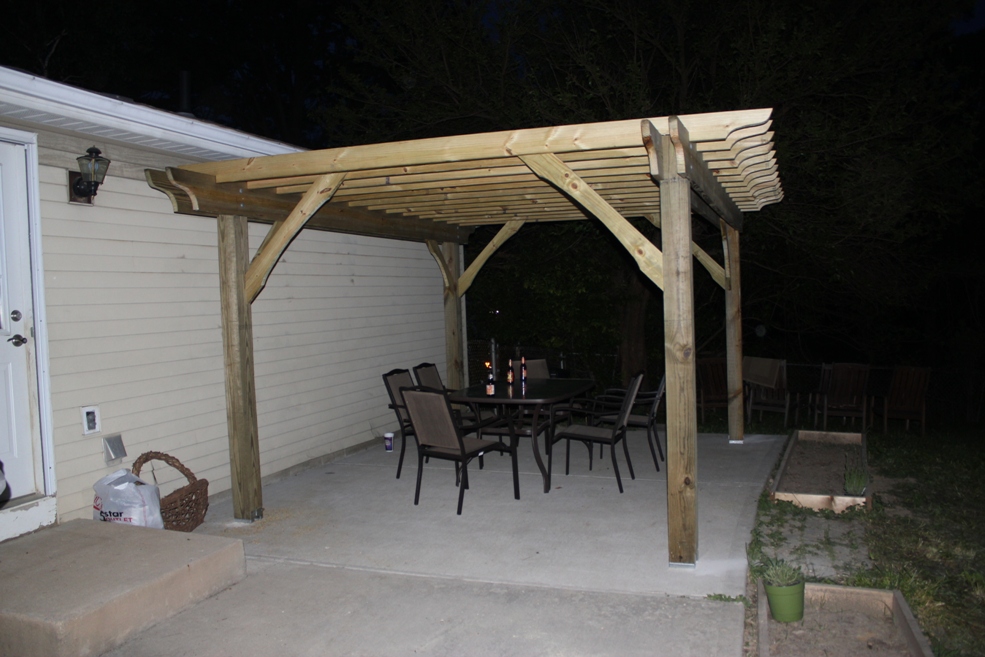
The patio is concrete, 12’ X 24’, and in very good condition (after a good power washing). After looking at some pergola pics online for inspiration, we came up with a simple design, and after pricing materials, we decided on roof dimensions of 12’ X 16’. We went with a free-standing design, which, in addition to looking good, requires no permit, since it isn’t attached to the house. Building codes vary widely, so check with your local inspector.
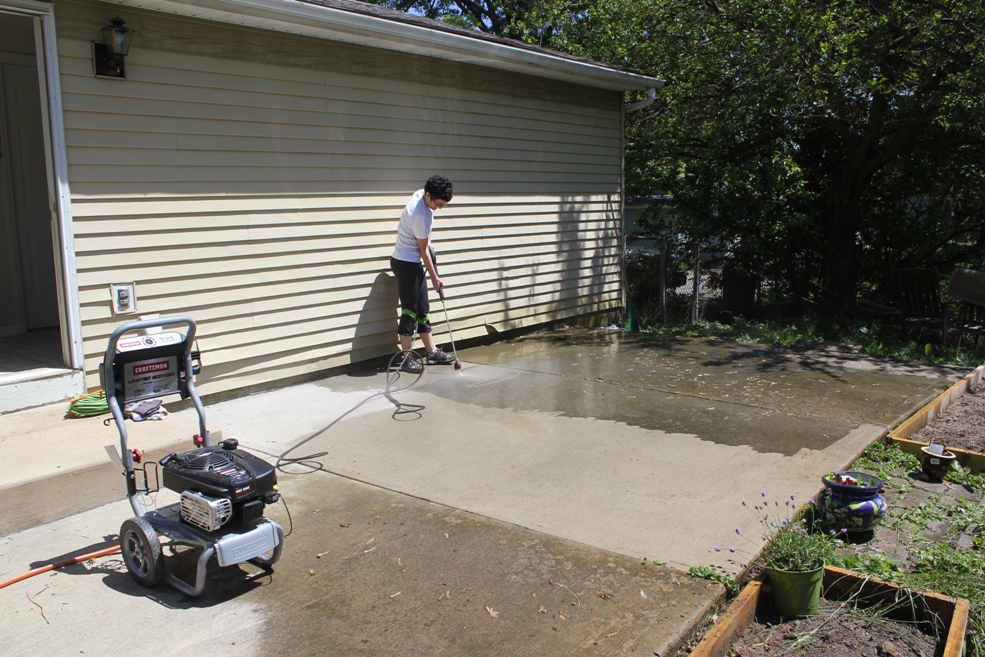
While my daughter rinsed the scuzz off the patio, my son-in-law and I went to the local home center, and managed to get everything onto my (somewhat overloaded) truck in one trip.
Our Pergola Material List
4 2X10X16’ pressure treated (p.t.)
15 2X6X12’ p.t.
1 1X4X10’ p.t.
4 6X6X8’ p.t.
8 8” galvanized carriage bolts, with nuts and washers
1 5 lb. box 3”exterior screws
4 standoffs for 6X6 posts
4 5/8” expansion bolts
Pergola Post-Setting Options
Normally, a free-standing pergola would be built on concrete piers, sunk below the frost line. Since the patio was in good, solid shape, with concrete 5 to 6” thick, we took the instant-gratification route and built it right on the patio. Since this is an open-roof design, it will never have to bear any weight beyond that of the structure itself.
If you need piers, you’ll have to first ascertain exactly where your posts will sit. Take your time, and make sure your posts will line up right and be square to each other. Next, dig some 8-10” holes to below the frost level in your area (usually three feet or a bit more). Unless you are strong like bull, this is made MUCH easier with the use of a rented power augur, and is well worth the $40 or so for the rental. Insert Sonotubes in the holes, mix and pour your concrete into them, and insert a 5/8” J-bolt in the center of each while the concrete is wet, extending about 1” up.
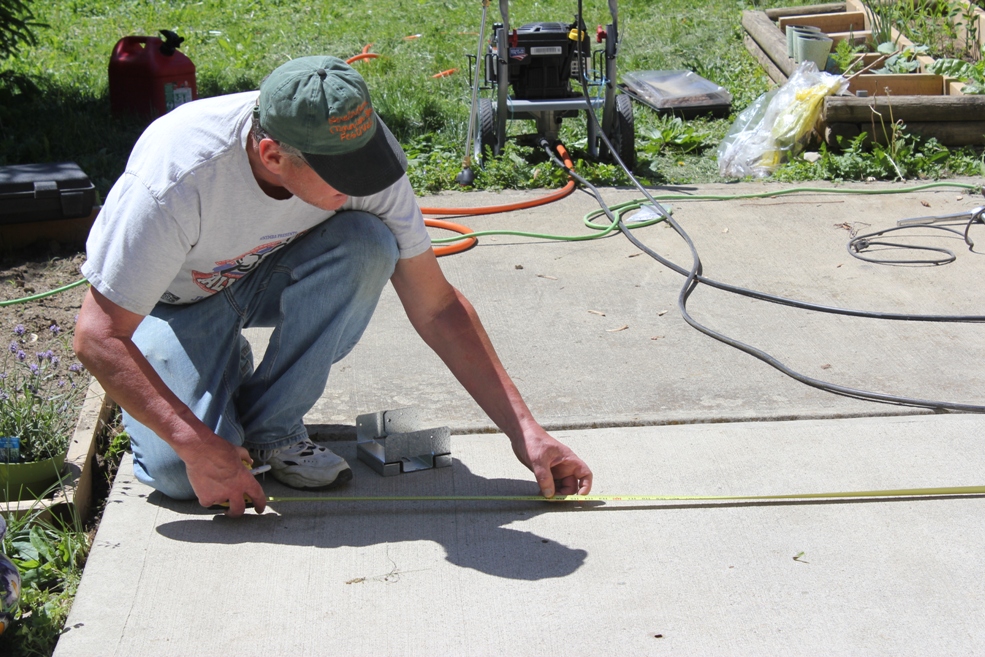
Our design called for the four 6X6” posts to be set around 12’ apart on the width, 9’ on the depth, to provide a stylin’ overhang. (We actually offset the left rear post about a foot to the right, to provide better access to an outdoor outlet and dryer vent). The front edge of the concrete patio curved, so we held our measurements square to the house, making sure the posts were held an equal distance from the rear wall of the house.
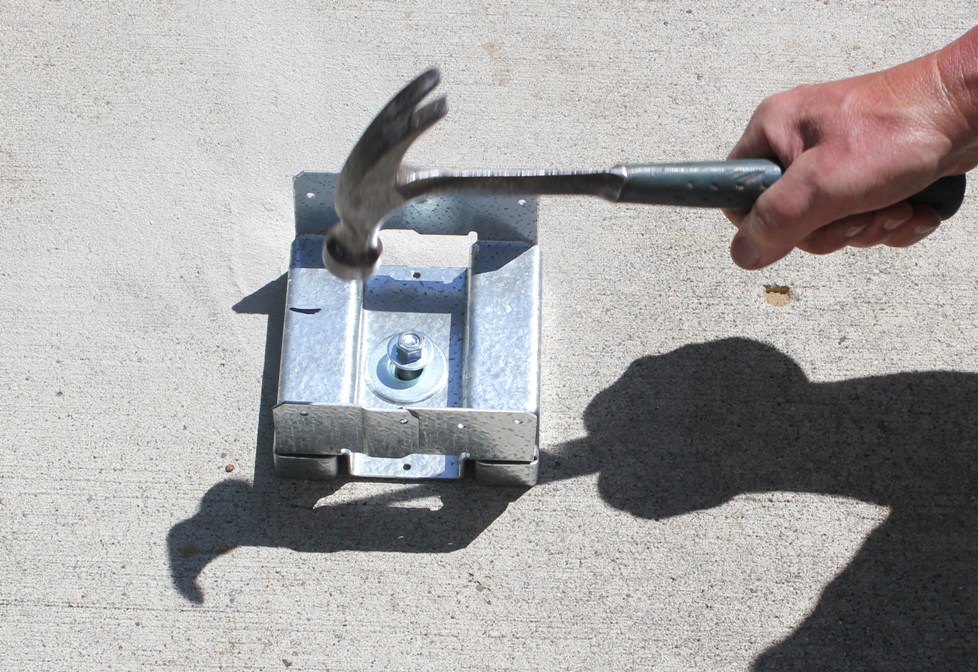
Installing the Standoffs
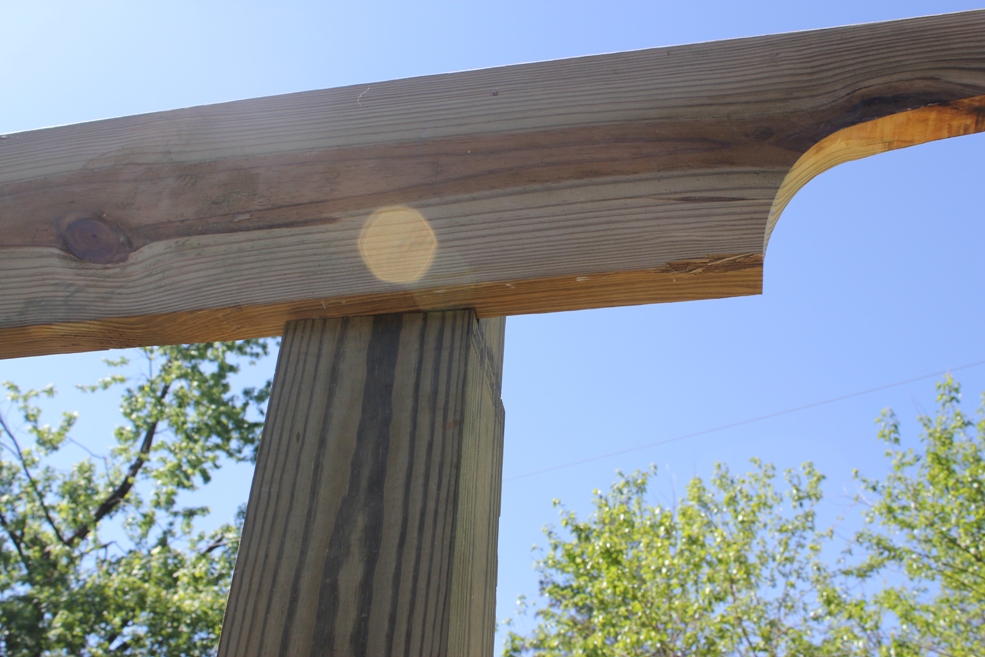
Once the location of the posts was settled, we marked the centers and used a hammer drill to drill a 5/8” hole, set the standoffs in place, and banged in a 5/8” expansion bolt through the center hole of each. After making sure the standoffs were square to each other (they have a slot to allow for some adjustment), we cranked down the retaining nuts. We had decided on an overall height of 90”, to allow the rear of the structure to extend slightly under the house’s soffit. The posts were cut to 89” (allowing 1” for the thickness of the standoffs), and we then trimmed a slice 9 ¼” long by ¾” deep down the opposing faces at the top of each post. This was done to allow the 2X10’s used for the double header to sit flush with the top of the posts, giving each beam a shoulder to rest on, while protruding a bit to add some visual interest (hey, this is Ohio; you NEED some visual interest!). The posts were set on the standoffs, plumbed front and side, and nailed to the standoffs with galvanized structural 10p nails.
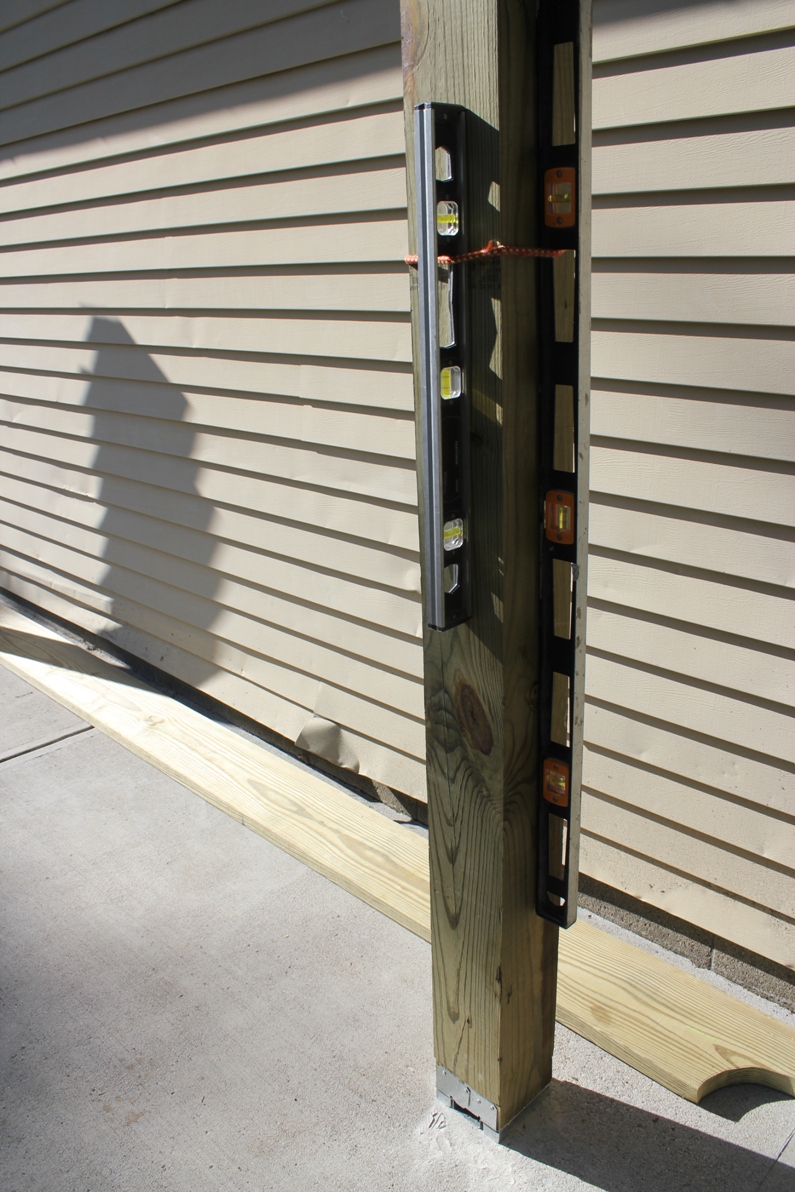
Special Bonus Tip: The posts must be plumb in two planes—front to back and side to side. For those of you with only two hands, simplify the task by placing levels on adjacent sides of the post, and securing them with a bungee cord.
Giving Your Pergola Some Style
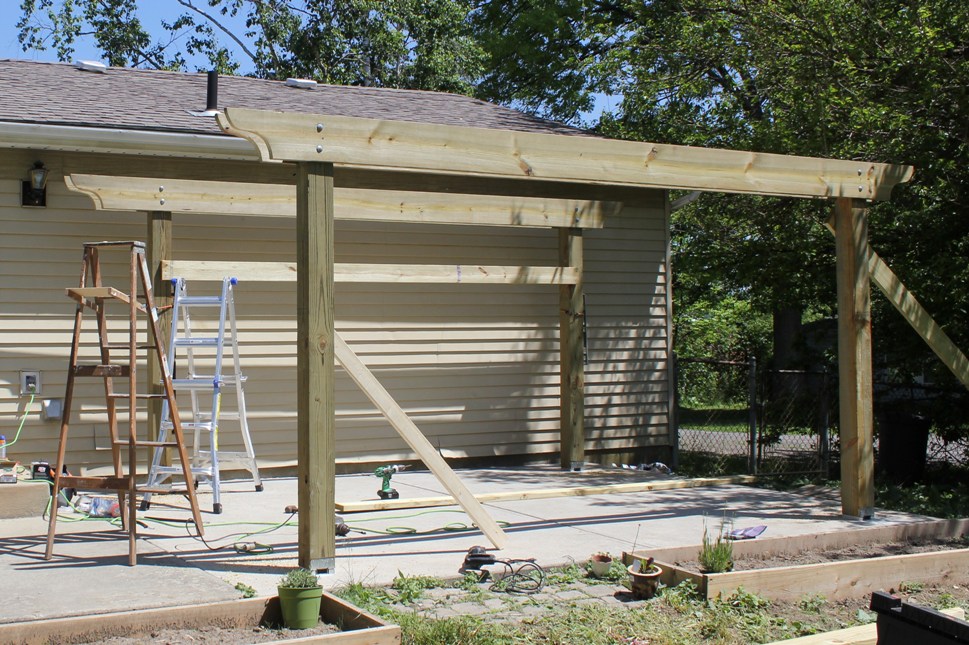
To conjure up the feeling of being in a fabulous Spanish hacienda by the sea (well, Lake Erie is only an hour or so away), we shamelessly copied a simple, curved line from a neighbor’s pergola, drawing it freehand on the first header, then using a cardboard template to trace it onto the rest. We did the same for all the joists, then made all the cuts with a sabre saw. By this time, the sun was fading, and so were we, so we wrapped up and rehydrated ourselves in an appropriate fashion.
Installing the Headers
Bright and (fairly) early on day two, we leapt (OK, fine—stumbled) back into action. After temporarily bracing the posts, we lifted one of the headers and rested it on the cut-out shoulders of the back side of the front set of posts. We were careful to maintain plumb, and to allow an equal amount of overhang at both ends. We screwed the header to both posts to hold it in position, raised another header into position on the front side of the same posts, and screwed it to the posts.
Our next step was to drill two ½” holes, one above the other, through both headers and the posts. We secured each header/post connection with two 8” galvanized carriage bolts, washers and nuts, and then repeated the header installation process with the other set of posts.
Avoiding Lawsuits in Style
Before installing the joists, we wanted to give the structure more stability, to prevent it from racking. (Having pergola parts raining down on you doesn’t generally improve the festive party atmosphere—unless you’re a personal injury attorney…). We cut 2X6’s into pieces about 3’ long, cutting 45º angles on the ends, and scribing and cutting a gracious Mediterranean curve onto each. (Okay, so maybe it was a stylish Buckeye curve). After pre-drilling, to avoid splitting the wood, and double-checking for plumb, we screwed them to the face of the post, holding them all to the same height, then to the headers, using 3” exterior screws.

Installing the Joists
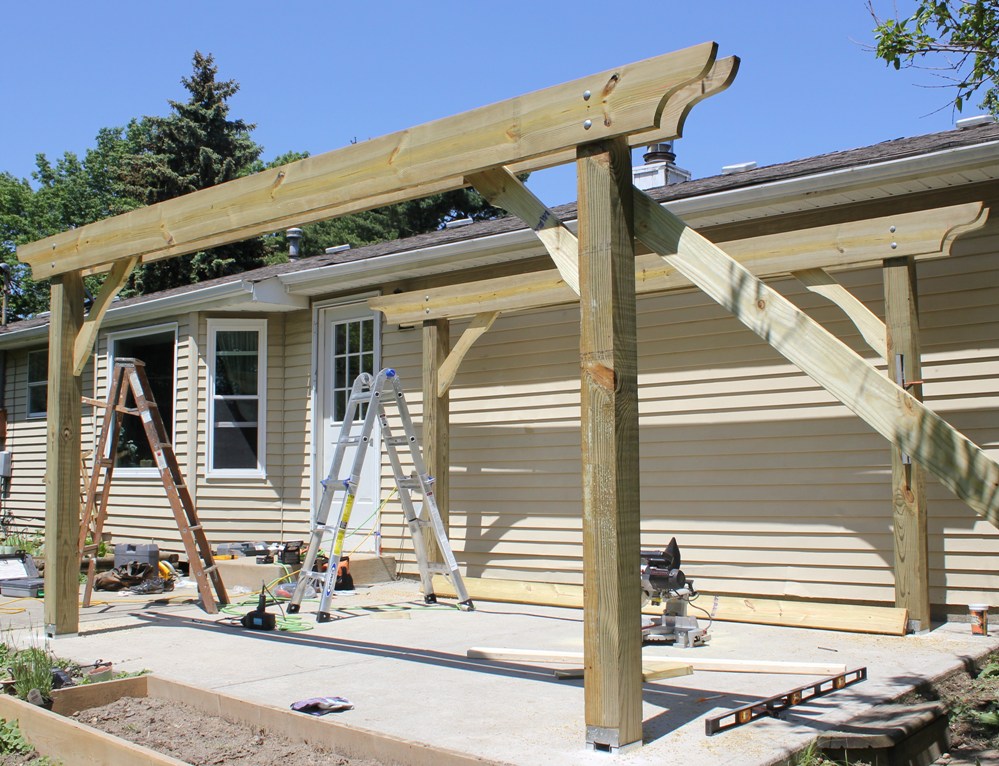
And so, on to the joists! We set two joists, one at each end, to span the two sets of headers. We held them out 16” from the face of the front header (our overhang), and set back 16” from the end of the header on each side. We marked the joists where they sat on the headers, and cut a notch out of the bottom, roughly 7” long (to fit over both headers) and 1 ½” deep. We then slid the notches over the headers, pre-drilled, and toenailed each joist-to-header connection with 3” exterior screws. We then made and installed braces similar to the first set, but about 8” longer for the extra height, to brace the joists to the posts.
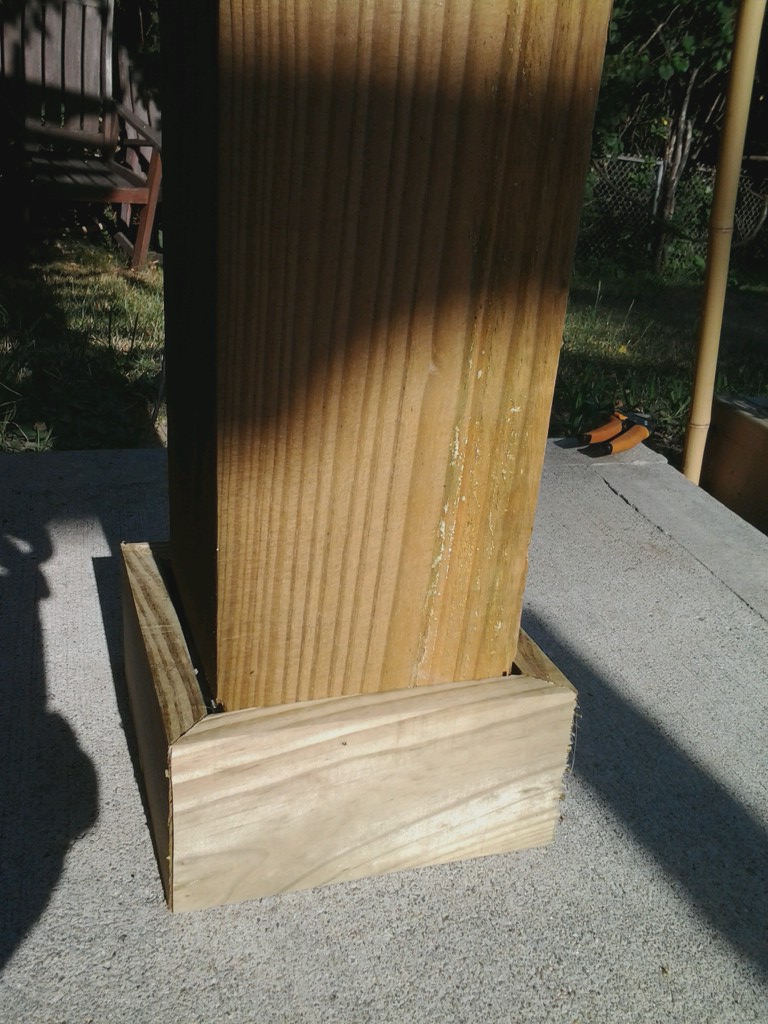
After figuring the spacing for the remaining joists, and marking it on top of the headers, we installed a joist in the center. We made sure the measurements between the front and rear headers were the same there as at the ends, and that the header wasn’t bowed, before securing it into position. After that, with beer o’clock rapidly approaching, we moved right along, notching and installing the remaining joists using the same refined techniques as with the first ones. To dress up the posts (since no one wants naked posts; well, ALMOST no one), we took a piece of pressure treated 1X4, measured and cut 45º mitres on the ends to fit around the post bases, attaching them with 8p. galvanized finish nails.
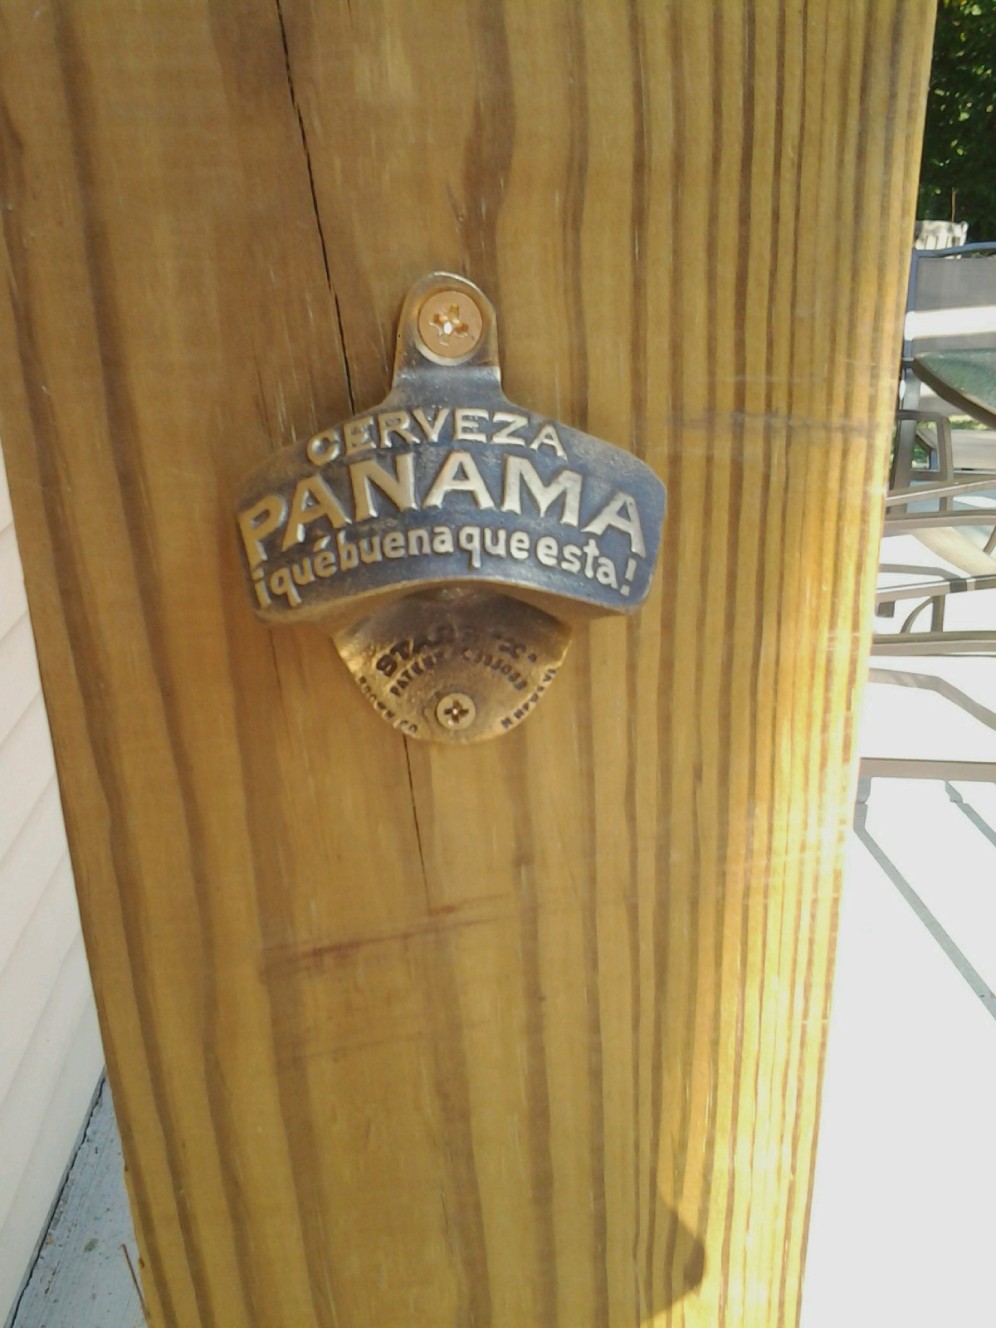
Essential DIY Pergola Finishing Touches – Installing the Bottle Opener
The final step to the perfect pergola, and one often overlooked by the novice, is to install a durable, good-looking bottle opener on one of the posts, preferably at a height and location that doesn’t require leaving one’s chair to use. After that, it’s just a matter of moving the patio furniture and grill under the freshly-screwed joists (hey now, get your mind out of the sawdust-filled gutter), and kicking back in your home-made shade with a fat, juicy burger and an ice-cold beer.
Thanks everyone for all the great comments and questions! Since Phil actually has articles to write and a life outside of Home Fixated comments, we are closing comments on this thread for the time being. For projects that involve some engineering and potential safety concerns, we always encourage you to consult with local, experienced pro(s) whether that’s to make sure you don’t do anything crazy DIY, or to hire them outright to do the work. Stay tuned and subscribe to our newsletter for more great content like this, and good luck with your projects in the meantime!
Phil, What power tool did you use to make the notches on the 6X6?
We just used a circular saw, Sim. Just measure down from the top of the post to where you want the “shoulder” to be; this was 9-1/4″ in our case. Use a square to mark the line, and set the cutting depth on the saw to 3/4″. Cut your marked line, then cut a series of lines parallel to it, fairly close together, all the way to the top of the post. Knock out the waste with your hammer, and clean up any remaining chunks with a wood chisel. Good luck on your project!
I might give this a whirl. What’s the method for getting the “proper layout” right when trying to line up where the posts will sit? I have a similar concrete pad. My biggest concern is getting everything plumb, squared, and lined up on my slab.
Love this pergola. Question….. I want to build one which is not the issue, I have a roof that is tin and sheds heavy winter snow sometimes all at once and it comes down with great force. what kind of “roof” or top will I need so that the snow doesn’t break it. Thank you. Ellen
Hi, Ellen – Glad you like the pergola. Unfortunately, your situation calls for the expert advice of a structural engineer, which I am definitely NOT. In a situation like yours, where the structure will be subject to sudden heavy loads, the entire structure needs to be built more robustly, to keep it from wracking or collapsing. It will probably cost a few hundred dollars to do it, but it will save you time, expense, and possible injury down the road, and you’ll have expert advice tailored to the exact design you have in mind. Good luck!
Hi Phil, we have a concrete slab that is 18′ wide and really don’t want to drill into our concrete if possible. The distance between our posts would be 18’x14′. 8×8 posts if necessary with 2×10 or 2×12 headers braced in about 2.5′ or 3′ on each side. Thinking about 2×8 rafters every 24″ to cut down an the load and some 1x4s on top running the opposite direction for shade and for stabilizing the rafters. Is this even possible to span the 18′? having trouble finding the maximum load for this application. Thank you!
Hey there! So I’m planning on building a 20′ x 25′ pergola. My question is can I some how get away with not outting a beam in the middle of the pergola? Or due to the massive size of it will I have to end up putting beams in the middle after all?!
Hi Phil
I am trying to make a pergola here in Austin Texas where rocks are in ground even at 1 feet. Anway, i made 4 footings of 12″ Sonotube in approx 2′ deep with concrete mix and also add 4 bars in each sontube and added a L shape bolt in middle with approx 1 inch open for bolt. The width between post is 12′ and length between post is 16′.
I am planing to buy 4 6x6x8 for post and was wondering if i use 2x8x20 two each on both side of length or 2x6x20 will be enough.
IAny idea on the rafters?
Hi, DK –
You definitely don’t want to use 2x6x20′ material for your header; even using 2×8, it’s likely to be sagging in relatively short order. For spanning 16′, with 2×6 rafters above, I would go with 2x12x20′. You’ll end up with a much sturdier structure, and the minor difference in price is well worth it.
We are building a pergola over a new 12×16 deck platform. Naturally, my husband went bigger than I wanted, so we now have 6×6 posts, set in 4′ of concrete, about 13′ interior span. I’m thinking of using (4) 2x12x16s for the headers, and 2x8x16s for the joists, possibly with crossbars atop, along with 2x6s cut to about 4′ for bracing. We want to hang a few hanging chairs — should I make any adjustments to the plan for this extra weight?
Your husband sounds like my kinda, Sarah – if you’re gonna do it, go big! It sounds like he did it right with the posts – setting the posts in 4′ of concrete should definitely get you below the frost line, and give you very good stability. The 2x12s for headers sound good, too. Using 2x8s for joists would probably have been OK, even with some crossbars (depending on the size of the crossbars), but with your plans to add “a few” hanging chairs, the whole equation changes.
You would need to factor in how many chairs, how much they weigh, how far they are from the support headers, and which direction they swing, for starters. Hanging chairs can put a significant amount of stress on the various components, both in the weight they carry and in the torsional stress they put on the structure.
I’m not an engineer, and wouldn’t know how to size everything safely. It seems like you’ve got a great start on the project, and intend to do it right. In that vein, I would advise you to talk to a structural engineer. You should be able to find someone who’d be willing to work with you on an hourly basis, and it shouldn’t take much time to come up with the information you’ll need to finish your project and have it be safe and sturdy. Good luck, and enjoy your pergola!
Your going to need significantly sized footings for what your describing. 4″ of concrete will not only be unable to keep it in place the weight alone will crack it. The structural engineer here in Cali spec’d out 12x12x24 deep. With cages!! Same size lumber. Count on having to cut out concrete at your post locations to accommodate footings. Phil’s right on with snow loads, ECT.
Hey Phil,
Kia Ora from Auckland. I recently moved into my own house here in AKL and have got a sun roof done by a handyman as I was not sure if I would be able to do the job well. Turns out, I could have done a better job.
My Issues –
the guy has used just 2 bags of 10KG premix cement on 3 posts which are roughly 2.5 mts High and he has dug a foundation less than 50 cms – You reckon I can relax about it when I am sitting under it?
For the joins, he has used only nails… no joist holders, no L brackets and in some of the beams he has used just 2 nails on each end. – You reckon I can relax about it when I am sitting under it?
another important thing – he has never come across the rule “measure twice – cut once”, he has rather measured after cutting and cut after measuring and so on… hence there are 2 to 3 mm wide gaps betn perpendicular beams which are hanging out (literally) together through 2 (and where he was generous… it is 3) diagonally hammered nails (yes, no nail gun used) – You reckon I can relax about it when I am sitting under it?
Sunroof support – this is minor compared to the 3 issues raised above, fence posts running under sun roof are not parallel (looks ugly) and sunroof is also mounted in a haste… I thought the sun roofs will be fitted seamlessly but not a single overlap is seamless.
I tried to talk to him about it but he would not listen so thought I will let him finish first and then take a call once it is all built. Can you please give me your honest opinion about the fence. How I landed up into contracting this guy is a story…. he was referred by a friend that I regard highly so did not doubt once on his ability but I feel like not just looted but foolish too.
regards
VA
Hi, VA –
Kia Ora from Pittsburgh! Wow – what a saga…From your description, the whole thing sounds like a disaster waiting to happen. It seems like you’re already aware of that, since it’s not even finished, and you already know you won’t feel safe sitting under it.
I’m not sure what all the circumstances are; did you have to get a permit to build it, and will it be getting inspected? If so, there’s no way it will pass, and you can force the “handyman” to do it over properly. If not, it will likely be sticky; he’ll want to be paid, and if the work is as bad as you say, you won’t want to pay him. If they have something like small claims court there, that may be your best bet to avoid paying for at least some of the substandard work.
As for feeling foolish, choosing someone based on the recommendation of a friend whose judgement you trust is pretty common, and usually works out well. If you decide to re-do the project, after getting recommendations, I’d want to go see a couple of completed projects, and talk to the homeowners to see how happy they were with the work. It’s also a good idea to have a contract, specifying details like how connections are to be made, depth of footers, size and spacing of headers and joists, etc. A reputable contractor should be happy to give you a written quote.
Meantime, good luck with your project. If you plan to let him finish, and the final product is poor, be prepared to point out all the areas you’re unhappy with, and withhold final payment until they’re fixed to your satisfaction. Once he’s paid, it’s unlikely you’ll ever see him again. Let us know how it turns out.
Have a read all the comments to see if your questions have been addressed. Regarding your slab: 6×6 post are significant and so is the size the structure being built. I missed if this is free standing or not. There are going to be lateral forces that your connection to a 4 or 5″ slab just isn’t going to cut it. I’d imagine your just thinking about throwing a Simpson post base down and standing them up. To give you an idea although a bit of an over kill they engines a 12x12x24″ footing w/ #3 cages,(I know cages ?) and this structure was not free standing. 4 to 5″ is only going to safely allow 3 1/2″ bolt embedment. Sorry its just not enough.
. your headers can for surly sit on top of posts. But 3 ” isn’t ideal. Your going to want to get some Simpson saddles.. As well as key your 2 the header joints together. Get your carriage through that and you good to go.
. Right here is your structure. Pretty smooth sailing after this point and its going to last.
Really like the way this came out, looking to do something similar. Have a few questions if you don’t mind.
My patio is 27’x12′ on a good concrete slab, so I was thinking of doing what you did and anchor the posts to the slab. At 27′ and given my sliders I’m thinking of going with 8 total posts, 6×6. I would also like to make the roof solid to make it good for rainy days. Thinking plastic corrugated sheets but that might be loud. Possibly thin plywood or maybe tight, thin planks. Not sure yet. My main question would be, given the weight of the structure and the number of posts, do the main headers need to be made of a solid length or could multiple beams be used? I think it would work physically, having the header meet in the middle of the posts, giving each 3″ of area per middle post. I just don’t know if that is safe and structurally sound. I can order a 30′ beam and have a foot and a half overhang on each end, but obviously going shorter headers would be easier. And easier is not always the best way to go. Any advice would be great.
Thank you.
Not sure where you live, but if you have a closed roof it has to be weight bearing for snow (IF you get snow where you are).
Hi, Chris – sorry for the delay, I somehow missed this when you posted…
A couple of considerations: First, as Mary Jo pointed out, adding a solid roof adds a whole new dimension to your planning. The roofing material, as well as the rafters and headers, all need to be sized to carry whatever snow load is expected for your area. Having a solid roof also makes the structure much more reactive to wind.
As for using short headers, and having them meet/butt over the posts, that would be dangerous. The structure would be much more rigid by either using one beefy 30′ beam, or using doubled-up headers long enough to span at least a couple of posts, and staggering the joints.
If you decide to go with a solid roof, I recommend talking to a local structural engineer, and having them spec out the sizing for your framing materials. As you wisely pointed out, easier is not always the best way to go, and with a structure that big (which will be awesome when it’s finished!), you definitely want it to be safe.
Hey Phil, you seem to be some what of an expert. I was thinking about building a pergola that’s about 20×20. I just had concrete poured in my patio area that’s about 4″ thick. The materials I am going to use are redwood lumber I’m ordering from a local home Depot. I’m looking to use six 6x6x8′ (spaced about 10′) for the post, 2x6x20′ for the “rafters” (spaced 18″ apart) and headers, then 2x2x20′ across the top of the “rafters”, 2×6 for the joist, like yours. My question is will anchors like yours hold the post down enough to be stable? And are the joists gonna hold the pergola from swaying from wind?
Realized I posted this as a reply earlier.
Hey Phil, you seem to be some what of an expert. I was thinking about building a pergola that’s about 20×20. I just had concrete poured in my patio area that’s about 4? thick. The materials I am going to use are redwood lumber I’m ordering from a local home Depot. I’m looking to use six 6x6x8? (spaced about 10?) for the post, 2x6x20? for the “rafters” (spaced 18? apart) and headers, then 2x2x20? across the top of the “rafters”, 2×6 for the joist, like yours. My question is will anchors like yours hold the post down enough to be stable? And are the joists gonna hold the pergola from swaying from wind?
Have similar setup where I’m building a pergola. Have you experienced any cracking of the patio or is there any worry that the weight of a pergola this size could Crack the concrete patio? Looks great just about exactly how I’m planing my on my exiting concrete patio just worried about cracking.
A pergola that size packs a lot of weight, and cracking could definitely be a concern. The answer depends on a few factors: the thickness of the concrete, the strength of the mix used to make the concrete, and how well it’s cured. The quick and dirty answer is that thicker is normally better (at least 4-5″), a high-strength PSI mix offers better strength, and the concrete should be fully cured. My daughter and her husband no longer live there, but in the 3 – 1/2 years they did, there was no cracking at all. You could try asking a local concrete contractor to take a look at your patio; he may or may not be able to give you an idea of the strength of the mix used.
I’m in the process of building 12 x 10 footprint pergola over and connected to an L-shaped 3.5′ wide raised bed garden box. My 3 fave takeaways from your article are 1) bungee-ing two levels on a post; 2) using 2×6 as braces instead of full post size (made easier to keep off the post edge by my #3 kudo); 3) shallower notch instead of full 1 1/2″ notch to get another point of visual and architectural interest. Two questions: trying to keep a lighter look I’m using 4×4 j-bolted to 2′ footers, 2×8 beams and 2×6 rafters w/ 1×3 slats on top. Do you think stacked 2x8s as a side of bed boxes along the 10′ and 12′ w/ 1/2″ lags to the posts will add any signif structural support? They’d only be in 3 of 4 posts and only 2 of those posts would be in the long boards. The third would be connected to a structurally insignificant 3.5′ end of garden box. Secondly, is a 45 degree brace stronger than a sharper angle, where the brace would rise more vertically? Great post, thanks.
Hi, David –
Sounds like a pretty cool project! As for stacking 2X8s, I assume you mean on edge. You didn’t say how high you’d be going with them, but tying three of your posts together with 2X8s, each with a couple of 1/2″ bolts at each end, would certainly add some stability to the structure, and help keep it from racking, at least on two sides. The more 2X8s used, the more strength added.
As for diagonal bracing, in general a 45 degree brace is stronger than a brace with a steeper angle, and a longer brace is better than a shorter brace. For the best strength, the bracing should be attached using brackets, such as those made by Simpson, which you can get at most big box home centers. When in doubt, build it stronger than you think it has to be – or ask a local pro. Have fun!
Hello, I need to build a 14′ x 29′ pergola, my questions are …..
1. Putting a post (using 6×6) in the center of the 29′ span, which will be the “header” posts, will 2×10 headers be ok?
2. Will 2×8 joices be ok with 14′ span?
Wow – when you build something, you don’t mess around. That’s gonna be a big pergola!
Considering its size, I’d go with doubled-up 2x12s for the headers. That’s a big structure, and the extra size will give it more stability. I think I’d go up to three lag bolts in each post, too, which will give you a more rigid structure.
As for the joists, assuming you’ll have a couple of feet overhanging the front and rear headers, 2x8s should be fine. With the overhang, they’ll only be spanning about 10′.
Make sure everything is securely bolted down, and I’d use good, beefy bracing at every post, secured with lag screws. That’s a huge, heavy structure, and you want it to stay up where it belongs. If you live in an area that’s prone to extreme weather (which seems to be just about everywhere these days), make sure you secure all your joists with hurricane clips, and check with your local code enforcement peeps to see what other regulations apply. Good luck, have fun!
Hi, I need to build a 8 x 24 pergoda… how much material do I need to build like similar like yours? Thanks much in advance for your advice.
I can’t give you a complete materials list, but you will need to add two more posts in the center for a span that long, one for the front wall and one for the back. Once you decide how far apart to space the rafters, you’ll have to do a little math to figure out how many 2x6s to get.
Assuming you’re holding the rafters in from the edges, measure the actual length of the area the rafters will sit on. For example, if you’re holding them in 12″ from each end, and your total length is 24′, your rafters are sitting on a 22′ span of the headers. Convert that to inches (22′ x 12″/ft = 264″). Divide that number by your rafter spacing, eg. if they’re to be 16″ apart, 264 / 16 = 16.5. Round that up, and you need 17 rafters. Make sure everything is securely anchored, and everything is well braced. Hope this helps, good luck!
Hey. My lumber’s delivered and I have my posts in. I was just doing a bit of research before I go buy my hardware and I was pleased to stumble across these instructions – thanks a tonner for posting them. One question: You say you used 8″ lag bolts, but aren’t you going through 8.5″ of material with the 6×6 and the two 2xs? Perhaps you countersunk? Thanks in advance for clarification. Oh, another question: 3/8″ lags are half the price of 1/2″ lags. Any thoughts on using the smaller bolts to save some cash? THANKS!
Hey, Grant – We did use 8″ bolts. The 6X6 posts are actually 5-1/2″, and we notched them 3/4″ on each face, to make a shoulder for the headers, so the width was actually 7″ total (4″ left on the 6X6 + 3″ total on the 2X headers). As for using the smaller 3/8″ bolts, I’d stick with the 1/2″ ones – they’re much beefier. Good luck with your project!
Thanks for the quick reply. It all makes sense now – Cheers!
Phil,
Need some help my man. I built a 10×10 pergola very similar to yours, 6×6 post and 2×6 headers and joist. It sits on my concrete pad by the pool. Instead of using two 2×6 joist to tie the 6x6s together, I used one 2×6, notched the 6×6 post so that the 2×6 sits inside the post. I toe nailed all my joist except for the two on the ends of the header. Also, note I did not use bolted standoffs as you did, I used square 6×6 standoffs that are not anchored (For a column) to the concrete. I haven’t installed the braces yet, do to long days at work.
Problem: A lot of swaying/racking in the direction of the joist.
Will the braces help with this? Very nervous.
Since it sit on a concrete should I used bolted standoffs?
Should I make all the rafters notched instead of toe nailed?
im hoping by now you have received some input. A dark road you are heading on. “Positive Connection” is a term you may want to look up. Truly hope you’ve got it all safely figured out. Feel free to ask anything.
JaMarr – sorry for the delayed reply, I somehow missed the comment when you posted it. As Landon indicated, your design has some serious problems. First off, a single 2X6 header isn’t strong enough, and will end up sagging as gravity works its magic. Notching the rafters would definitely be a stronger way to tie things together than simply toe-nailing them in. Your most serious issue is not having the structure anchored or braced. As you pointed out, it’s already swaying and racking. That’s dangerous; the question isn’t IF it will fall down, it’s WHEN.
I strongly urge you to re-do pretty much everything; your best bet is to disassemble it and start over. When you put it back together, I’d lean toward making it beefier than you think it has to be. You’ll never go wrong by spending a few extra bucks and making something stronger than it needs to be. And if you have questions, ask us and we’ll try to help. You can also try asking the employees at the lumberyard or home improvement center. If yours is like mine, several of the guys that work there are retired part-timers who worked in various trades for decades, and have a lot of knowledge they’d be willing to share. Good luck and be safe.
Agreed. Take it apart, and quickly. If you need any drawing details is more than happy to sketch them for you. Good luck!
Ps. Post base= important positive connection.
Phil,
Nice work on your Pergola and helping your daughter out. I installed a pergola about a month ago, it was kind of spur of the moment as I had some unexpected time off and I didn’t do as much research as I should have. I used pressure treated pine for everything. Four 6x6x10 posts, Four 2x6x20′ headers sandwiched on either side of the posts, 1/2″ lag bolted. 2x6x16′ joists. The posts are set 12′ x 16′. My problem is that my headers are sagging. I was trying to avoid putting a post in the center. Do you think corner braces would fix this problem or is this just to long of a span for 2×6’s?
I hate to be the bearer of bad news, Mark, but I’m afraid you nailed it with your guess that 16′ is too long a span for 2×6’s. Corner braces might help a little, but I’m guessing gravity will continue to work its magic, and the sagging will get worse. Putting in center posts should take care of the problem; the only other cost-effective solution I can think of is to remove all the joists, and replace the headers with 2×12’s, which would be a bit of a PITA. If any of our readers have a simpler solution, we’d love to hear from you!
Thank you Phil. You don’t think 2×10’s will make that span? It’s actually 15′ inside to inside post measurement.
You might be able to get away with it, but 15′ is still a pretty fair span. I tend to lean toward overbuilding. I’ll give you a link to a span calculator from the American Wood Council, where you can punch in your type of lumber and various dimensions to get recommended maximum spans.
http://www.awc.org/codes-standards/calculators-software/spancalc
Ok, thanks.
Hi Phil,
Do you think the 16 feet headers with only 2 posts will bent in the future?
Thank you for your help.
Francis
Hi, Francis –
So far, the pergola has been up over four years, and there’s been no sagging. Make sure when you put the headers in that you do so with the crown up, and if there is any sagging as gravity works its magic, the headers will end up being straight. Since there isn’t really much load on them, they should last a long time with no droopiness.
Great job on the addition and instructions, very clear and concise. I’m currently working on a little project myself and would appreciate any feedback you may have.
I live in FL and plan on building two 8×17 pergolas in an L shape. I plan on using the same materials minus the 6x6x8 posts; instead I’ll be using 6x6x12 posts and cementing them into the ground. I’m still undecided if I’m going to have it free standing or if I’m going to attach it to the house (I guess which ever would be sturdier). I will be adding 2×2 slats on top along with a bamboo roof due to the unpredicted rainy days in Fl. I also wish to install eye hooks on the insides of the post so I can hang two different hammocks.
Considering the extra weight from the 2×2 slats and bamboo roof do you think I’ll still be able to hang the hammocks? Or what do you think would be required to do so. I don’t know if it makes a difference but I will be building the pergola with a slight slant for the rain water to fall. Thank you
Hi, Dan, sorry for the delayed response – I was in Milwaukee checking out about 1,000 new red tools…
Burying the posts in concrete will definitely make your pergola more stable. Attaching it to the house would make it even more so, but introduces new issues: First, it may trigger a permit requirement (if there isn’t one already). You would also have to make sure that any penetrations at the attachment points are properly flashed and water(and bug) proofed; normally you would use lag screws into solid framing members to make the attachments.
As for adding the hammocks, my guess would be that the weight wouldn’t be as much an issue as the torque it puts on the posts. The weight of someone in the hammocks will tend to pull the tops of the posts toward one another, so you would need to add extra bracing across the top, to help maintain the distance between the posts. I’m not sure how many 2x2s you would be using, or how much weight they would add; you should check with someone locally to make sure your framing will be beefy enough. One thing you really should do, which is likely required by Florida code, is to tie all your joists and roofing materials down with hurricane clips; I understand it gets a tad windy down there sometimes!
I am in Southern California so I do not have the freeze issue so one less thing I have to worry about. I want to build a pergola in to a dirt area that I have laid down flagstone and gravel. This will not have a closed roof just cross beams for fabric hanging or a light shade material and some string lights. I will have some stained glass pieces that I will hang but that will be around the edges.
What I have not been able to figure out is what materials I will need. My area is approximately 11 W x 12 long. With this configuration I am not sure how many posts I will need to hold it up. I am not sure if 4 are enough or if I will need 3 on each of the long walls? Also in CA how deep do I need to bury them in with concrete or would it be better to have footers and then add brackets to keep the wood above ground?
Can you help me with a materials list?
You’re right, Katherin, out there in sunny CA the only frost line you have to worry about is the one on your Margarita glass! Seems to me there’s some other issue of concern…ah, yes – earthquakes! California has its own very robust building codes, and for good reason. Being an east coaster, I am totally unfamiliar with building practices and policies out there, but I can pretty much guarantee you that you’ll need to pull a permit for your project.
When you apply for a permit, around here anyhow, you’ll normally go in with a rough sketch of the project, with your dimensions labeled and a description of the materials you’ll be using, e.g. 6″x6″x8′ posts, 2″x12″x12′ headers, standoffs for the posts if necessary, etc. The building inspector will be able to tell you whether your plan and materials are acceptable, and will advise you on any requirements for footers (how deep, how wide, type of concrete required), fasteners and brackets,and so on. My guess would be that the same materials I used, but scaled down to fit your space, would be more than adequate, but be sure to check with the building inspector – if you don’t do it their way, they can make you tear it down. Here’s a link with some tips for dealing with building inspectors. Good luck!
https://homefixated.com/building-inspectors/
Hey Phil!
Thanks for this awesome write up. Much like your son in law, I have never built something like this. I live in Utah and I was planning on 6x6x8 for my supports. 4x6x16 for the, headers?, and 4x6x12 for the cross support beams and 2x6x12 for the cross beam things (those are all technical terms). I was thinking the 4×6’s due to snow fall, but do you think it’ll be too much weight for the 6×6’s? My area is the same as your daughters 12×24 or so.
Thanks,
Zach
Hi, Zach –
Despite your awesome use of all the technical terms, I’m not quite following you. Were you planning to double up the 4X6s in the front and back for the headers? And I’m not sure what the 4X6X12 is for; to cut shorter pieces for the angled support brackets, maybe?
If you were planning to use a single 4X6 for the headers, that is likely not enough to carry all the rafters. Even accounting for a snow load, the lumber I used should be more than enough, providing you’re not covering the rafters with any type of roof. If you’re planning to add a roof, all bets are off, and you’ll need to really beef up your structure. You should talk to a local structural engineer or someone knowledgeable at the lumberyard, familiar with the snow loads you’re likely to encounter, to determine what kind of lumber to use. My point of view is it’s always better to overbuild…Good luck!
Hi Phil,
It looks really great! I’m planning to build a 12′ X 9′ pergola on our deck. deck panels are 2″x 6″. can I just attach the pergola’s posts to deck panels or it should be mounted on beams. the other question I have is if the 3″x 3″ post would be strong enough to have a sturdy structure?
Thanks
Peyman
Hi, Peyman –
This is one of those questions that can’t be answered properly without seeing the setup, knowing the dimensions, height off the ground, and how well the original deck was constructed. In general, though, it would NOT be a good idea to just build it on top of the existing structure, especially just attaching it to the 2X6 decking. It’s a lot of weight to add, and that weight needs to be solidly anchored and transferred to the ground. I would also recommend against using 3X3s – they would definitely not be sturdy enough to support your structure. I recommend having an experienced builder or structural engineer review your plans before you proceed; it would be money well spent if it avoids having your project go kablooey!
How many hours do you think the project took and people?
Hi, Frank. My son-in-law (who had pretty much zero in the way of DIY skills at the time) and I finished the entire project in two days. If I had to guess, I’d say we spent 8 or 9 hours a day at the most. And that was working without a set of instructions. It was a fun project, and they really enjoyed the end result.
Great looking.
What size headers should I use? the pergola I’m making is 16 X 12 with the headers being the 16 feet and rafters 12 feet. No bearing weight. I was thinking 2 X 10 header and 2 X 6 for the rafters. Also can I get by with one header on one side it will be by the house but not attached.
Thanks, Ken. Sounds like you’re building the exact same design – 12X16′ are the same dimensions we used. The dimensional lumber you mentioned is what we used, and worked out fine. As for using only one header, I wouldn’t recommend it; the second header helps stiffen the structure, keeping it form twisting. It also obviously adds strength, and it just looks better. Well worth the few extra bucks it costs. Good luck with your project!
Thanks for the info. It it a spring project will keep you updated.
Hi Phil! Husband & I are loving this!!! We’re going to copy you…..kind of!!! But down here in the south I’ve got to have my swing!!! How would you advise us “beefing” up your design to support the weight of a solid wood bench swing that can accommodate 3 average sized adults? (Total weight people & swing not to exceed 600 lbs) I’m estimating on the high side.
Hi, Kristina – a porch swing sounds like an excellent addition to your outdoor piece of paradise! Having said that, it also complicates the project, and you are wise to understand it requires some “beefing up.”
A lot of the necessary improvements depend on where exactly the swing will be located: Hanging off the main support beams? Hanging from a single joist? Suspended from a couple of joists a few feet apart? Swinging parallel to the joists, or perpendicular to them?
There are a few other things you need to consider: obviously, there is the extra weight to support. This can be handled by using beefier material, or doubling up the original material. There is also the issue of movement (unless you plan to sit perfectly still on the swing – not very likely!) This puts a lot of additional stress on the connection points, and the torque tends to loosen things up over time. Again, a lot depends on your placement, but as a minimum I would definitely beef up all the corner bracing, and probably add blocking (using the same material as the joists, but cut to fit perpendicular between them) between the joists to stiffen them and keep them from racking.
Another good idea, even if you don’t have a porch swing, is to install hurricane ties to connect the joists to the headers. This gives a more secure connection, and is less likely to split the wood than toe-nailing, and more likely to hold together despite repeated bouts of swinging.
That’s all that comes to mind at the moment. As always, if you have any doubts, it’s not a bad idea to pay a local pro to review your plans. It’s always better to over-build, just in case the crowd gets a bit rowdy after too many mint juleps, and you end up with six people on that swing! Good luck, and let us know how it turns out!
Awesome advice!!! Thanks Phil!!! We will take that all into consideration as we proceed forward. My husband really liked your suggestion for the hurricane ties & I really liked your suggestion for the mint Julius!! Lol!! We will update you on out progress & send you pictures of the completed masterpiece!! Thanks again!!!
Kristina & J
I’m looking for plans to build a half pergola along perimeter of my patio.
Hi, Dennis –
I’m not sure exactly what you mean by a half-pergola. If it’s just a smaller pergola, you could take most pergola plans and just scale them down. If it’s something that would be attached to a house or other structure, that’s a whole ‘nuther matter! If that IS the case, everything would depend on your individual circumstances, including the layout, the composition of the structure you’d be attaching to, the size of the pergola, and so on.
Great article! Just curious. How secure is the pergola in standoffs like those? I’m considering doing this on our patio and wasn’t sure what to use. Also, do you think you could use these for bigger posts such as a10x10?
Thanks, Jordan. The pergola we built has been there four years, with no issues at all. If you live in an area that’s prone to tornadoes, hurricanes, or other unpleasant weather phenomena, you might want to check with your local zoning peeps, but the Simpson standoff bases we used seem to be providing a very secure bond. I’ll include a link to some specs for their products, and they do offer a standoff for a 10×10″ post. That’s gonna be a beefy unit! Good luck with your project – let us know how it turns out!
http://www.strongtie.com/products/connectors/ABA-ABU-ABW.asp
Great pictures! I was able to model my build off of what you laid out! thank you for these detailed pictures. Did you have to add any purlins to the top of the pergola to prevent the rafters from twisting?
Thanks, Scott – glad the post was helpful! I didn’t add purlins, and so far, over three years later, there have been no issues with the rafters twisting, and the structure is still very stable. If you’re concerned about twisting, you could easily incorporate some purlins into the design, even fancying them up a bit to make them an architectural feature.
Hi Phil. I am building a too post cantilevered pergola and need to know how much over hang I need to span 9 ft from the posts
Hi, Mitch – Sorry, but I’m having trouble visualizing exactly what you’re trying to do. If you can give me more details, I’ll be happy to try and come up with an answer for you…
Great pergola! I’m in the process of making one myself albeit just half the size of yours. I’ll post pictures once its done.
Thanks, Stephen. My daughter loves hers – good luck with yours, and definitely let us know how it turns out!
the pergola you built for 500 dollars is beautiful…can’t believe it only cost that much…I am desperate to build one, but I am 71 years old and need help!!!. first, I put done stones in my backyard, square design, then drew a circle around the square, why, I will never know…I used gravel and sand for these, weed is growing as fast as I am getting older…right now, the whole thing looks like a helipad…I wanted 4 posts…I need someone to help me…or just stay happy with my helipad…
Thanks, Susan. It’s a good low to moderate budget project. The materials aren’t bad, as it’s all standard dimensional lumber and other materials that are pretty readily available at any home improvement store.
Unfortunately, good (and cheap!) help isn’t always so readily available; maybe try contacting your local Boy Scout troop, and see if they’re willing to take it on as an Eagle Scout project? I hope you’re able to get some help and get your project completed; if not, I guess you’ll have to invest in a helicopter…Let us know how it works out. Good luck!
Great write up. I am looking to copy your pergola design. I have a question about the post bases connected to your patio. I am worried about frost heave up here in metro Detroit as my patio does move some in the winter.
Not to be a party pooper, but if you know your patio likes to move and groove (you’re in Motown, after all), your best chance of having a stable pergola is to put in some footers, extending below the frost line. Otherwise, over time, all that movement may end up racking the frame and weakening your connections. Ain’t it great living in the frozen northeast?!
I am so glad I found this. It is amazing how hard it is to find information on building a pergola. This sounds very doable. I just have one question, you size is 12 x 16, is that post to post or total footprint. If it is total what is your post to post. We want to build a 10 x 14 and I was curious if I needed to adjust the material list.
Thanks,
Patti
The pergola we built had a total footprint of 12X16. We used 12′ material for the joists, 16′ for the headers. I asked my daughter to measure the post to post dimensions (they’re in Ohio, we’re in PA), and here’s what we had:
Back to front posts were 116″ center to center, side to side were 145″. You can adjust this a bit, depending on how much overhang you want.
Hope this helps; good luck with your project – let us know how it turns out!
Phil, Great Job, agree with the rest that your instructions are not only the clearest but the most informative. I’m in the process of putting this up and based on my floor plan/space used the same dimnetions as well as lumber. My question is do we really need to inlude the braces for support?
YES! You definitely want bracing, and it wouldn’t hurt to make it even beefier than what we used. The way we built it is pretty solid, but over time, lateral stresses from wind, kids (or exuberant adults) hanging from it, and good old gravity can start to rack the structure. There’s a lot of weight there, and having it come crashing down would be a bad, bad thing. You could make it fancier if you want, but you definitely want it braced in both directions. Good luck with your project; let us know how it turns out!
Great pergola. My question is to make a pergola 16 X 11.5 feet would I have to use bigger post than 4×4’s and can I use 2×8 for joist and 2×6 for the beams. There would be three 4×4’s on the 11.5 feet side with six 18 feet joists to make the 16 feet. Then use the many 13.5 foot beams to finish it off.
Hi, Ken –
It depends to a large extent on what type of lumber you’re using. The American Wood Council has a span calculator you can use to determine the maximum length your joists can be, depending on what type of wood you’re using. As to using 4X4’s as posts, using three at each end is probably enough to carry the load; again, it depends on the type of lumber you’re using, so check with the pros at the lumber yard or your local building department to be sure. We used 6X6 posts, not only because they’re stronger, but because they give the structure a more substantial look. I assume since you’re only using 2X6’s to make the header that you plan to double them up; you can use the span calculator to help figure that out, too. Make sure you use good, beefy corner bracing too. Good luck with your project; let us know how it turns out!
Omg I finally found a detail step by step how to a pergola . Me n the hubby will be working hard to finish our pergola . Although we did the white vinyl post cover for our post we decided to use cedar to finish it. Hope it looks good. You give me more info than the guy at HD did after talking to him for 1.5 hrs this evening. Left more frustrated than I came. I thought I had done all the research but clearly the more info the better to make it safe n within our price point . Here in LI ,ny I was getting $5-7k quotes for kit or to have a built would be 9-10k that we don’t have . Worth researching and give it a try. We ll keep you posted. Thanks very much
Hi, Gina-
You’re right, it’s crazy how much they want for the kits. It’s nice to start out with everything pre-cut and ready to go, but you pay a HUGE premium for the privilege. With basic carpentry skills and some planning, you can easily do it yourself. The end product looks just as good, and you have the added brag factor, “Yeah, we designed and built that!”
One small change you may want to consider: For the bracing that goes up at the end, we just attached them with exterior-grade construction screws. The pergola is in its third year and doing fine. It will give you more rigidity, though, if you instead use a couple of 3/8″ or 1/2″ lag screws or carriage bolts at each attachment point. The added cost would only be a few dollars, and it should greatly improve the structure’s ability to withstand high winds.
Good luck with your project; let us know how it turns out!
Your pergola looks great. Thanks for sharing! I will be using this tutorial to build my own pergola this week. My husband and I have been trying to figure out how to build it ourselves, and your step-by-step demo will be helping us a lot. Now my question is: does it require a special treated wood (factoring the weather) or the material from Home Depot will do just fine?
Thank you!
Hi, Isi –
Since it will be exposed to the weather (and bugs), you definitely want to use something that will stand up to the elements. Pressure treated works great; that’s what we used. If it’s in the budget, a good grade of Western Red Cedar, Cypress, or Redwood will look really sharp, and they’re naturally resistant to insects and rot. Whatever you use, to keep its original look treat it with a good sealer, otherwise it will weather and turn grey. Good luck with your project; let us know how it turns out!
Thank you so much! I will post pictures.
Raise the return boards on top of the headers and cut them each so they are square to one another and to your house exterior. Use metal brackets with screw to secure these in place.
We wanted to notch the rafters a bit for two reasons: First, we liked the look better, and second, notching them helps tie the two sets of headers together better than having them sit on top of the headers would have. They are square to one another and perpendicular to the house; it may not show up well in the pics. Thanks for your comments!
Cheers,
Phil
What tool(s) did you use to notch the 6X6
Funny, someone else just asked that same question! We just used a circular saw, Burt. Just measure down from the top of the post to where you want the “shoulder” to be; this was 9-1/4? in our case. Use a square to mark the line, and set the cutting depth on the saw to 3/4?. Cut your marked line, then cut a series of lines parallel to it, fairly close together, all the way to the top of the post. Knock out the waste with your hammer, and clean up any remaining chunks with a wood chisel. Good luck on your project!
Hmmm…the question marks after the measurements should actually be quote marks indicating inches. Saw depth to 3/4 inch, measure down 9-1/4 inches.
Great looking Pergola!
In our locale, Colorado Springs, we have to get these structure permitted and the design has to satisfy engineering requirements for wind resistance; Probably due to some failures and aforementioned PI attorneys. The knee braces are a great solution but they should probably be beefier and be attached with bolts and hardware or metal angles
Thanks for the input Kimber!