

“Can we do this? I want this.” These are not words I want to hear right now. We are lying in bed and my wife is furiously Googling “IKEA hacks“. I am afraid because those words indicate she has found something she likes (this in fact is the hack in question) and has decided that because some random individual on the internet did it, we can and should do it too. And so begins my journey into the world of IKEA hacks.
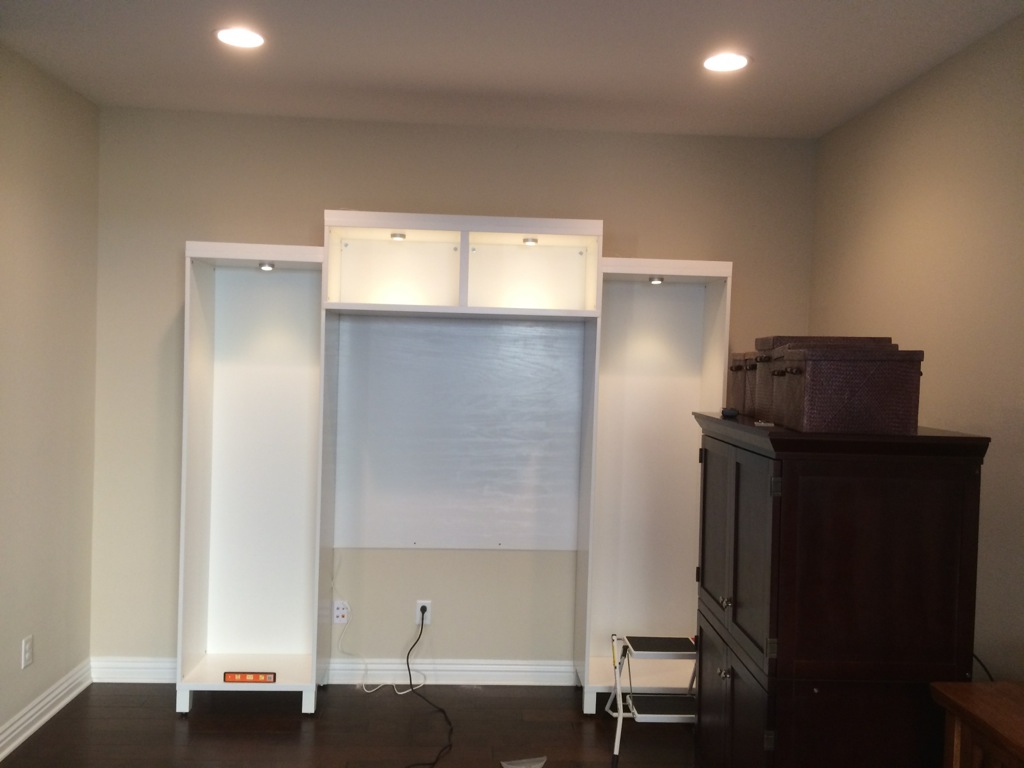
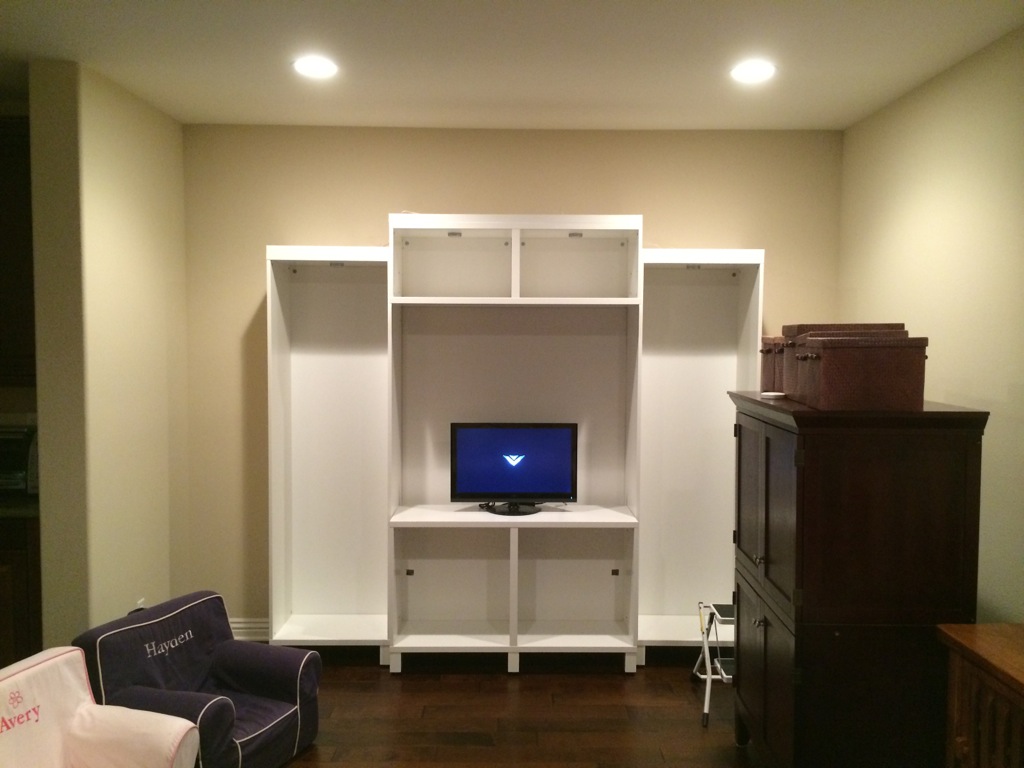
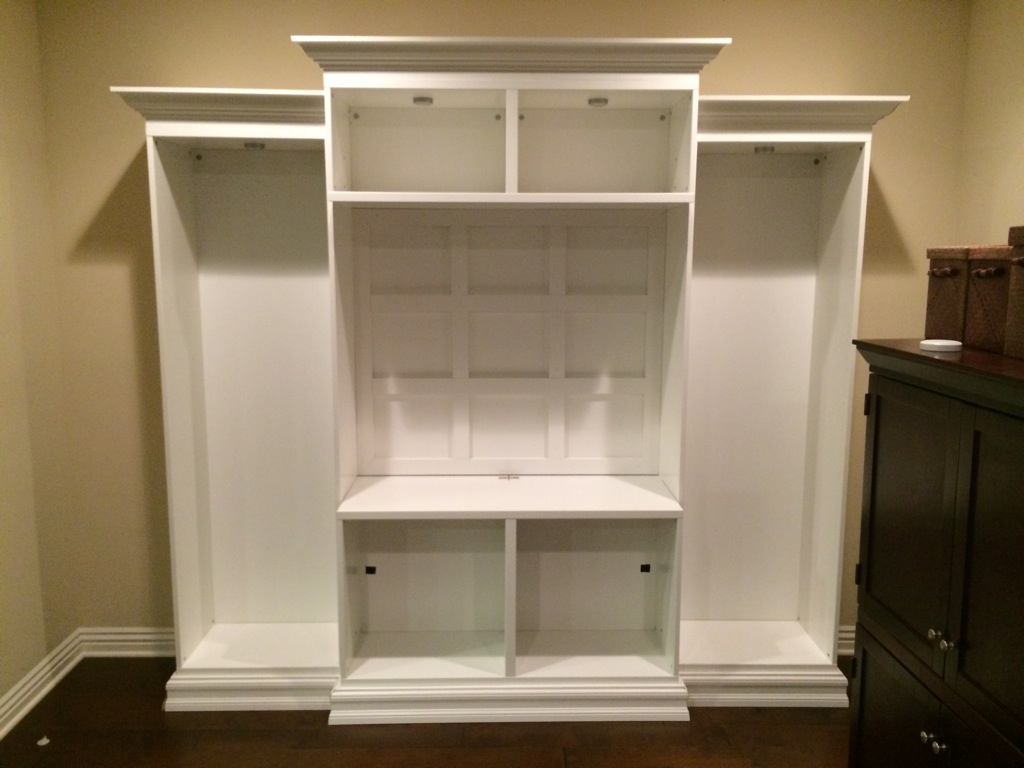
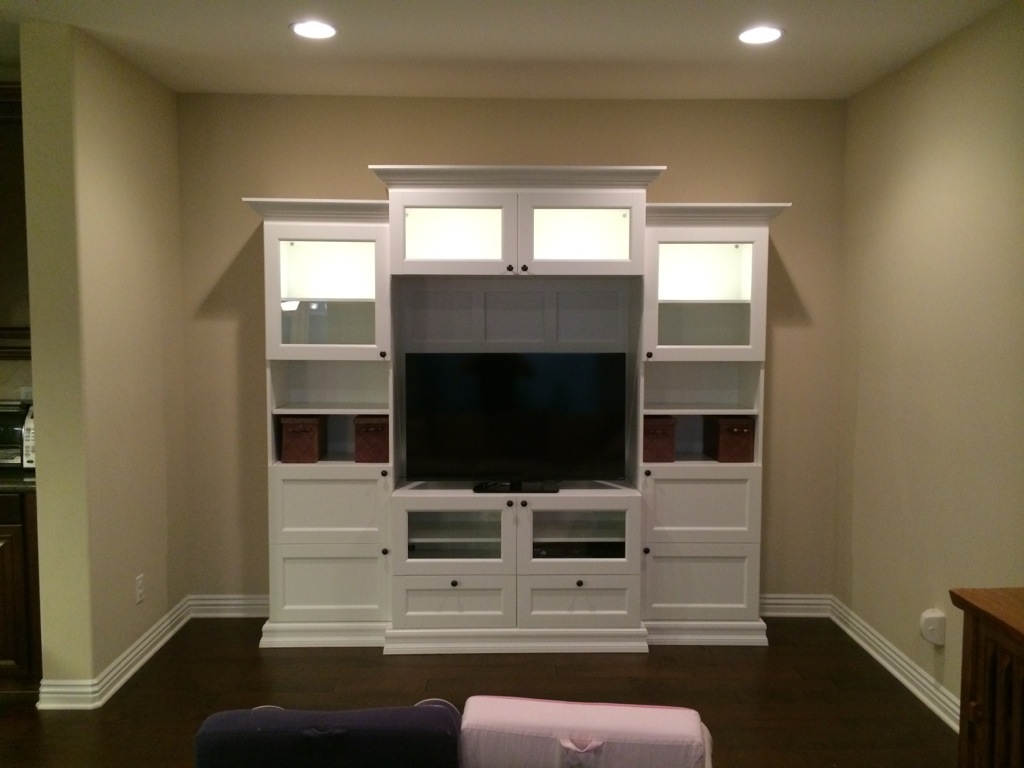
To put things in context we should probably back up a couple of years to December of 2011. It was at that time that we bought our first home, adding about 1000 square feet of living space over the condo we had been renting. The problem with all those extra square feet of course is the temptation to fill them with something. I’m a perfectly good minimalist but even I have to admit that all those blank walls and empty spaces don’t always make for a beautiful and functional living space. Nevertheless, for almost two and a half years our living room looked like this:
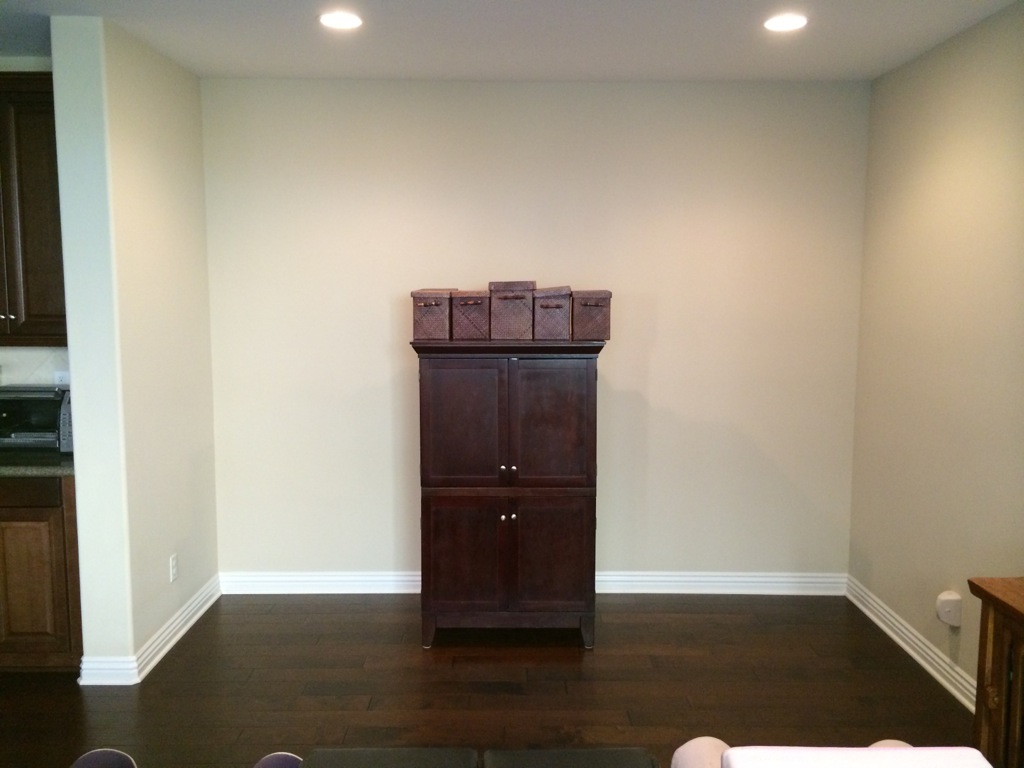
With the stark emptiness of our living room, it was difficult to ignore my wife’s call to action.
Step 1: Continue to Furiously Google
Seriously though, what else (home improvement wise!) are you going to accomplish while lying in bed at 11 PM? These hacks served as our primary inspiration:
- Shirley and Chris Projects Blog – Ikea Hack 2: BESTÅ Built-In Family Room TV Bookshelf
- Shirley and Chris Projects Blog – DIY: Built-Ins Using Ikea BESTÅ Shelves and PAX Wardrobes
- Centsational Girl – From Billys To Built-Ins
- Besta, Billy, & Brass Bookcases
- Ikea Hackers – Big Besta Built-ins
Step 2: Scouting Mission to IKEA
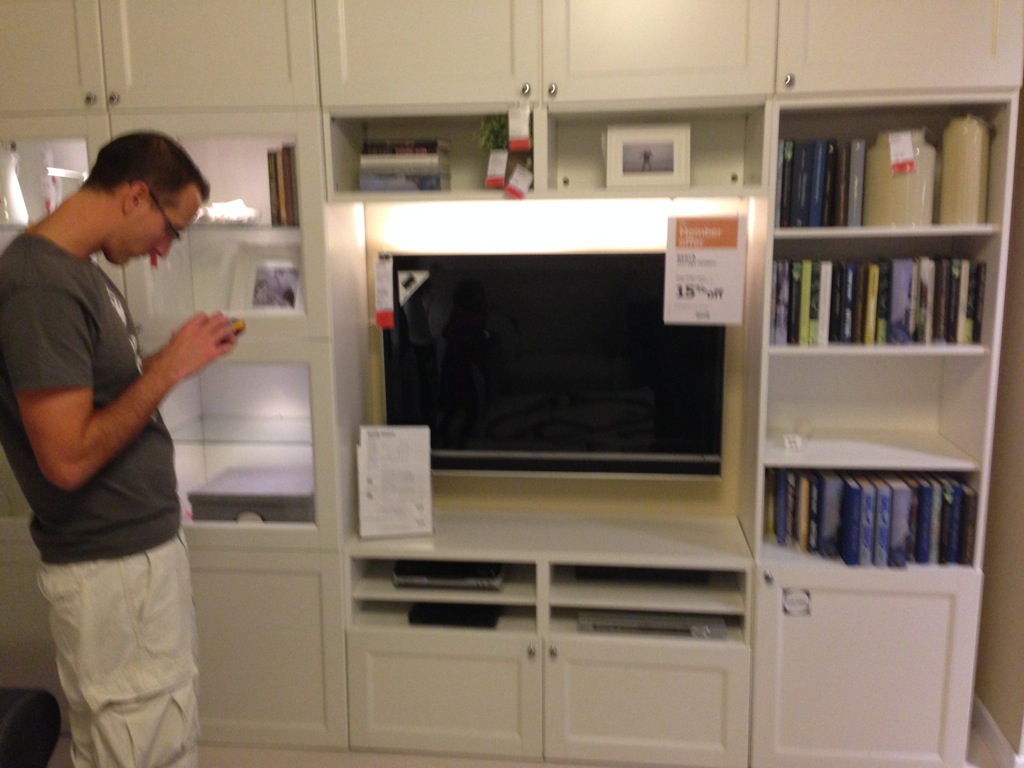
Before we got too emotionally invested in the project we wanted to make sure the BESTÅ stuff looked half-decent in person. With one child in the ball room and another dangerously wielding a small pencil after steadfastly refusing to enter the ball room, we stumbled upon what was certainly an omen: 15% off on all BESTÅ products.
Our scouting mission taught us two things:
- That the look of a BESTÅ unit depends almost entirely on the doors. We far prefer the look of the BESTÅ VASSBO doors which give the units a classic kind of look. Other doors are far too modern for our tastes.
- That we needed several hundred dollars of other IKEA furniture as well. But that’s a story for another time.
Step 3: Plan, Measure, Plan
It was now time to figure out just how much BESTÅ we could cram into our living room. BESTÅ comes in sections that are roughly 2 feet in width. The built-ins that started this all consisted of a two section shelf followed by a three section TV area followed by another two section shelf, or what we would come to call a 2-3-2 arrangement. It’s also about 14 feet wide, so far too large for our space. With roughly 11 feet at our disposal we had the following options:
- 1-3-1 – Symmetrical, but with a really big TV area in the middle. Which is all fine and dandy if you want a really big TV, but we didn’t want one (and especially didn’t want to have to pay for one). As you’ll see later, your TV needs to match the space!
- 2-2-1 – This fills up almost all of our space, but is asymmetrical. Which is fine if you are not a complete nutjob who lies awake at night with symmetry-related heebie-jeebies.
- 1-2-1 – Symmetrical and the TV space isn’t too big, but leaves a decent chunk of space on either side of the built-in.
We decided to go with option #3, the 1-2-1. That would leave about 20 inches on each side of the unit, just enough space for a plant or some massive speakers (no matter how many times I photoshop massive speakers into that space my wife isn’t going for it).
Step 4: Use IKEA’s Super Fancy BESTÅ Planning Tool
That’s right, IKEA actually offers a pretty sweet online BESTÅ planner. I anticipated it being lame and sucky but was surprised by just how great it was. You throw down some BESTÅ frames, add some doors and just generally play around with the look of your unit. You can even customize the width of the room in the online tool. The biggest benefit for us was that it allowed us to visualize how different doors look on your configuration. We ended up with a mix of the medium doors (about 15″ high) and large doors (about 25″ high) in both solid and glass. We also left some open space on each vertical shelving unit. This just made things a little more interesting than if we had gone with the same size doors all around.
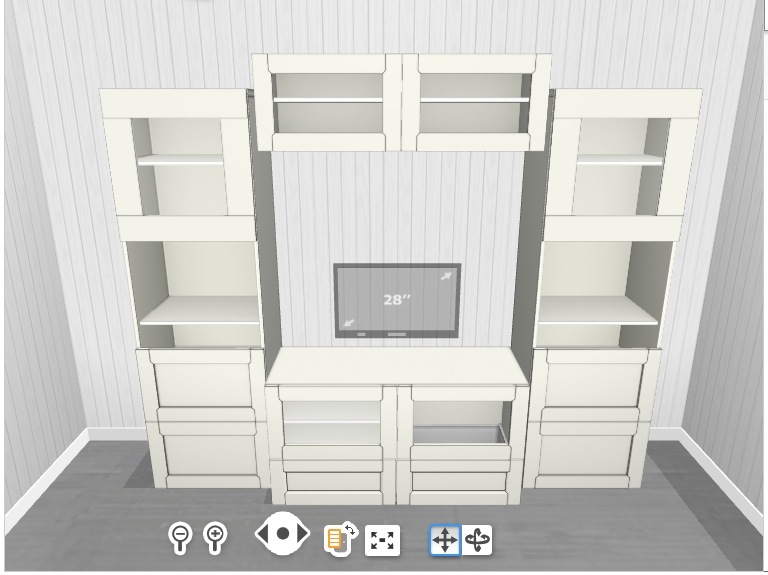
You can see that much like the hack we were copying, we wanted to bring the central portions forward a bit and raise the upper-central part. This adds dimension to the finished product and makes it look a lot more interesting. At this point you also get a glimpse of just how silly our TV would look in the unit. Our actual TV was only 26″ but 28″ was the smallest size IKEA even had in the planner! If you look closely you’ll notice something wrong here. Those big glass doors up top are the VARA doors! That necessitated a frantic last-minute trip to IKEA to swap them out for the correct VASSBO doors.
One of the nicest things about the IKEA planning tool is that when you are done it will print out a shopping list for you. This includes a list of all the parts you need to buy, how many of each part, the location in the warehouse and whether or not they are in stock.
Step 5: Make Several Trips to IKEA and the Hardware Store to Buy Everything
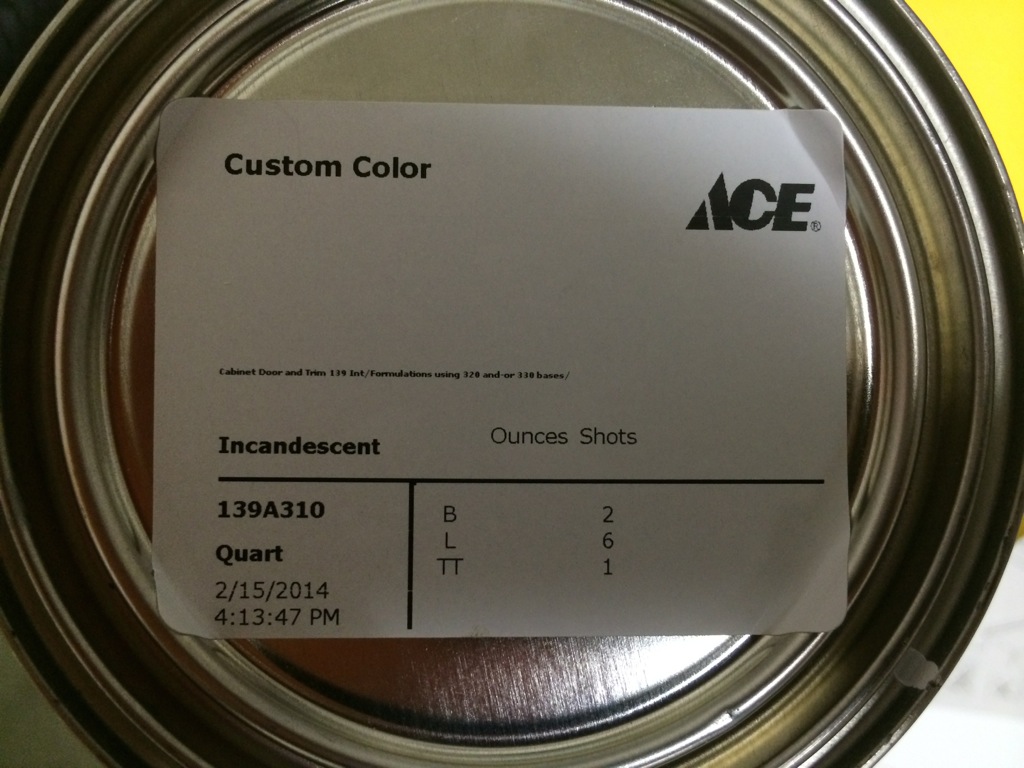
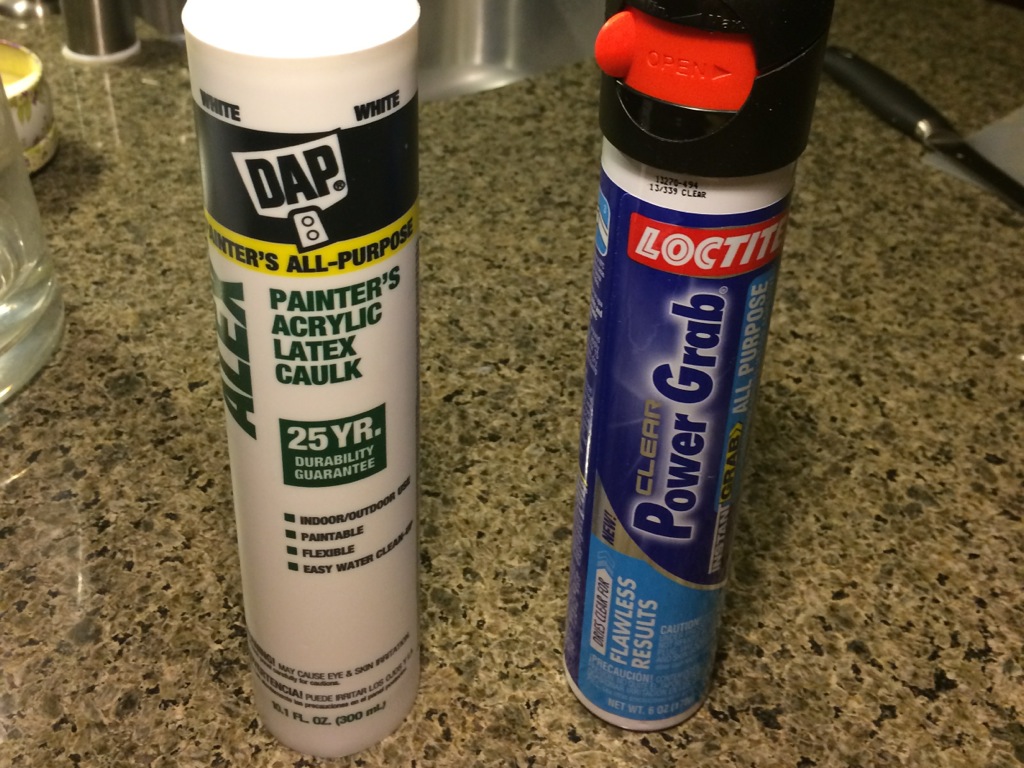
Depending on the size of your vehicle you may need to make more than one trip to IKEA – I sure did. This might be a good time to take advantage of IKEA’s legendary 99¢ breakfast! We ended up getting the trim boards, baseboard moulding, caulk, glue and other incidentals from Home Depot. Crown moulding was purchased from Mission Moulding here in San Diego (Home Depot didn’t carry large enough pine crown), and color-matched paint from Ace Hardware.
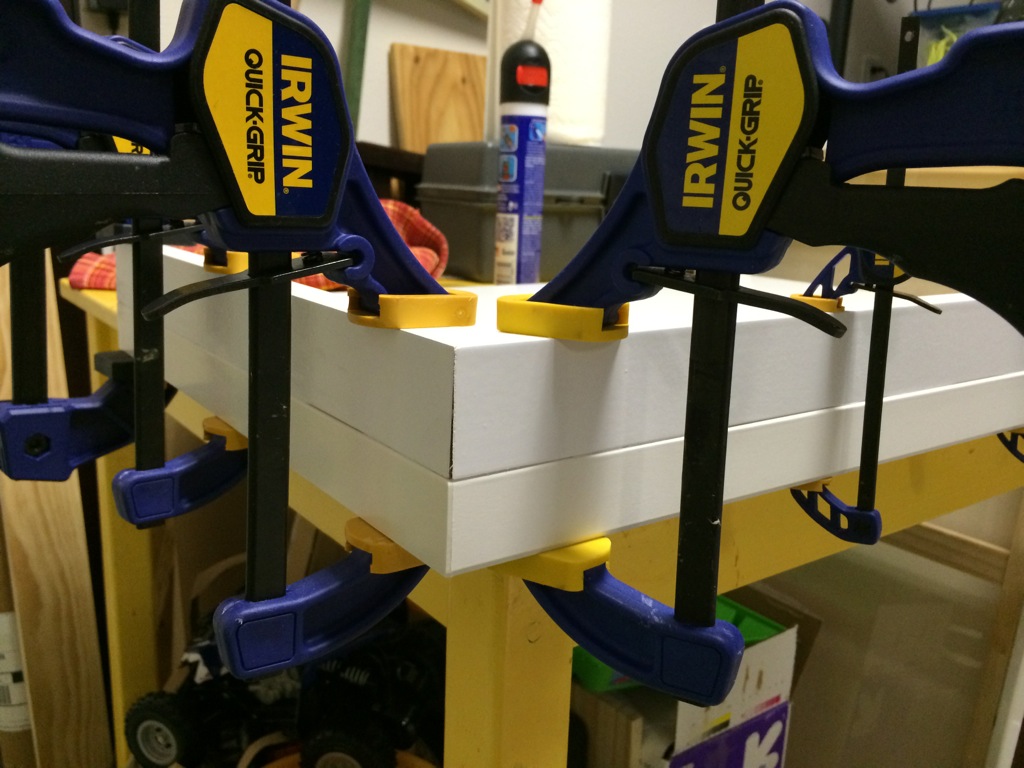
Step 6: Attach Trim Board to Top of BESTÅ Frames
The BESTÅ doors are flush with the top and bottom of the units. This means that there is nowhere to attach the crown moulding to the top of the units. To solve this I had to attach 1X2 trim pieces to the tops. This was done with clamps and glue. It’s important to do this step before you assemble the frames or clamping is going to be a real hassle.
Because the center unit is raised up and brought forward compared to the side units, crown was attached to the front, left and right. For the left-hand unit crown was attached to the left and front and for the right-hand unit crown was attached to the right and front.
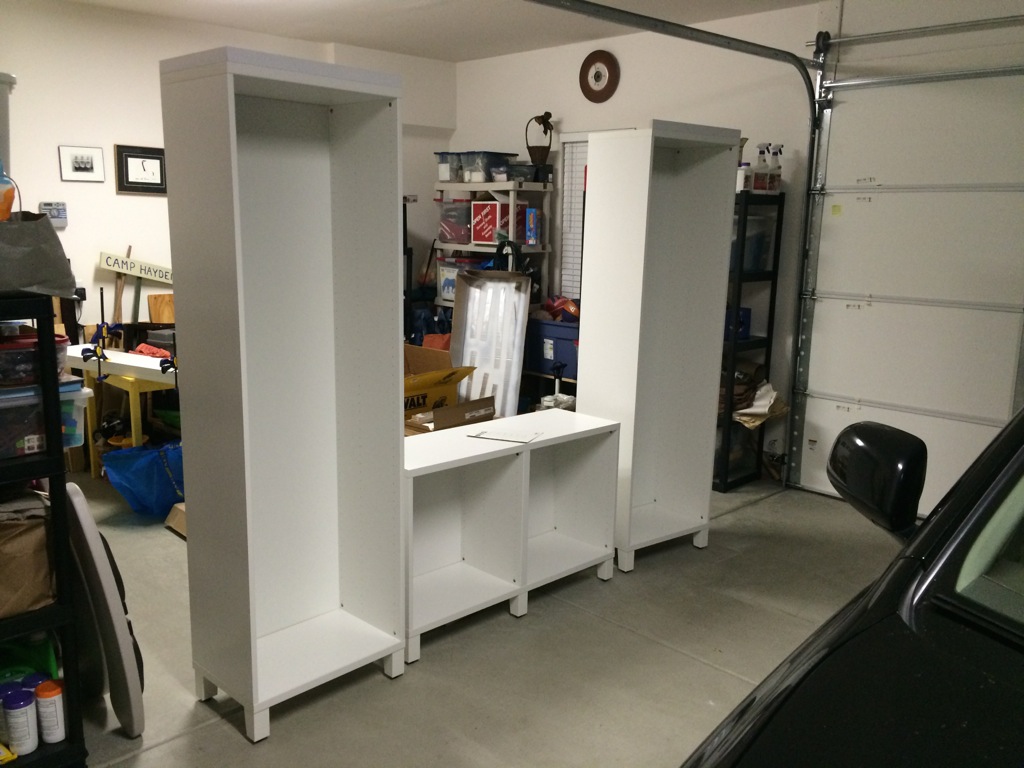
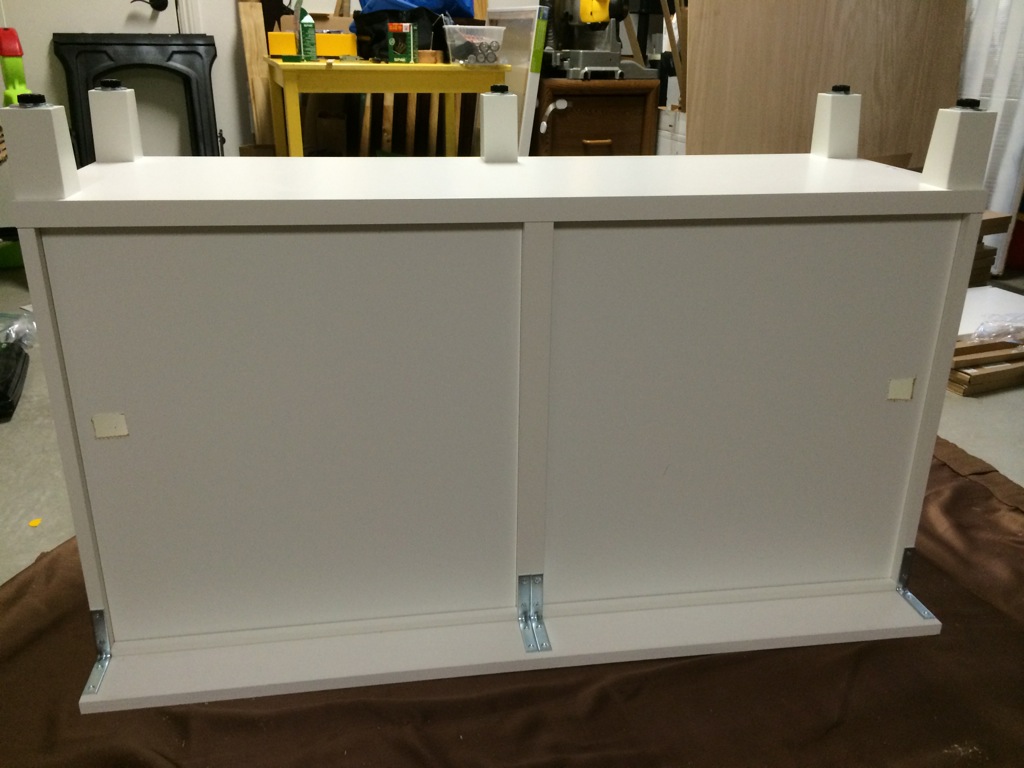
Step 7: Assemble the BESTÅ Units
Now that those trim boards are attached it’s time to assemble all the frames. Don’t put on the doors or shelves yet though! At this point I also added the official BESTÅ feet to the units. You need to raise the entire thing at least the height of your baseboard. This is certainly the easiest way to do so, but also one of the most expensive ($10 for two feet and I needed 13!).
Step 8: Build a Support For the Top/Middle Frame
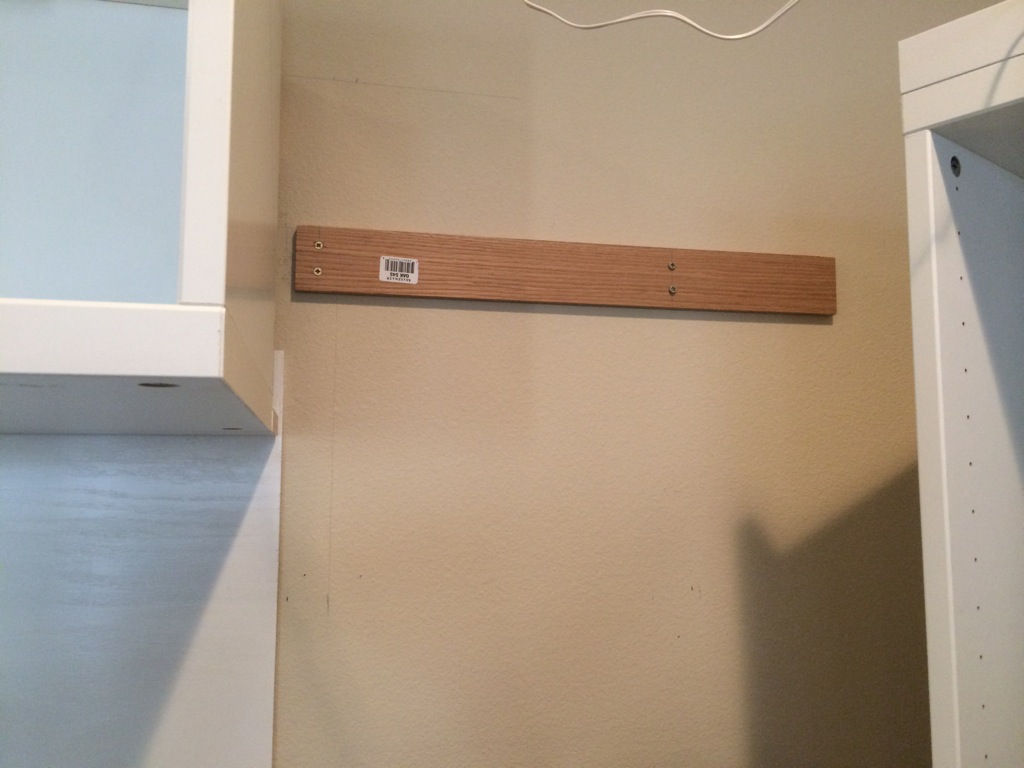
The plan was to both raise the top/middle frame up, and bring it out from the wall. This adds a really nice look to the unit but means that you can no longer attach it directly to the wall. Instead I used large screws to attach a wood sandwich to the wall at the correct height. You can then attach the BESTÅ wall-mounting bracket directly to this wood sandwich and the unit will be suspended off the wall.
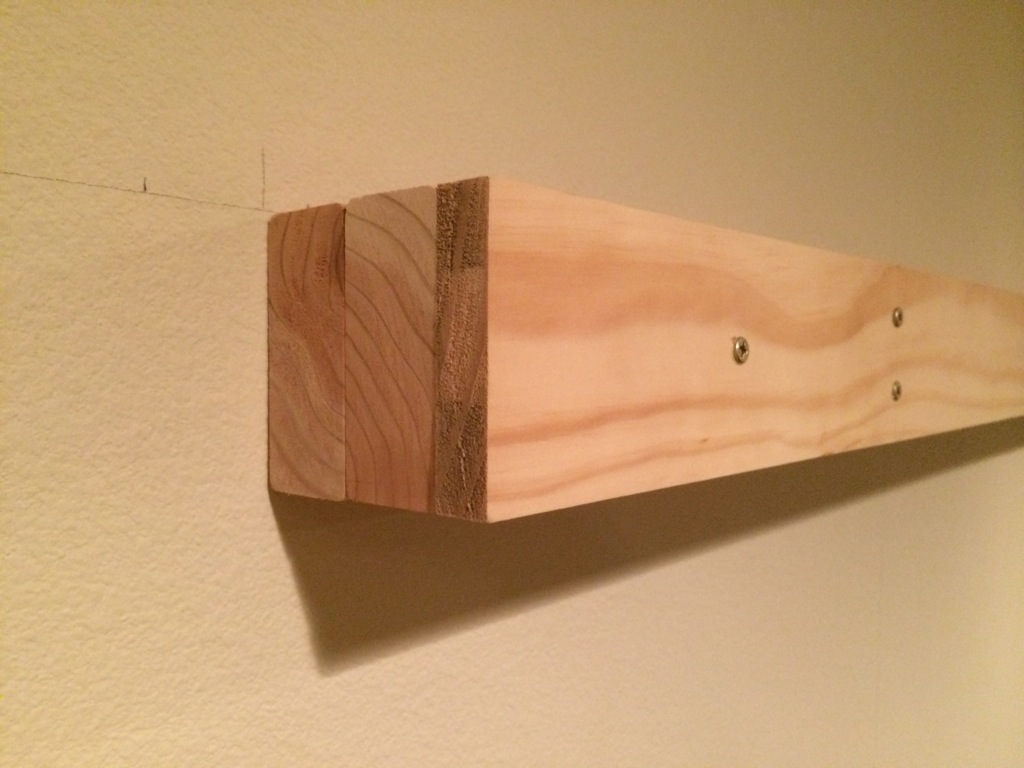
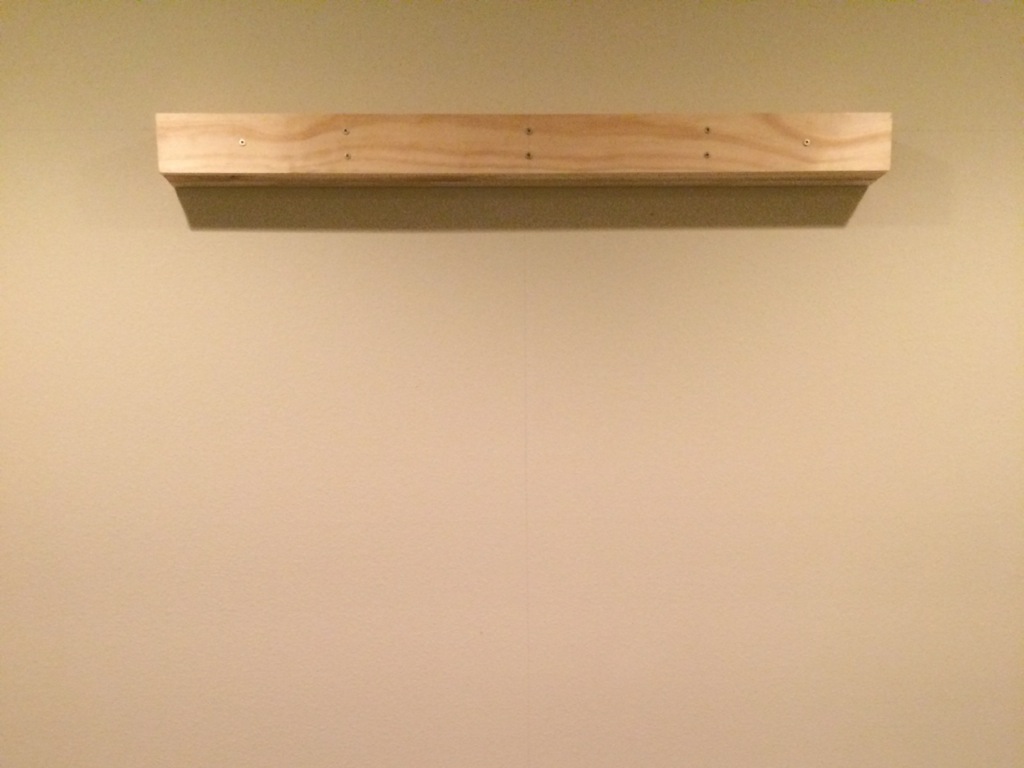 Here’s a picture of the sandwich. I used the full height BESTÅ frames to measure the starting height, and then added several inches. You need to add enough height and bring it forward enough so that the crown moulding from the left/right frames connects to the side of the center frame, and doesn’t hang over the front or top.
Step 9: Attach the Lighting
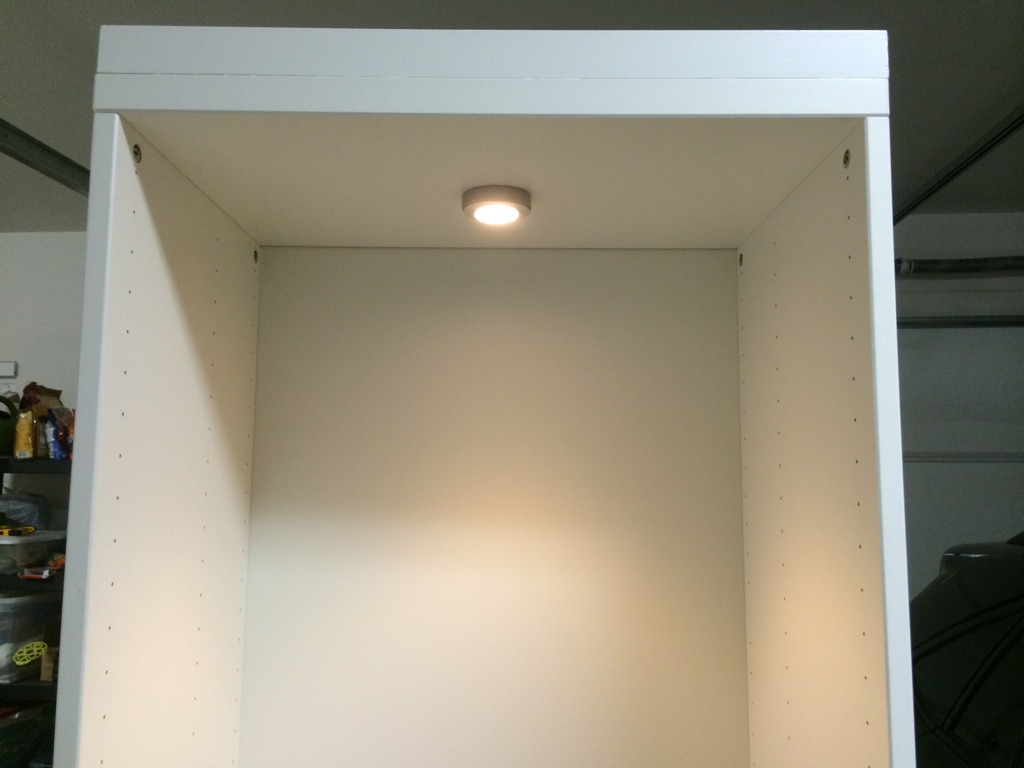
Did I mention I purchased some LED lighting to add to the cabinets? Now is the time to drill the holes and do the wiring. If you wait until everything is attached to the wall you are going to have a real hassle running all the wires to the correct location. I purchased the INREDA spotlights as well as an ANSLUTA remote control to turn them on/off.
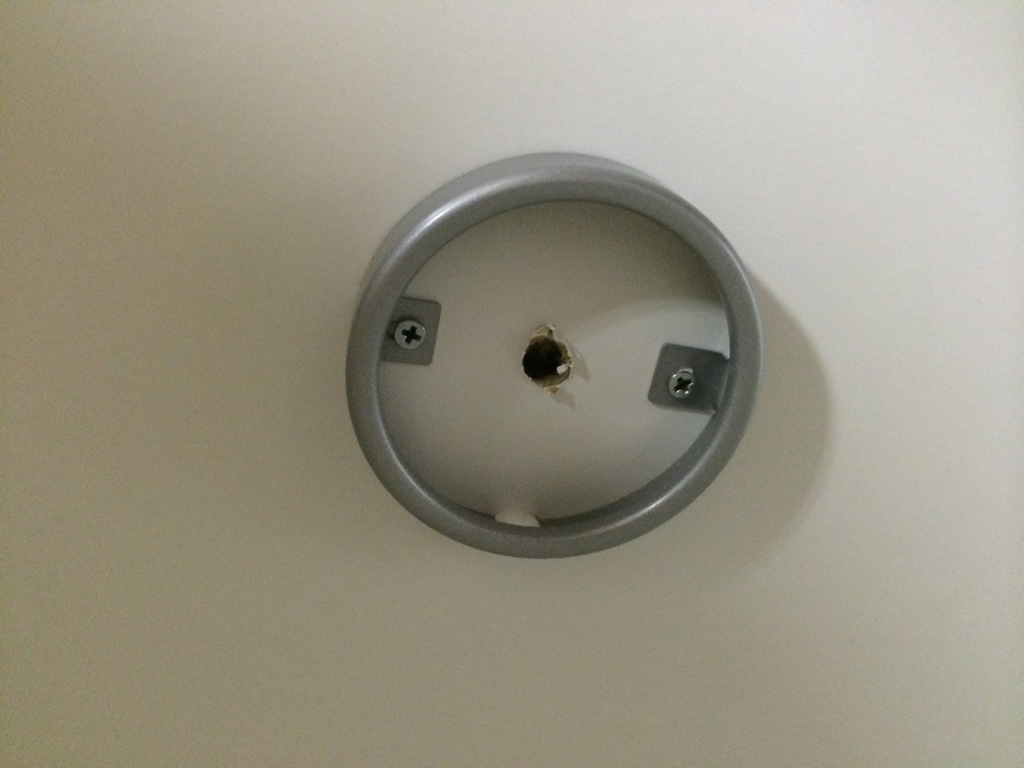 This is a picture of the INREDA mounting bracket attached to the top of one of my frames. The instructions don’t say so, but you can drill a hole right in the center of the mounting bracket and take the wires out the top of the unit. When the wires come out the top they will be hidden by the crown moulding.
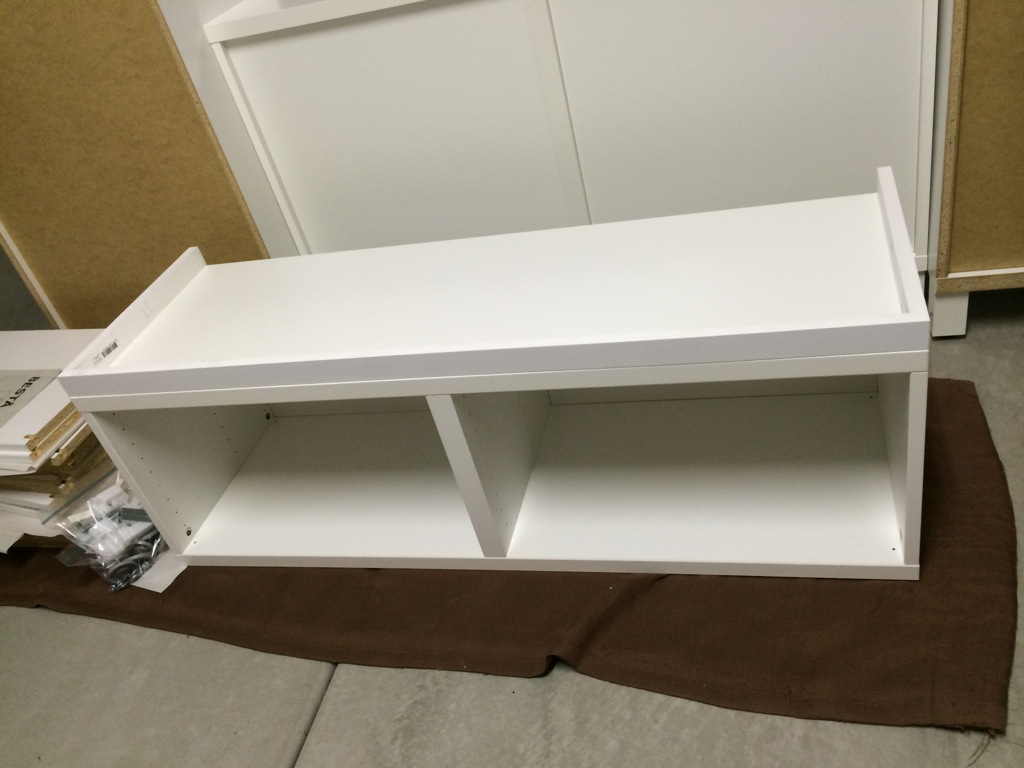
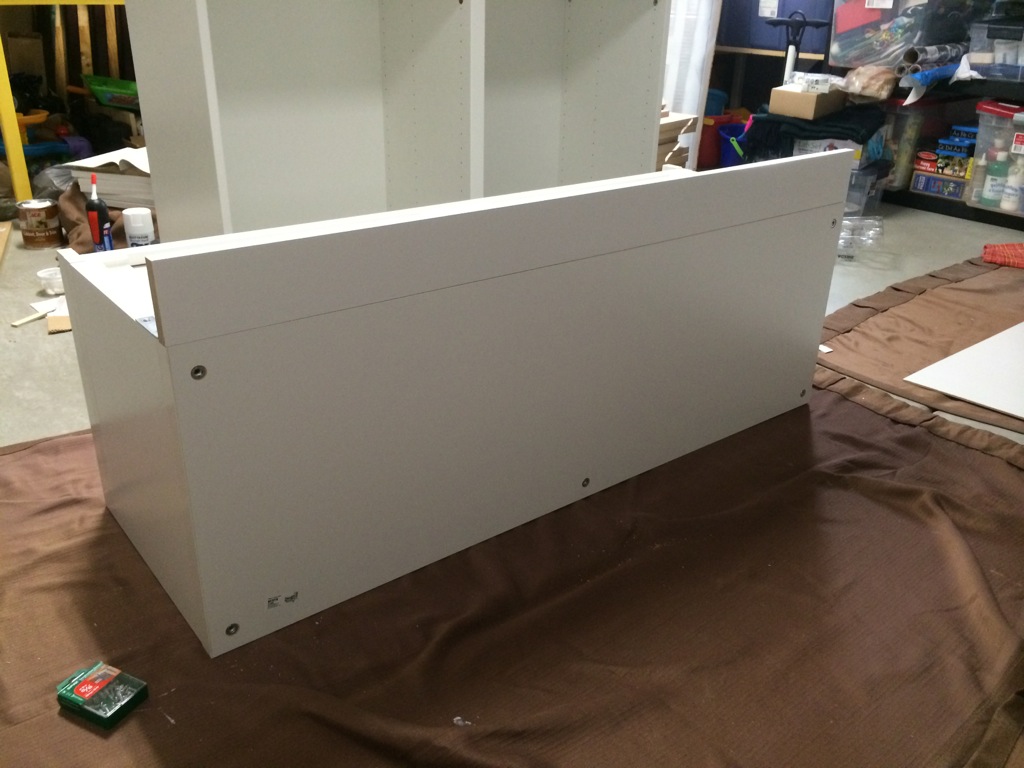
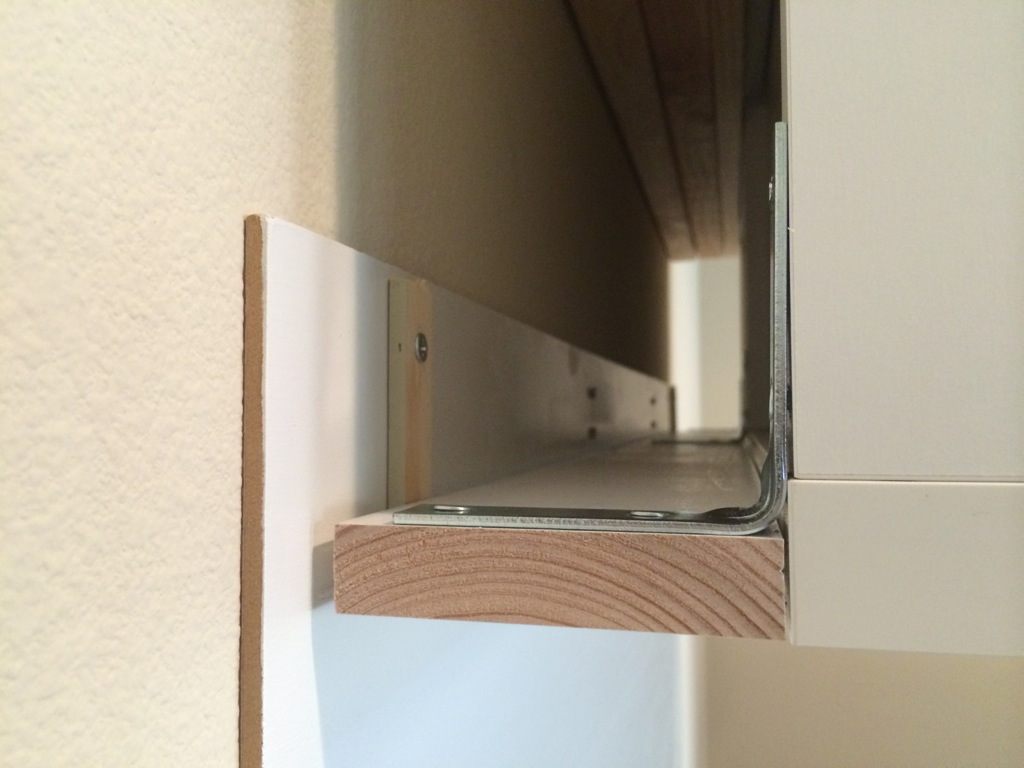
Step 10: Extend the Bottom Surface of Your Upper Frame Backwards
Remember how we are bringing the top/middle frame out 3 3/4 inches from the wall? We’ve got to take care of that gap, and we can do so by attaching a single trim board to that unit. A 1X4 trim board and some L-brackets will just about do the trick.
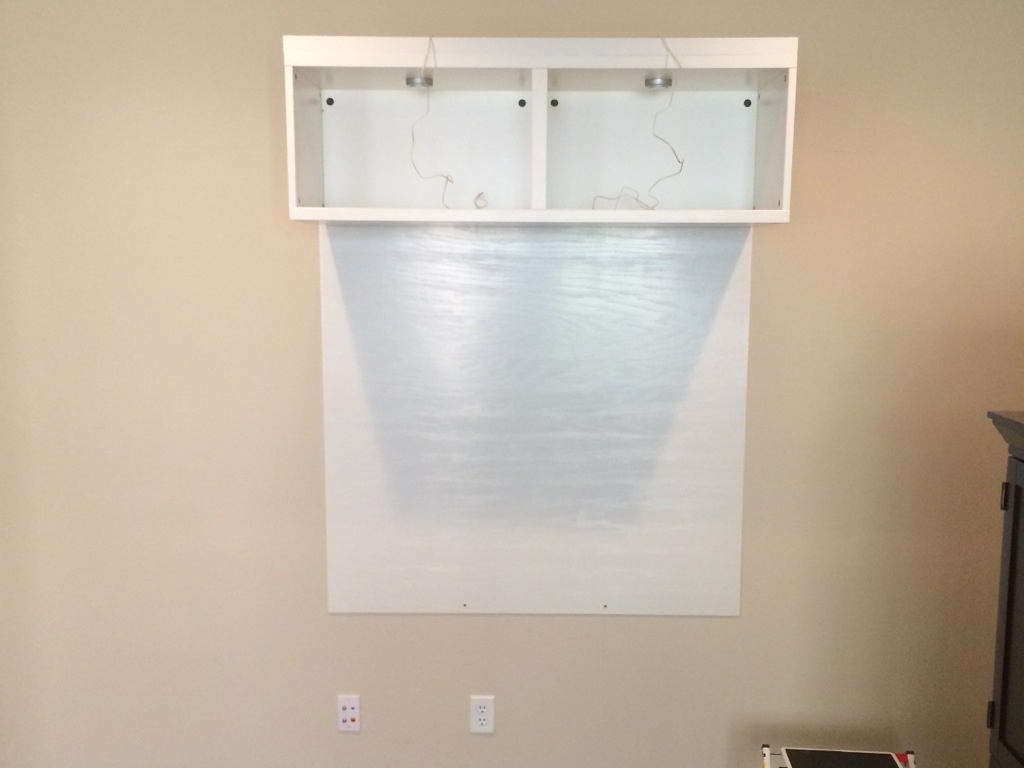
Step 11: Attach a Panel to the Wall to Cover All That Open Space
In between all of your BESTÅ units is going to be a big open space. Sure, a massive television is going to go in there but you are still going to see plenty of bare wall if you don’t do something about it. We decided to cut a piece of 1/4 inch plywood to size and mount it directly to the wall. This will provide a nice surface to mount some trim pieces later. It needs to be tall enough and wide enough to cover the entire space, extending just behind the left, upper, right and lower frames.

Step 12: Mount the Upper Frame to the Wood Sandwich
This was the scariest part of the project for me and I had some concern that the wood sandwich was going to come straight out of the wall (you did attach that sucker to the studs, right?).
Remember how the wood sandwich brought the unit 3 3/4 inches of the wall? Well our 1X4 trim board (3 1/2 inches) and our 1/4 inch plywood should compensate for that perfectly. Almost…
Step 13: Attach the Left and Right Frames to the Wall
I did something very lazy with this project. Rather than remove the existing baseboards, I decided to leave them in place and just snuggle the BESTÅ right up to them. Because of this I couldn’t attach the left and right frames directly to the wall. I first attached a 1/2 inch thick board to the wall, and then screwed the frames into this 1/2 inch thick board. Piece of cake! If you are less lazy, you can choose to avoid this issue by removing the baseboard behind your unit.
After the frames are attached to the wall, you can use the screws supplied by IKEA to connect the upper frame to the side frames to provide a little more stability.
Step 14: Extend the Upper Surface of your Bottom Frame Backwards
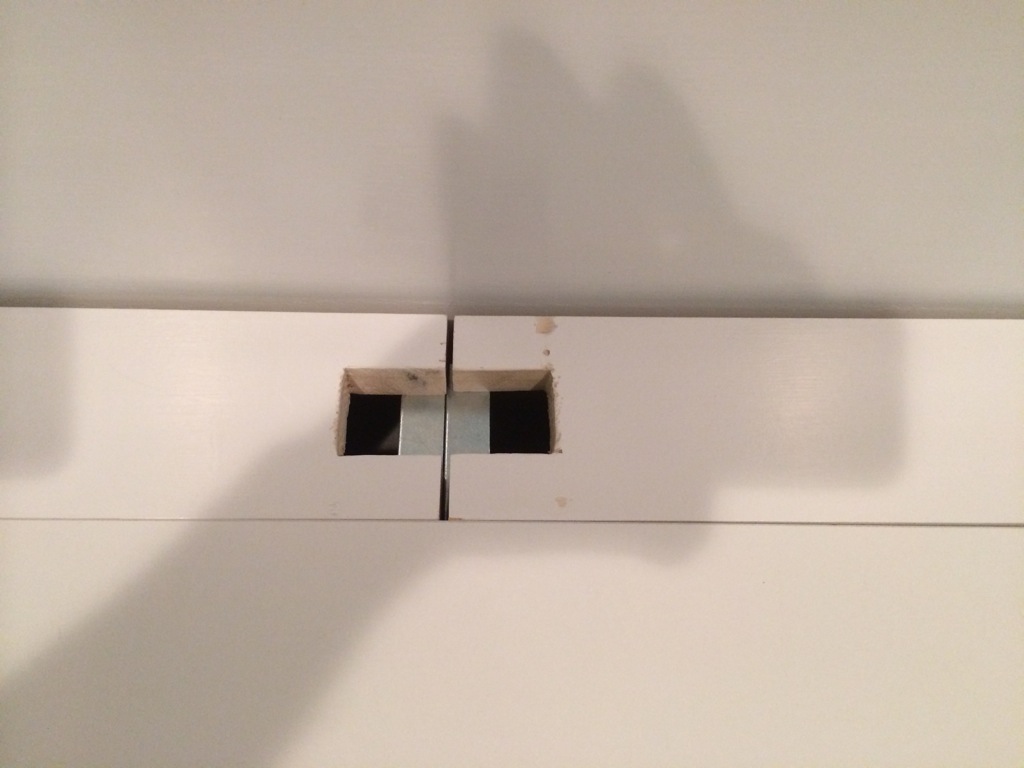 Remember Step 10? Now we’re going to do the same thing for the bottom frame – almost. This time though, we’re going to mount the L-brackets to the bottom frame but just place the trim board on top of the L-brackets. This way the board is removable, and will allow access to all the wiring that’s going to end up behind the bottom frame. I also cut the trim board in half, and notched the ends of the half-pieces to allow wires to connect to the television. Yep, they’re going to need some touch-up paint.
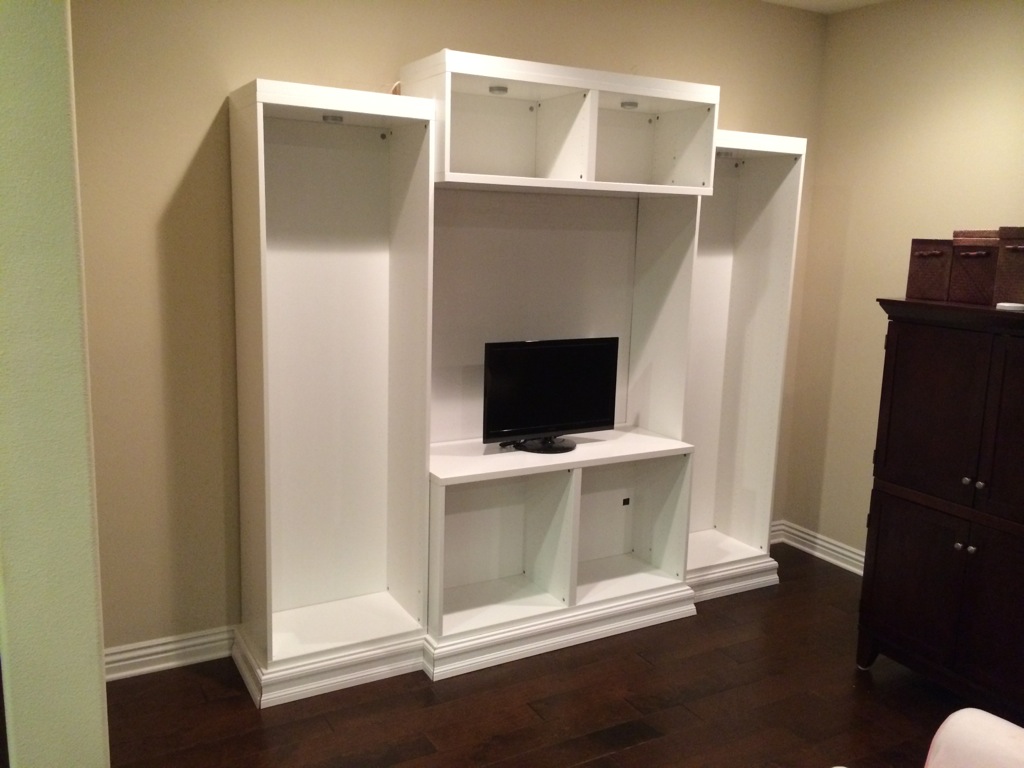
Step 15: Slide the Bottom Frame Into Place
This is an easy step. Since the left and right frames are already attached to the wall, you just slide the bottom frame into place. You can use the trim board from Step 14 as a guide to see how far back you need to scoot the unit. Use the IKEA screws to connect the bottom frame to the sides and lock it into place. At this point things are starting to look good, but there’s a lot of work left to be done.
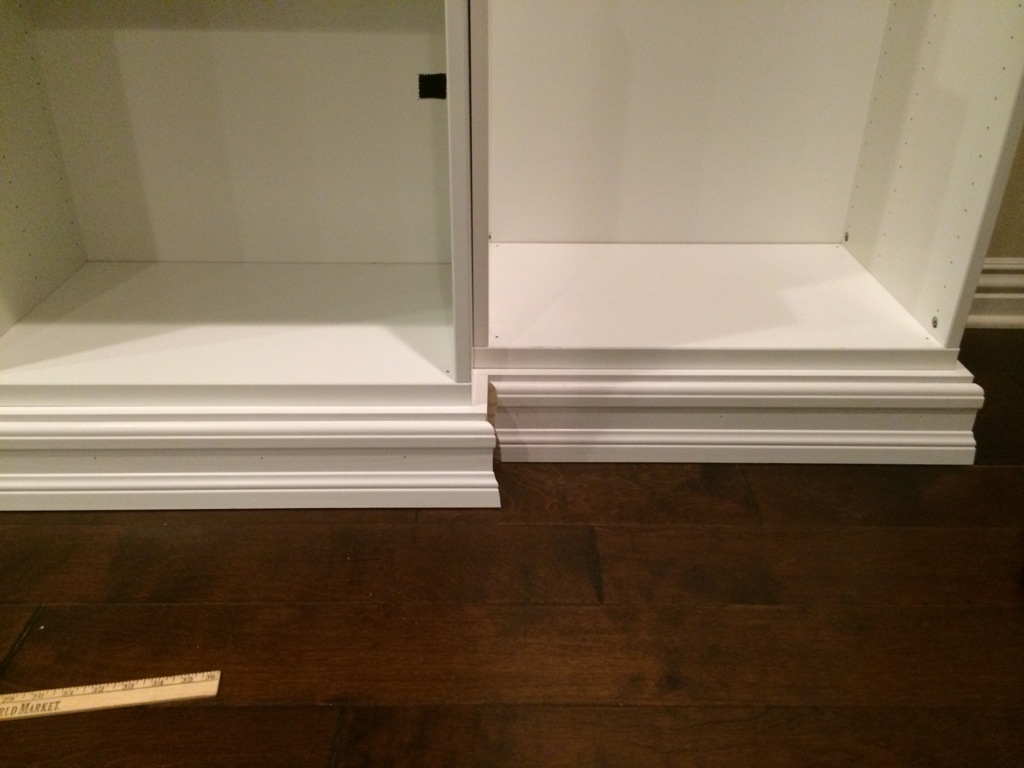
Step 16: Wrap the Bottom of the BESTÅ in Trim Boards
You can’t just attach the baseboard moulding to the BESTÅ units for a couple different reasons. First of all, the legs are the only attachment points and will provide sufficient stability to the rather flexible baseboard moulding. Secondly, remember that we are attaching doors to the frames. The doors stick out from the frame, and so if you attach baseboards directly to the feet they will be recessed behind the doors.
To solve both these problems we wrapped the bottoms of the units in 1X4 trim boards, screwing and gluing them to the feet. The trim boards are stiff enough to provide a good surface to attach the moulding, and move the baseboards out past the doors.
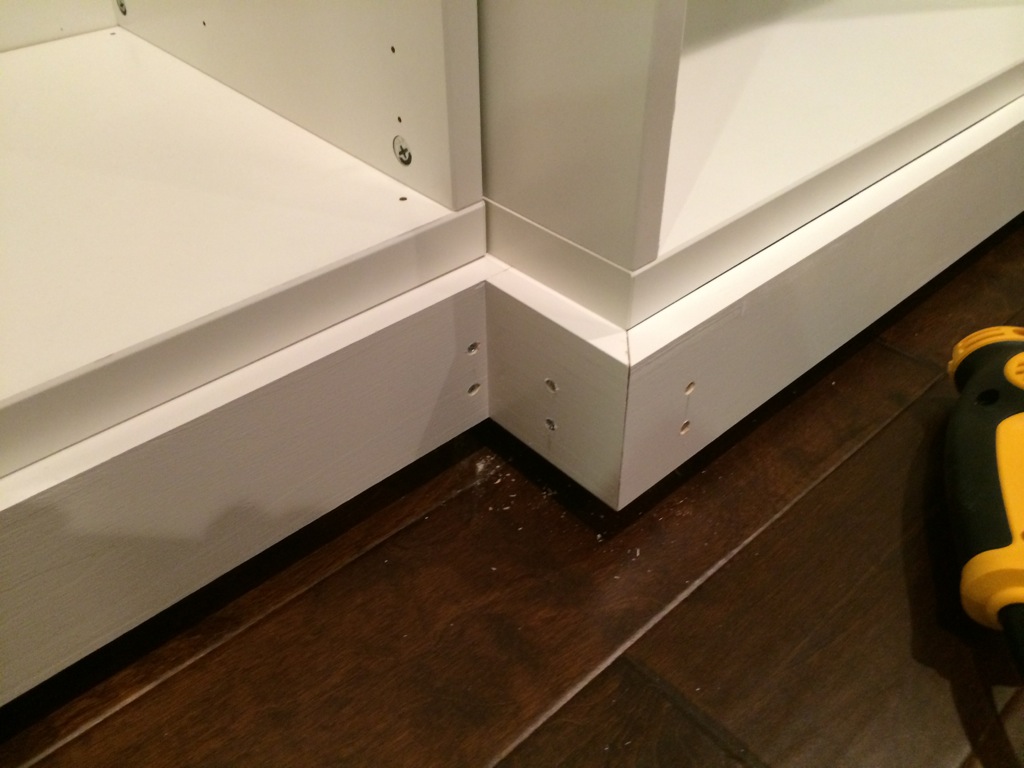
If you look carefully you’ll notice the trim boards don’t actually reach the floor. That’s okay, that gap will be covered by the moulding. The baseboards are 4 1/4 inches, and the feet raise the unit about 4 1/2 inches from the ground (that’s adjustable). This creates a reveal where you see just the top 1/4 inch of the trim boards.
Step 17: Add the Baseboards
There are no real surprises here. We used a DEWALT DWHTTR350 Stapler that accepts 5/8″ brads. The brads (and of course some glue) were just long enough to work.
Step 18: Add the Crown
Again, no surprises. The crown is actually a lot easier because you don’t have quite as many turns and joints compared to the baseboards.
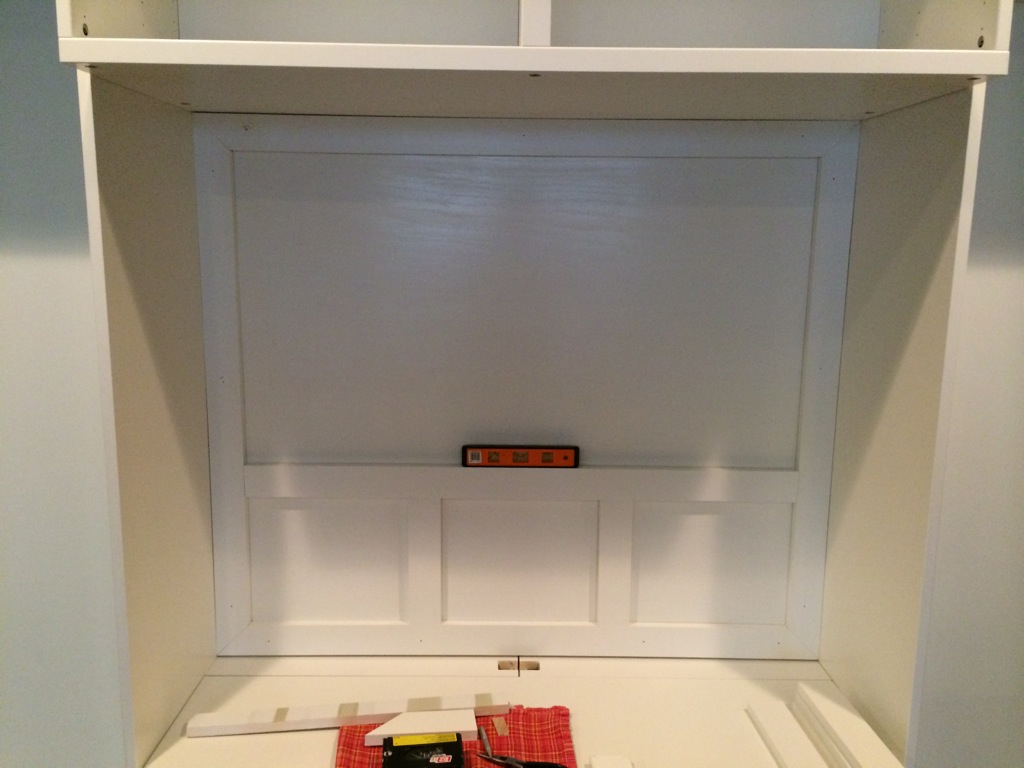
Step 19: Jazz Up That Plywood Backing
Remember that plywood we attached to the wall so you wouldn’t see the wall itself? The grain was very visible through the paint, and it looked a bit plain so we decided to liven it up a little. Nothing a lattice of 1X3 trim boards won’t fix!
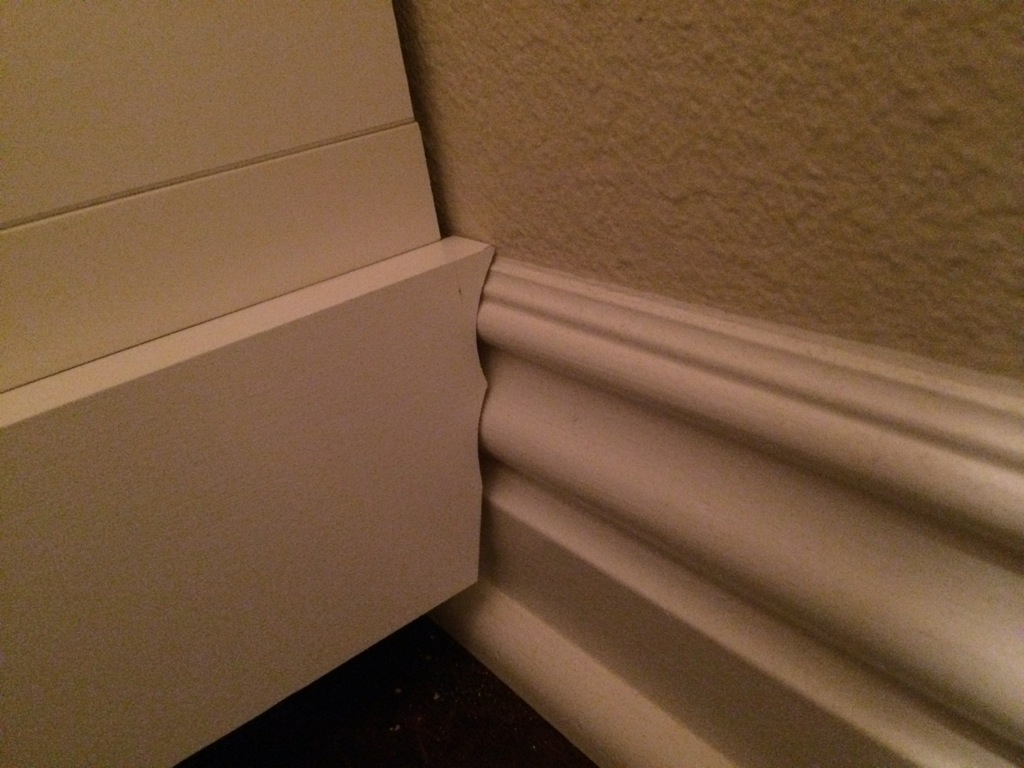
Step 20: How About Some Quarter-Rounds?
Remember that gap between the left and right frames and the wall? We need to cover that up with something and a 3/4 inch piece of quarter-round moulding does the trick nicely.

Step 21: Caulk, Caulk, Caulk, Paint
This job fell to my better half, who did a masterful job of filling all the holes and painting them over. Do this now, before Step 22!
Step 22: Shelves and Doors
The final step is all the shelves and doors. Don’t forget to put some knobs on everything before attaching them to the units!
Step 23: Buy a Much Larger Television
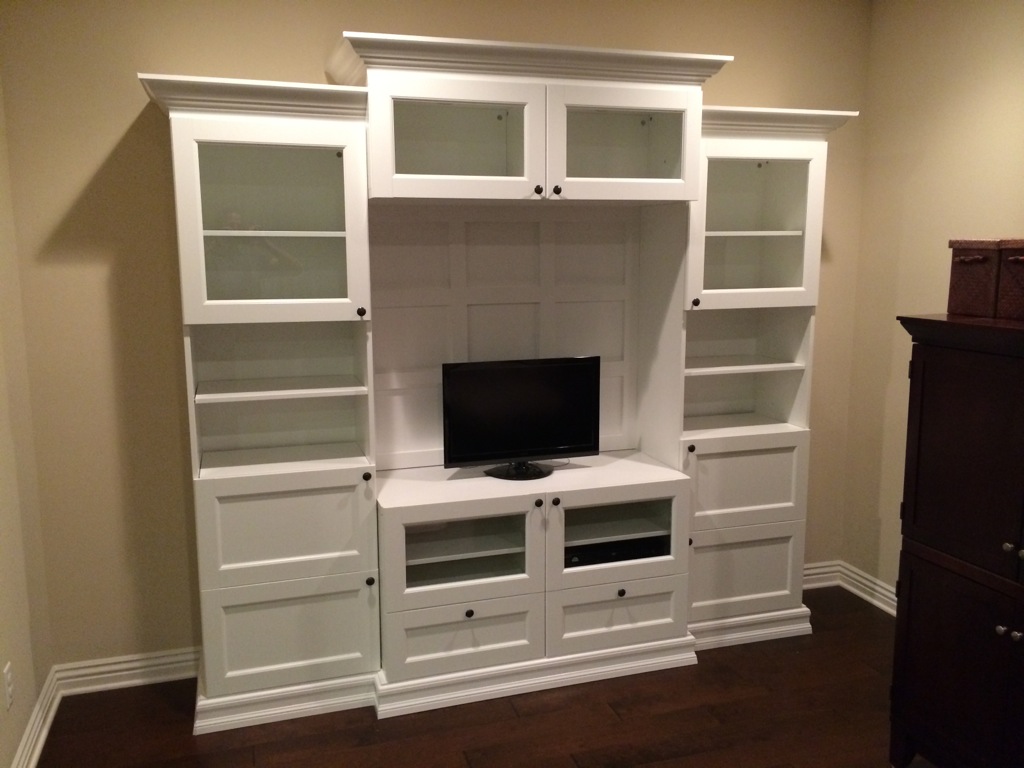
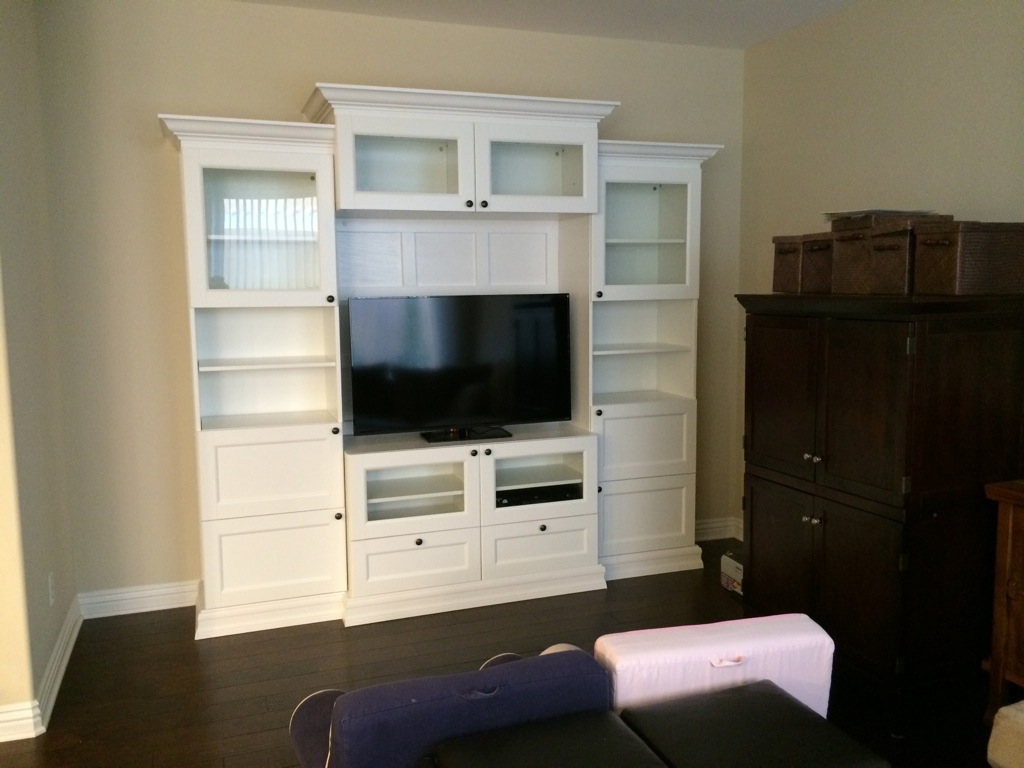
We didn’t start this project with the intention of replacing our spacious 26″ TV (really honey), but once we saw how foolish it looked in there we had to do something. Here’s our new 48″ TV (thanks Costco) – and it was just in time for the Academy Awards!
The Paint
Caulk and Glue
Required Tools
Yes, you are going to need a few tools aside from a hammer/nails and screwdriver/screws.
- Miter Saw – you’re not going to get through all those trim and moulding pieces without it. We used a DEWALT DW715
that we had previously purchased when we trimmed out our windows.
- Power Drill – I’ve used a hand drill for a long time but this project finally broke me. We used DEWALT DWD110
corded drill because I really hate batteries (and I’m cheap).
- Nailer – Like I mentioned our Dewalt DWHTTR350
was great for the moulding, but the brads weren’t long enough for the trim boards. I used a good old hammer/nail for the lattice behind the TV. A cordless pneumatic nailer like the Ryobi Airstrike is another relatively inexpensive nailer option that will enable you to use longer fasteners where needed.
Yes, this is pretty much sounding like a DEWALT ad right about now. I’m sad to report that I paid for all of the equipment myself.
Final Project Cost
- IKEA Stuff: $650 – This included $70 for the legs and $80 for the lighting. If you plan in advance you can get cheaper generic legs, but they are a metric thread so would need to be special ordered.
- Everything Else: $348 – This included all the trim boards, plywood, glue, paint, caulk and a few boxes of different sized screws. It does not include the drill I purchased ($60) or the TV!
- Total: $998
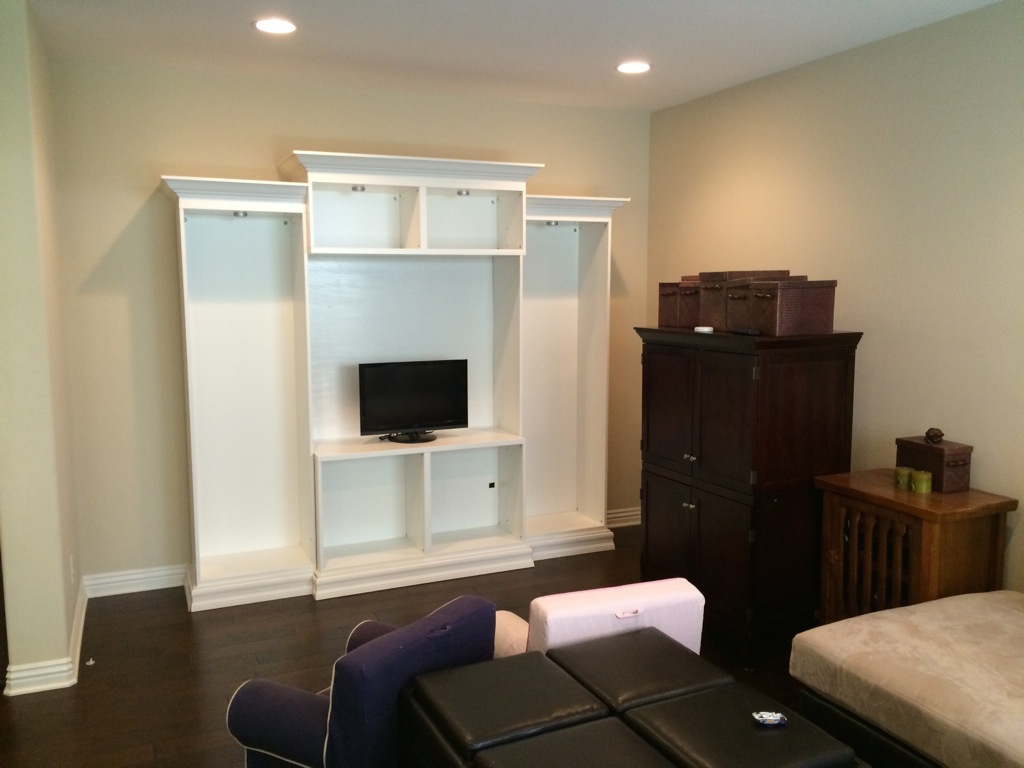
Final Before and After
Guest Author Bio
 Mike Sykes is without a doubt the most overqualified author to contribute to HomeFixated. With a PhD in Biophysics from Stanford, Mike displays shockingly good DIY chops for a Bioinformatics geek. We’d tell you more about his “real job”, but sadly his Computational Biology work can’t be explained to 99.99999% of the population. Not even HomeFixated readers. When not working at his fancy-pants scientist job, Mike enjoys trying to keep his wife/DIY mastermind away from the iPad at bedtime. Mike vehemently denies any allegations that this project was all an elaborate plot to get a bigger TV authorized.
Hi, I’m having trouble reading the custom paint formula? I’ve made a “built-in” Besta TV shelf and am looking to paint some trim to match. unfortunately, the photo you have here is a little blurry. Do you mind re-posting the info?
THanks.
Great stuff!
That is beautiful!
Looks great! TV might look a little better more centered vertically – maybe on a wall mount?
Thanks Thom! My wife was totally the brains behind the project so she deserves a lot of the credit.
Nice job the finished product looks great. I like your humor in this article and I know your a smart guy because of using “we” and most of all giving credit were credit was due to your wife. “Happy wife happy life” is a good motto.
Sincerely Thom